News:

Please read the Forum Code of Conduct   >>Click Here <<

Main Menu
Menu

Show posts

This section allows you to view all posts made by this member. Note that you can only see posts made in areas you currently have access to.

Show posts Menu

Topics - Yampa Bob

#41
General Discussion / Balanced Thinking
June 03, 2008, 09:29:44 PM
The way you operate your model railroad might be related to whether your brain is left dominant or right dominant.  After several tests, I am about 66% left dominant, slightly more analytical than artistic. 

This means I enjoy building and bashing, but have a slight problem with the fine details and painting.  I also prefer to run my trains counter-clockwise, with a slight leaning to realistic operations. This presents a slight conflict, as my space constraints require significant selective compression and certain compromises. I am more concerned with such aspects as logistics, practicality, durability and efficiency than I am with appearances.  I would probably have been successful operating a real railroad.  :D

First, spend about 10 minutes on this visual test.  Most people will see the dancer rotating counter-clockwise.  My first perception was clock-wise but I was able to immediately change the direction due to the dominant influence. 

http://www.news.com.au/perthnow/story/0,21598,22492511-5005375,00.html

Next, take the Hemispheric Dominance test.  Don't cheat on this, answer on your first impulse or impression. After you get your score, click the link at the bottom for an explanation of the influences. Some minor adjustments might help you to have more enjoyable railroad experiences.

http://www.web-us.com/brain/braindominance.htm

Have fun, but don't take it too seriously. 
#42
General Discussion / Passenger Car Trends
June 02, 2008, 12:53:50 AM
As many of you know, my passenger car roster consists of smaller vintage models, by preference because I like them and by necessity due to my small layout and vintage locomotives.

After several days of searching availability from 26 manufacturers and every source I could find on Google, it seems the only passenger cars being made are in the 72' to 86' sizes.  Many of these are backordered, discontinued, call, temporarily out of production, don't hold your breath, etc.

Is there that large a demand for these longer cars?  Freight cars abound, in every style, size and era.  What happened to the medium size passenger cars for earlier eras? 
#43
General Discussion / Lest We Forget
May 25, 2008, 01:01:51 PM
On this Memorial Day, please observe in your own way, a moment of remembrance and respect, pausing from whatever you are doing for a moment of silence.

http://www.usmemorialday.org/backgrnd.html

I fastened a poppy on a locomotive, and will run it tomorrow at 3:00 p.m. Mountain Time.

If you're driving somewhere, remember to "Click it or ticket".

And now: " Ladies and Gentlemen, start your engines! "  They're off !
#44
General Discussion / Cheap Laptops
April 30, 2008, 11:43:24 PM
This might be considered train related as some modelers are controlling their locos by computer. 

I get tired of paying over a thousand dollars for a new laptop, then a year later it's junk.  The new cheap laptops are junk to start with. This time I'm going refurbished.

This company has been in business over 10 years, all units fully guaranteed.  I checked out several outlets but this one impressed me.  I got a great deal on a Dell, free shipping, and with my preferred operating system. They were very patient, and helped me find exactly what I wanted.

They also have factory new discontinued models.   

http://www.laptopoutlet.com/index.html

Bob

#45
General Discussion / Georgetown Loop
April 30, 2008, 12:52:58 AM
Season begins May 24, tickets sell out fast so better hurry. Prices are very reasonable.  If you don't want to ride, there are scenic lookouts along I-70 for great tele-shots.  Oh yeah, "thar's gold in them thar hills".

http://www.georgetownlooprr.com/

Here are some more great pictures of the loop.  It's only 2 miles from Georgetown to Silver Plume, but elevation increases 638 feet, about 6%.  A couple of loops and a spiral cuts it down to about 3.5%, while increasing the track distance to 4.5 miles.

In picture 3, a runaround at Silver Plume gets the loco to the other end.  Note diverter in picture 6.

http://www.homestaydenver.com/CS9/

Enjoy

Bob

#46
General Discussion / Sunsout Train Puzzles
April 18, 2008, 12:20:55 AM
One of our ways to pass the long winters here is putting together jig saw puzzles.  Our favorite brand is "Sunsout", they are top quality. After we put them together, we seal them on both sides then have them framed. They make great gifts either in the box or ready to hang on the wall.

Sunsout has a collection of train puzzles listed on their site.  They don't sell to the public so you have to find a retail vendor to get them.  Our local Murdochs ranch supply store has a huge selection at about 20% off retail.

There is one, #27806 titled "Passing Time" that many of you might enjoy.  I ordered one as I thought it was a nice change from the usual railroad paintings.

I'm sure there are other puzzle companies with similar themes, if you find any feel free to post the links here.  My wife, being a cowgirl, likes pictures of horses and western themes, so would appreciate any links to those as well. We bought a bunch of Sunsout so we already have those links.  She lays most of the pieces on our  layout for sorting and works on a card table, so my request is train related, sorta.  :D

http://secure.amipublishing.com/sunsout/index.cfm?f=shop&r=3297687&category=Trains

Check out the menu on the left for some other beautiful puzzles.  This winter we completed and framed # CL5901 from the American Pride collection, and #28436 from the Eagles collection.  They look great on our wall, be sure and look them over.

While visiting Caboose Hobbies, we picked up a puzzle of a vintage train crossing a trestle, with an old stage coach on a flat car.  They also have the special coating to seal the completed puzzle.

Enjoy
Bob 
#47
HO / Modular DCC Connectors
April 14, 2008, 02:03:10 AM
Many modelers are now installing their own decoders. I'm preparing to tackle my first one, adding DCC to a Bachmann 2-6-0 Mogul.

Installing the decoder is pretty simple, the problem is finding small connectors to use between the loco and tender.  Tonight I unplugged the telephone line from my computer to clean the desk.  As I looked at the small RJ plug, the perverbial light bulb came on.   :o

I found these parts at AllElectronics.com and made a composite picture.


1.  CMP-6.....Modular 6 connector (6P6C) plug.    30 cents each
2.  MT-66......Modular 6 connector jack with solder lugs on top.   75 cents each
3.  MT-64......Modular 6 connector jack with solder lugs on back. 75 cents each
4.  6CF.........6 Conductor stranded wire, 28 AWG with 6 colors.   $6.00 for 50 feet.
5.  MPC PT-6...Crimping tool.    $14.00

http://www.allelectronics.com/cgi-bin/category/745/Telephone_Accessories.html

All connectors are gold plated.  The 28 AWG wire has a free air ampacity of 1.4 amps. The jacket can be stripped off close to the plug after crimping to allow wires to flex.  I installed all the phone lines, plugs and jacks when we built our house, the crimper is easy to use.

If this works, it would also solve the problem of fighting the small factory plugs. 

Comments?

Bob

#48
HO / Dual Mode Decoders
April 07, 2008, 03:44:46 PM
Consider the following taken from the Atlas web site:

"Atlas offers a patented HO scale Dual-Mode Decoder which allows you to easily switch your locomotive from true analog to digital mode and back again. This is done by simply removing the jumper plug (shown in green on the decoder above) and replacing it in different holes. "

Now who would want to take the tender apart to change the jumper, just to be able to run on your friend's analog powered layout?  For that matter, just to run on your own DC layout?  Is Atlas that far behind in technology?

They claim (without naming brands) that other methods of dual mode creates a speed differential between analog and digital.  I run my Bachmann DCC locos on both DC and DCC, and have seen no difference in speeds, at least none that I can discern.  Not being a purist, I am not concerned with starting thresholds, speed steps, acceleration and deceleration curves or whatever.  I turn the throttle and the loco moves smoothly and realistically at varied speeds.  I close the throttle and it stops.  The loco will crawl very slowly with either DC or DCC.  I am happy.   :D

So far I only have DCC equipped locos, but am considering one that is DCC ready, which I usually take to mean that the motor wires have been "isolated".  I think Bachmann takes it a step further by having a DC compatible board installed. To get DCC in the model I want, I have to accept sound as well.  I would like to install a Bachmann plug in decoder, but the loco has a 9 pin plug which is irritating.  So I have to order a special  Digitrax decoder.

My question specifically is about the "DC compatible" issue.  What makes the Bachmann DC compatible?  I have always assumed it is the circuit board that allows this feature, not the decoder itself.  However someone told me that any dual mode decoder is DC compatible.  If that is true, then why does Bachmann bother installing the extra circuitry on the board.? 

Also, I have an extra DCC board from a Bachmann GE 70 ton.  As long as the new loco motor has the same stall current as the 70,  could not the board be installed and work ok?  According to Tonys Trains it will work, they even detail checking the stall current in their DCC handout.

Several have recommended removing the boards on my Connies and hard wiring the decoders.  One source says it will then not be DC compatible, another source says as long as the decoder is dual mode it will be.   When sound became a big issue, I was told that dual mode simply meant sound was included.  Dumb question: Is there a triple mode?...and why do some companies have an 8 pin and others 9 pin? What significant advantage is there to hard wiring the decoder other than personal preference?

I prefer "plug and play",  and don't particularly enjoy having to solder anything although that does not intimidate me.  I also don't like having to pay extra for sound I don't need or want just to get DCC.   Bottom line is, I want my locos DCC equipped but still be DC compatible.  I like having choices.

Bob
#49
General Discussion / Right Track Software
March 22, 2008, 03:55:38 AM
Is anyone here a "Right Track" expert?  I have used the program for a year and like it except for one thing. 

Adding small pieces of flex track is not too difficult as long as you figure out the angle of divergence.  But when you try to connect long stretches around a curve, you get what looks like a pretzel.  The help file isn't much help either.  It just says if you don't like the transition curves, you have to program your own custom DLL  with Delphi.

I'm afraid my programming didn't get much past Visual Windows Basic.

It's no big deal to me, just curious if anyone else has figured it out.  There is also a bug in the program.   After a standard turnout divergence, 2 - 1/3 - 18" will return to parallel, however in the program it does not parallel.  For a #4 or #6 you have to use flex as there is no standard return piece in the track library. 

I guess you get what you pay for, but it is a good learning tool.

Also, can any track or geometry expert explain why the numbered turnouts have 12 degree 50 minutes , and 9 degrees 30 minutes, etc?  Yeah yeah I know, use flex and forget why they did it that way,  but I am a curious sort.   Might have killed the cat, but I'm still kicking.

Yampa Bob
#50
Jim
There seems to be some confusion regarding the proper powerup sequence for the EZ Command.  The instructional video says to plug the wall pack in first then plug in the controller.   There is no caution regarding this sequence. The only specific caution is to not apply power to the controller until the track connection is made. 

I know you have made extensive research on the EZ Command, to the extent of providing a basic power schematic on your site. 

One individual said he burned out a unit by plugging the wall pack in first. I had a similar shut down for the same reason, however being under warranty it was replaced.  My concern is after the warranty.

We humans don't always follow a certain procedure unless specifically warned.  For example I often leave the charger for our cell phones plugged into the ac outlet for extended periods, the only result being a small "phantom" load on the ac system. Of course the output is DC. 

Also, I have often wondered why Bachmann doesn't have an on/off switch on the unit.  I have considered adding one for convenience, but now  I have hesitations.

Can you shed some light on this subject?  If there is an inherent problem with the procedure, I would think cautions would be so noted in the instructions. In your judgement, can there be a chance of a "spike", perhaps caused by the  peak voltage of ac, or some phase issue? 

Would having a standard computer surge protecter to plug in the wall pack be of any use as additional protection for the controller? Due to the sophisticated design of the EZC one would assume buffers would be a part of the power circuitry.  Of course another consideration might be lightning or power utility spikes when switching transformers, or re-activation after an outage.

Thanks
Bob


#51
HO / Talgo Upgrade
March 20, 2008, 09:18:42 PM
Since this topic appears often, I thought a pictorial might help. Some easy steps but rather long.  If you already know all this, that's great. Title is brief for later search.

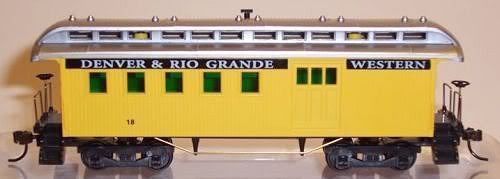
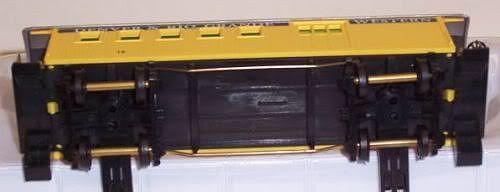
For an example, we will do minor surgery on a Mantua Combine. The car has knuckle couplers, but is prone to derail when backing up.


Turn trucks sideways for access to body mount tabs. Using fingernail pull one tab toward center of car until body lifts from floor.  Pivot body upward to release other end.  If you break off tabs, you will have to glue styrene blocks in body and fasten floor with screws.


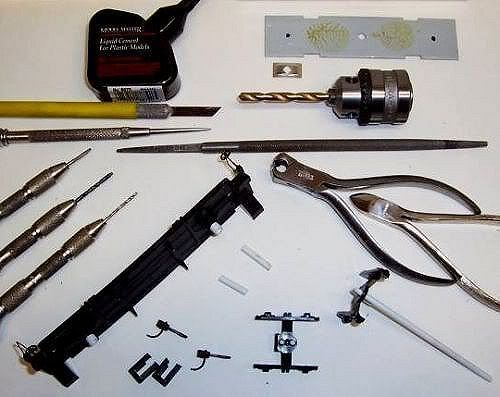
THE SURGICAL INSTRUMENTS.

When I have a bunch of cars to rebuild I don't have time or patience to improvise. Use what you have, but an essential tool is a pair of precision flush cutting end nippers. 

Remove truss wires and weight clip from chassis.  With a thin flat screwdriver pry weight from floor.  It is glued with rubber cement, but will come loose with some gentle persuasion on both sides and ends.

From the top, insert screwdriver into recessed bolster hole, pry one tab toward center of hole while pulling firmly on truck until it snaps out of hole. 

Temporarily replace weight, mark through bolster holes from bottom and drill two 1/4" holes in the weight.

From the top, drill out bolster holes  with 3/16" bit.    Time to cut some pieces of styrene. You can use leftover sprue, but the following assures a straight and centered bolt hole.

Cut 2 pieces each of 3/16"  and 1/8" styrene tubes, about 3/4" long.  Styrene is cheap, leave  extra for handles while gluing.   Smooth and round cut off edges with sanding board.

Ream  bolster holes slightly, alternating from top and bottom, with a 1/4" coarse tapered round file.  Check fit of 3/16" tube often,  needs to be a smooth fit without being sloppy or binding.  Better to be a bit snug than too loose, but there must be space for cement. 

My choice of cement is Testors #8872, a medium viscosity liquid with needle applicator.  Keep tissue handy to  remove excess cement immediately after gluing each piece. 

BODY BOLSTERS. Refer to this picture while proceeding


Apply a bit of cement inside bolster hole, and a generous spread  around outside of 3/16" tube.  Insert tube with a rotating motion until tube is protruding about 1/4" above and below floor.  On the top, run a bead of cement in the cavity between the tube and floor.

Apply cement inside 3/16" tube, and a spread around outside of 1/8" tube.  Insert inside 3/16" with a rotating motion until fairly flush at each end.  Let dry for at least an hour.

TRUCKS
Cut mounting posts and coupler plates off trucks with end nippers, close to center plate.

Cut about a 5 inch piece of 1/8" solid styrene rod.  Sand/taper one end until it fits into one of the truck plate holes and protrudes about 1/8" on the other side.  Cut off leaving 1/2" or so for a handle.  Continue tapering the rod and inserting in holes.  Then remove the plugs, apply generous  beads of cement, and insert into holes with a twisting motion until tight.  Let dry for an hour.  (Don't forget to keep wiping off excess cement that oozes out.)

Back to the bolsters.  With a fine razor saw, cut bottom tubes flush with the stock bolster tube.   Using a 3/4" wide sanding board, laid lengthwise across both bolsters, lightly sand tubes/bolster  smooth. This assures bolsters will be flat and even.

Don't pre-tap bolster tubes, let a 2-56 bolt do the tapping.  The bolt needs to turn fairly hard for precise adjustment of truck swivel and sway.

Trucks:  Snip off excess rods with end cut nippers.  Using a 1/2" wide sanding board, sand top of truck plate smooth.  Turn truck over, sand bottom of plate, support on narrow board,  make a heavy mark with fine point scribe at exact center of truck plate. between the two plugs.  Drill 1/16", then enlarge to 3/32".  Ream the journals with "The Tool" and install metal wheels if you like.  You might have to spread the frames to allow wheels to free spin,  be careful as plastic trucks grow brittle with age.

To make the coupler heights close to correct,  the truck mounting tube should extend below the bottom of floor about 3/16"  A digital depth gauge determined the measurement to be .2350, minus .1875 equals .0475.   So it will require 2 pieces of styrene shim under the draft box,  .040 and .010.  Glue the shims beween steps, even with end of floor, but do not cover square holes for body clips.  You can alternately sand off the bolster .030 and use thinner shims, though typically these vintage cars were never "low riders".  It's your option.

Assemble a  Kadee #148 coupler and box, center box between steps with lip against body.  Drill 1/16" hole through shims and floor, tap with 2-56 and attach box with a 1/4" phillips head machine screw.  Bend up trip pins a little with your tool of choice.  I use Kadee pliers, some have success with needle nose pliers. 

Install trucks with 2-56 X 3/8" or 1/2"  phillips head machine screws, check coupler heights with Kadee gauge. "Coupler too high, shim box down or sand off bolster, Coupler low shim between bolster and truck or file down floor." I prefer the machine screws for more precise adjustment, and you can buy them for as little as 57 cents per 100 depending on length.  In case you missed it before,  go to Fastenal.com.   I leave the bolster tube stick up above floor for more thread length.

Replace the weight and holding clip, add 1/2 ounce to bring weight up to standards.  Since my vintage cars are run as present day excursions, I typically replace trucks with Model Power # 9400 trucks with metal wheels, and save the old trucks for use on my give-a-ways.

http://www3.towerhobbies.com/cgi-bin/wti0001p?&I=LXWN06&P=SM


Have fun.
#52
General Discussion / Steam Road Numbers
March 15, 2008, 01:25:12 AM
Someone gave me the information earlier but I forgot to put in my log book. I'm sure Gene or others can refresh me on this. I don't recall if the information was posted here or came in a mail.   

Seems most steam locomotives have the number on the cab, and the name and logo on the tender.  One exception I noted is Santa Fe, which has a large number on the tender but only the name initals on the cab. 

Then some have the same number on both the loco and tender, for example Illinois Central.  Perhaps Lanny mentioned it at one time, but thought a post here might be interesting to others as well. 

Oh, would a loco and tender ever have different numbers?

I guess a yard manager knows the various numbering routines of different railroads for identification.  Any information helpful

Thanks
Bob
#53
HO / Advanced DCC
February 27, 2008, 12:00:42 AM
My recent thread titled "DC or DCC?" received positive comments on both sides of the issue.  Now I would like to take it to the next level.  I enjoy my EZ Command as I like to just park one train and run another.  Ten addresses is plenty for my small roster of locomotives.

Though I don't intend to buy a more advanced controller in the near future, I have read through the manuals for NCE Power Cab, MRC Advanced, and just starting to peruse the Zephyr.  My only purpose is to keep up with the latest technology.

It used to be that the guy with the most toys wins, now it includes the one with the most buttons to push. Reminds me of the commercial, a guy had 50 fishing poles lined up at the dock, someone asked him what he was after and he replied, "I want it all".

No brand comparisons please, my question is very direct:  Excluding sound and more  control over throttle functions, what benefits would I have by buying a more advanced unit?   They all have features, I'm referring to Benefits.  Every salesman knows the difference.  In other words, how would these units add to my enjoyment in  running my trains?    I may play "devil's advocate" (DA) with some comments, but I seriously  want to know.  Maybe I'm missing something.

Feature:  "A special sales inducement"  i.e. You can adjust CVs.
Benefit:  "An advantage"  i.e.  How does that improve my (your) enjoyment?

Bob
 
#54
HO / DC or DCC?
February 17, 2008, 12:35:41 AM
This has been hashed ad nauseum, but wanted to throw in my nickel, should say a dollar with inflation.

When I first thought of model railroading a year ago, I had no concept of trains, full size or scale.  I live in the remote mountains and no one else here has trains. 

After a little research, I called Bachmann for a catalog, had it in 5 days and they paid the shipping.  After looking through the catalog I was hooked. "Our"  first train was a Roaring Ridge, my wife said it was neat and wanted it just to display on the mantle. But she did  put it all together and ran the thing before displaying, after all it's her train.  The 56 X 38 EZ track was a nice start for me as well. 

Some more research, and the Spectrum line seemed to be the best bang for the buck.  Never heard of DCC pertaining to locos, but am very familiar with digital packets, sattelites and GPS.  DCC equipped yet compatible with DC? That's for me. I asked my wife if she wanted me to DCC her loco, she told me to leave it alone.

So which do I prefer?  Don't really know yet and may never have a preference.  Sometimes my wife likes to run her train, so I plug in her DC pack.  I run double heads of DCC diesels on DC with no problem.  I have 2 EZ Commands, (one for a spare) sometimes it's fun to have several consists in the yard, run one awhile, park it, then run another, but that can be done with a few switches on DC, or to be able to double head with cab forward on the lead and reverse for the rear like they do here with the coal trains, but again I can put a tiny DIP switch in the cab to do that.   

I tried sound, didn't like it and sent it back.  Also bought an MRC  Advance Squared, didn't like the continuous throttle so back it went.  I'm not knocking the DCC turnouts but I don't need them, I can reach the Caboose Ind manual throws or add a couple of leads for a remote switch.  I admit to being intrigued at first, but decided against them.

I don't follow polls or ratios, or buy something simply because "Everyone has it" just to be popular or accepted.  You know, the "Big Kauhuna" (sp) says to eat kangaroo so everyone wants Rooburgers. 

I don't know the future of DCC, but DC will never be extinct, (as some have inferred) at least not in my lifetime.  Remember the "conversion" can be both ways.  I have a friend who buys DCC equipped, but rewires and sends me the circuit board.  I have several boards from my "Goat" projects.  My wife may someday change her mind about her loco. Having her for a railroading companion is my greatest pleasure so I keep it simple for her sake.

A magazine article said that one day you will be able to program an operation sequence, then sit back in the easy chair and watch a continuous computer controlled session.   I can believe that, lots of people have more dollars than sense.

Ok, your turn.  Except for the automated thing, tell me what can be done with DCC that can't be done with DC, and let's moderate that just for average layouts, average modelers with average needs.   Facts, not opinions.

When someone tells me their opinion, I just say ok, and go on.  Doesn't mean I agree with them, but so what.?  Webster has one definition of "opinion" that is often true "A belief held often without knowledge or proof"  I rarely offer opinions, unless someone asks me, and I qualify it by saying I have no documented proof.  In other words, I have absolutely no clue what I am talking about at the time, just trying to help or make suggestions.

I once held up a sheet of white paper and asked a guy what color it was.  He refused to answer, because we might be in agreement and  he could never tolerate that. 

Bob     


#55
HO / Super Detailing
February 15, 2008, 10:34:54 PM
I  searched every recommended source, but couldn't find a particular  item I needed:  Tiny brass stanchions in various lengths.

During a recent trip to Grand Junction I stopped at the LHS and asked for stanchions, expecting the usual "Don't have any"...Surprise...they had 6 different lengths from 1.5 mm to 4.0 mm for all scales.     

The hole in the 1.5mm  is a precision fit for .020 PB wire.  I use .015 for grabs and stirrups but like the looks of .020 for handrails. 

The manufacturer should come to no surprise: Precision Scale.  You won't find them in the Walther's catalog but are listed on their website.  Part #585-370 for the smallest, they are  a bit short for  Bachmann boiler stanchions, other sizes may work.   I didn't check the hole size of other lengths, I was just excited to get the smaller for the cut levers and handrails on my Bachmann "Green Goat" project. 

I also like the caption on the package:  Made in Montana, USA

Bob


#56
HO / Mr Bach-man...Freebie
February 11, 2008, 01:17:34 AM
May I post a picture of a nice "freebie" (just for postage) on the forum?  I don't want to start that "landslide" you mentioned.

Thanks
Bob
#57
Plasticville U.S.A. / Mr Bach Mann - New Structures
February 09, 2008, 04:21:38 AM
We are modeling a western dude ranch and can't find any suitable buildings.  We would like to have a large "great house" like the Ponderosa on Bonanza,  realistic log cabins for guests, stables, barns without silos, equipment sheds (modern Butler style, not the old quonsets), etc.

Any thing in the works for new items that would fit our theme?

I have a suggestion...HO scale version of the old wooden Lincoln Logs in various lengths.  You have a log cabin, but we want the more modern square cut timbers. The pieces could be molded in wood grain styrene and painted, or premolded in light wood colors.   

Thanks
Yampa Bob