Title: Snowplow Project
Post by: jonathan on December 10, 2017, 06:30:18 AM
Post by: jonathan on December 10, 2017, 06:30:18 AM
There use to be a-half-dozen-or-so modelers on here who would share projects, so we could all learn from their successes and failures... basically tinkers. They taught me a lot. I miss 'em, and I hope we get some more folks who like to share. In the meantime...
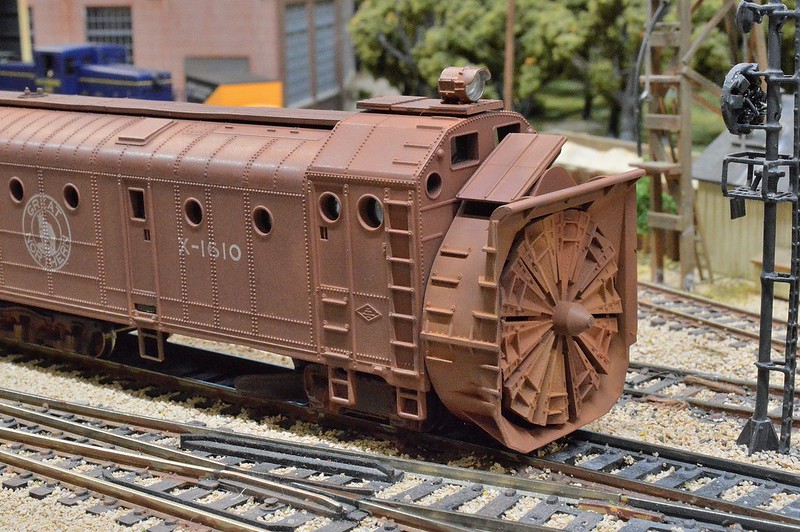
A fellow clubmember of mine handed me this old snowplow model, and wondered if I might enjoy tinkering with it. I think it may be an old Athearn model from late 60s to early 70s (just a guess).
 (https://flic.kr/p/22ibArU)DSC_0954 (https://flic.kr/p/22ibArU) by Jon Vogel (https://www.flickr.com/photos/152929963@N07/), on Flickr
Don't think they're made anymore, and I don't have anything disparaging to say, so hopefully the moderator won't mind my sharing this project.
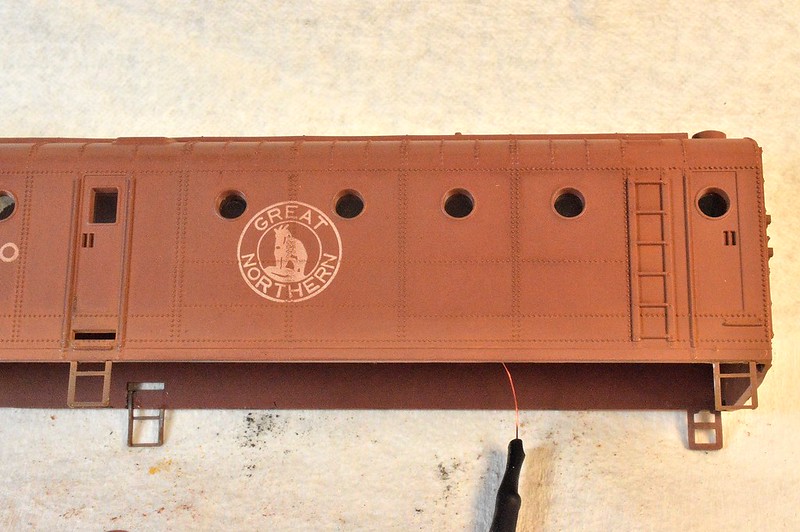
I'll start with the outside and work in...
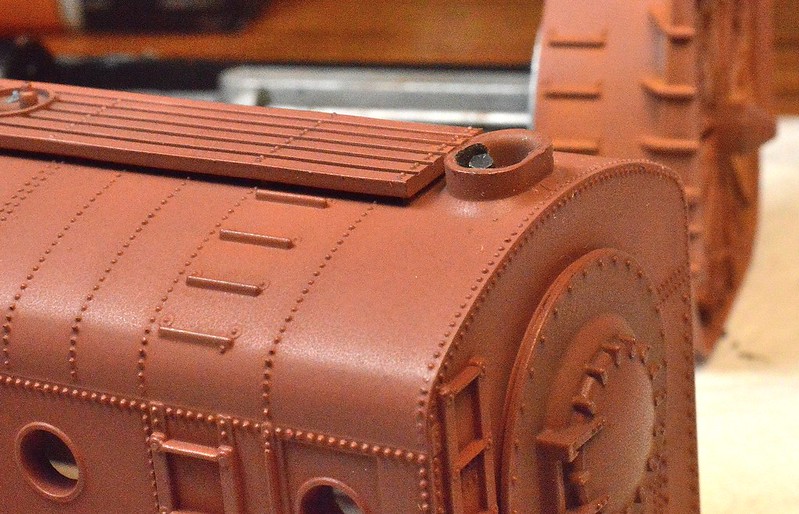
I fixed the broken stirups with a tichy ladder. Just cut up the ladder and drilled a few holes:
 (https://flic.kr/p/22ibxvU)DSC_0979 (https://flic.kr/p/22ibxvU) by Jon Vogel (https://www.flickr.com/photos/152929963@N07/), on Flickr
You may also notice I did a bit of touch up, weathering, and added window glazing. Couldn't get a decent photo, but I also fixed the snow throwing guide, so it easily flips from right to left.
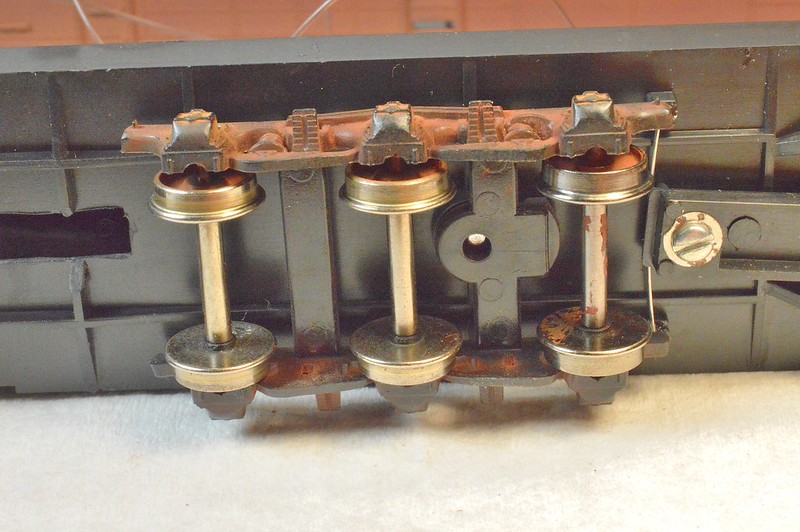
Added some metal wheels to the rear truck:
 (https://flic.kr/p/22ibyco)DSC_0978 (https://flic.kr/p/22ibyco) by Jon Vogel (https://www.flickr.com/photos/152929963@N07/), on Flickr
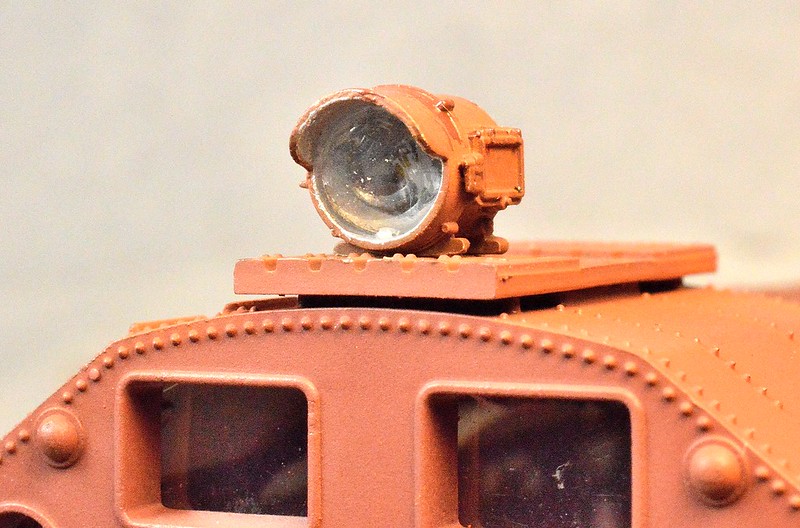
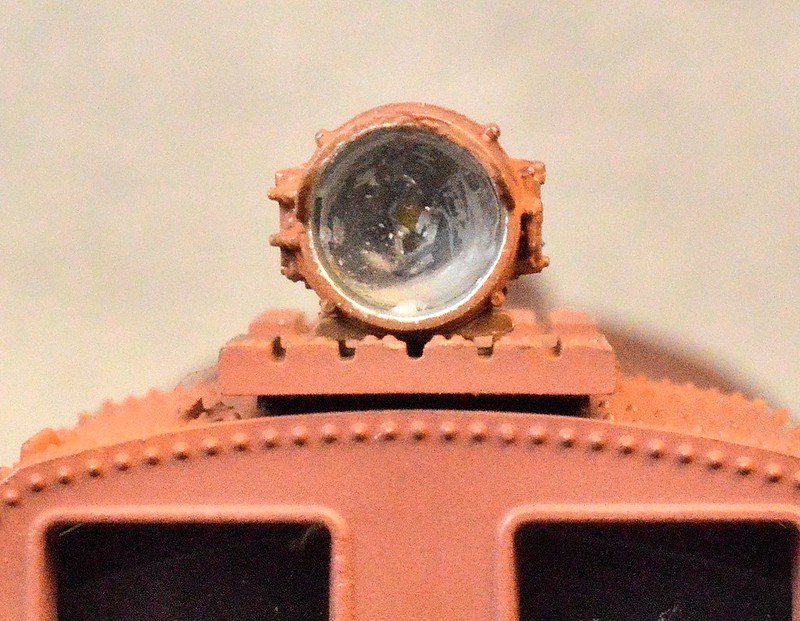
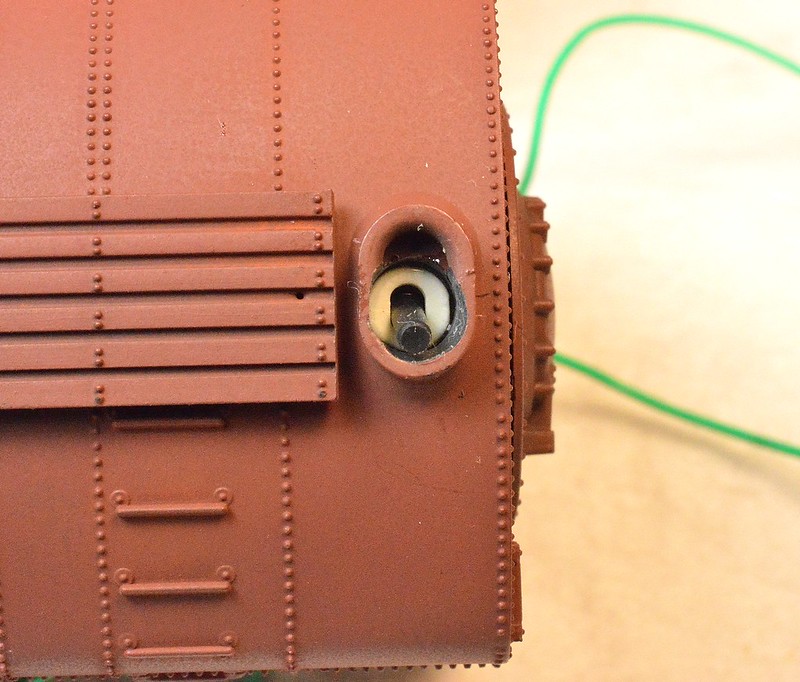
I absolutely HAD to add a working headlight to the thing! This is a brass headlight. I drilled a hole in the bottom, behind the mounting post. Then prepared and inserted an SMD (warm white):
 (https://flic.kr/p/CGQFfB)DSC_0977 (https://flic.kr/p/CGQFfB) by Jon Vogel (https://www.flickr.com/photos/152929963@N07/), on Flickr
 (https://flic.kr/p/22ibyG1)DSC_0973 (https://flic.kr/p/22ibyG1) by Jon Vogel (https://www.flickr.com/photos/152929963@N07/), on Flickr
 (https://flic.kr/p/CGQFAg)DSC_0971 (https://flic.kr/p/CGQFAg) by Jon Vogel (https://www.flickr.com/photos/152929963@N07/), on Flickr
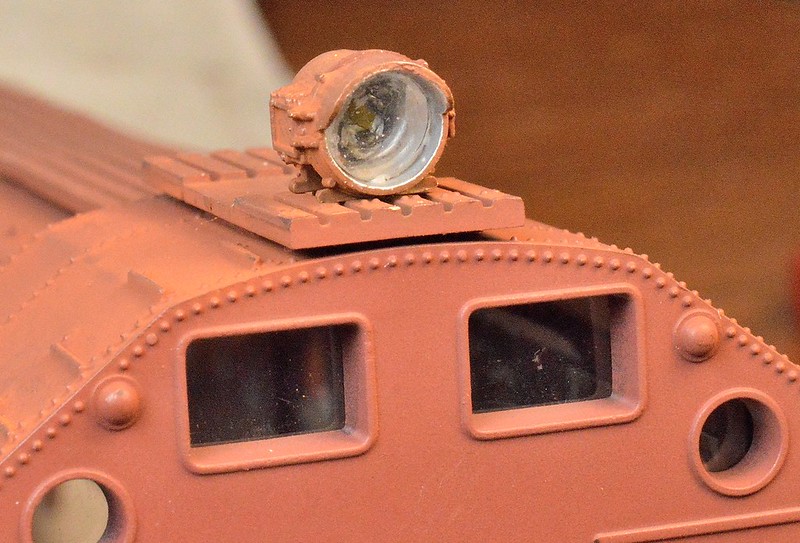 (https://flic.kr/p/CGQFKz)DSC_0970 (https://flic.kr/p/CGQFKz) by Jon Vogel (https://www.flickr.com/photos/152929963@N07/), on Flickr
 (https://flic.kr/p/22ibz9U)DSC_0969 (https://flic.kr/p/22ibz9U) by Jon Vogel (https://www.flickr.com/photos/152929963@N07/), on Flickr
On to the inside:
The old rubber band trick never worked too well. Here we see that two small rubber bands were suppose to be connected to a drive shaft... which in turn, caused the plow blade to turn:
 (https://flic.kr/p/22ibA87)DSC_0962 (https://flic.kr/p/22ibA87) by Jon Vogel (https://www.flickr.com/photos/152929963@N07/), on Flickr
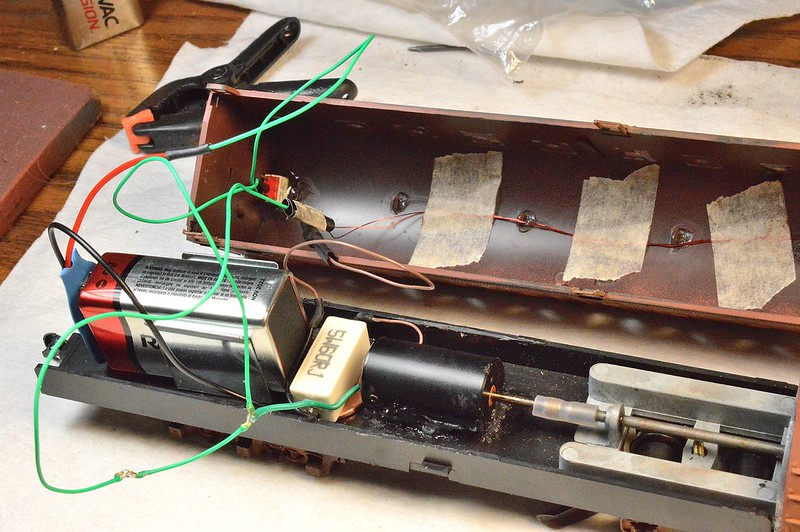
Instead, I took an old can motor from a '70s brass loco and attached it to the drive shaft. Don't worry. The brass loco got a new motor.
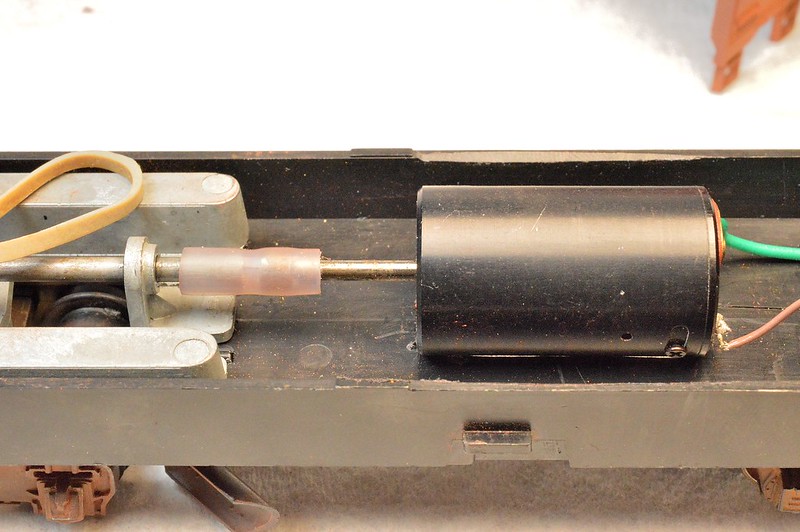 (https://flic.kr/p/CGQErc)DSC_0964 (https://flic.kr/p/CGQErc) by Jon Vogel (https://www.flickr.com/photos/152929963@N07/), on Flickr
To get things lined up, I cut and filed a notch in the floor, to which I will add silicone gel, when I'm ready to make everything permanent:
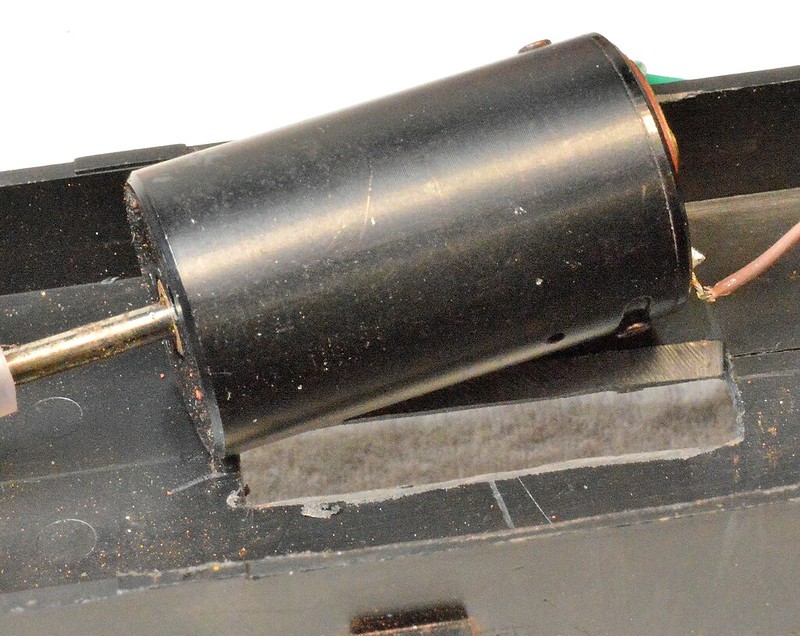 (https://flic.kr/p/22ibzVJ)DSC_0966 (https://flic.kr/p/22ibzVJ) by Jon Vogel (https://www.flickr.com/photos/152929963@N07/), on Flickr
I know what you're thinking... "Holy crap! Jonathan, that's going to be the world's fastest spinning plow blade."
Yes, well this is the part of the project I'm noodling with right now.
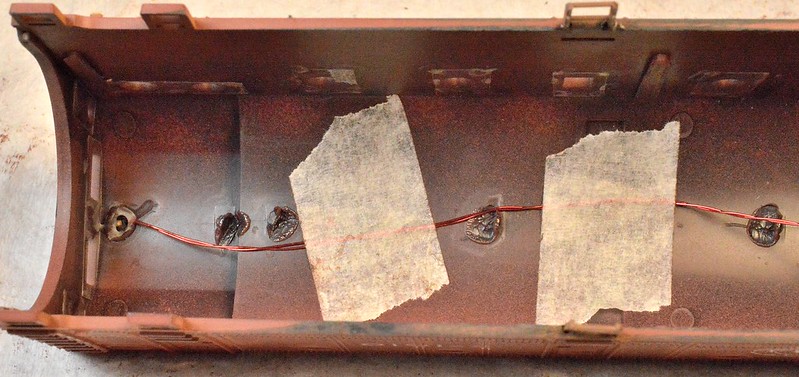
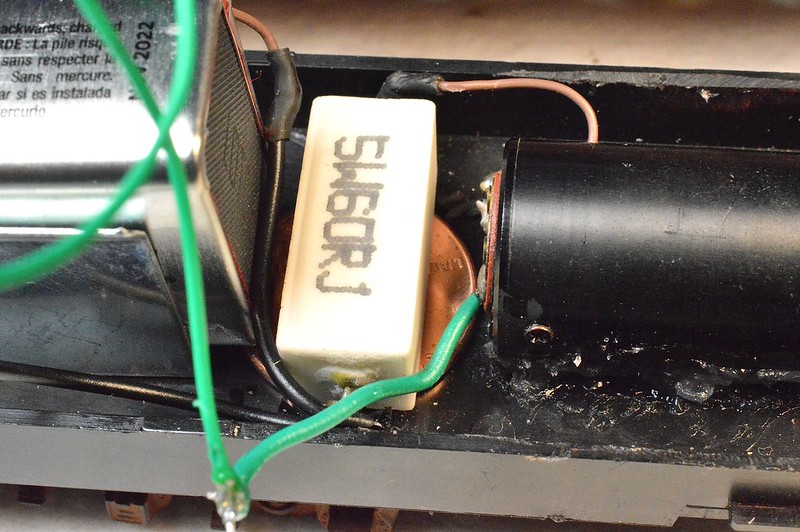
I'm using a 9v battery to power the motor and headlight. I considered adding pick ups to the wheels, along with a decoder, to run off track power. Instead, this will operate either DC or DCC and have a toggle switch to do the old on/off thing:
 (https://flic.kr/p/22ibzwN)DSC_0967 (https://flic.kr/p/22ibzwN) by Jon Vogel (https://www.flickr.com/photos/152929963@N07/), on Flickr
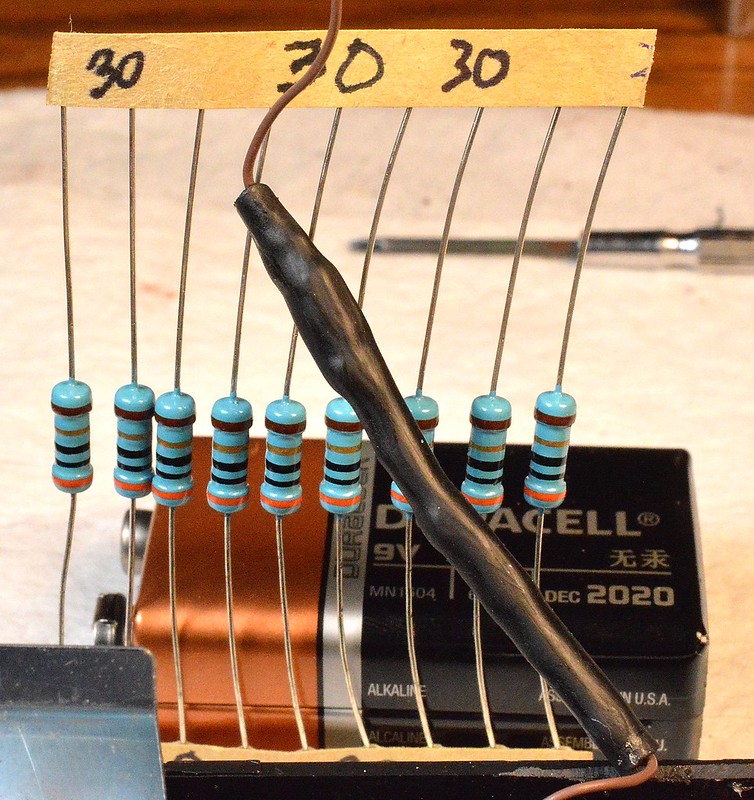
If my math is correct, I can use a 30 ohm resistor (2 watts?) to let the motor receive about 3 volts. That about the minimum current needed to get the motor running. I considered using two AA batteries, but they would require replacement too often. Anyway...
Here's the plot twist...
I went out Xmas shopping yesterday and intended to stop at one of three Radio Shacks located near my house. I needed a micro mini toggle switch, a 9v battery connector, and some resistors. All three Radio Shacks were gone! In fact the nearest one, still open, is nearly 50 miles away. Nervousness and depression came over me like a tidal wave. I hate shopping on line. In fact I was going to call this thread 'R.I.P. Radio Shack!'
Perhaps, I'm being a bit over-dramatic. I really, really hate shopping on line.
So, here I sit... waiting for parts to come in the mail. While I'm waiting, if anyone out there is real handy with electrical algebra, feel free to knock me in the head and tell me the right resistor size to use. Imma tinkerin' here...
Regards,
Jonathan
A fellow clubmember of mine handed me this old snowplow model, and wondered if I might enjoy tinkering with it. I think it may be an old Athearn model from late 60s to early 70s (just a guess).
(https://flic.kr/p/22ibArU)DSC_0954 (https://flic.kr/p/22ibArU) by Jon Vogel (https://www.flickr.com/photos/152929963@N07/), on FlickrDon't think they're made anymore, and I don't have anything disparaging to say, so hopefully the moderator won't mind my sharing this project.
I'll start with the outside and work in...
I fixed the broken stirups with a tichy ladder. Just cut up the ladder and drilled a few holes:
(https://flic.kr/p/22ibxvU)DSC_0979 (https://flic.kr/p/22ibxvU) by Jon Vogel (https://www.flickr.com/photos/152929963@N07/), on FlickrYou may also notice I did a bit of touch up, weathering, and added window glazing. Couldn't get a decent photo, but I also fixed the snow throwing guide, so it easily flips from right to left.
Added some metal wheels to the rear truck:
(https://flic.kr/p/22ibyco)DSC_0978 (https://flic.kr/p/22ibyco) by Jon Vogel (https://www.flickr.com/photos/152929963@N07/), on FlickrI absolutely HAD to add a working headlight to the thing! This is a brass headlight. I drilled a hole in the bottom, behind the mounting post. Then prepared and inserted an SMD (warm white):
(https://flic.kr/p/CGQFfB)DSC_0977 (https://flic.kr/p/CGQFfB) by Jon Vogel (https://www.flickr.com/photos/152929963@N07/), on Flickr (https://flic.kr/p/22ibyG1)DSC_0973 (https://flic.kr/p/22ibyG1) by Jon Vogel (https://www.flickr.com/photos/152929963@N07/), on Flickr (https://flic.kr/p/CGQFAg)DSC_0971 (https://flic.kr/p/CGQFAg) by Jon Vogel (https://www.flickr.com/photos/152929963@N07/), on Flickr (https://flic.kr/p/CGQFKz)DSC_0970 (https://flic.kr/p/CGQFKz) by Jon Vogel (https://www.flickr.com/photos/152929963@N07/), on Flickr (https://flic.kr/p/22ibz9U)DSC_0969 (https://flic.kr/p/22ibz9U) by Jon Vogel (https://www.flickr.com/photos/152929963@N07/), on FlickrOn to the inside:
The old rubber band trick never worked too well. Here we see that two small rubber bands were suppose to be connected to a drive shaft... which in turn, caused the plow blade to turn:
(https://flic.kr/p/22ibA87)DSC_0962 (https://flic.kr/p/22ibA87) by Jon Vogel (https://www.flickr.com/photos/152929963@N07/), on FlickrInstead, I took an old can motor from a '70s brass loco and attached it to the drive shaft. Don't worry. The brass loco got a new motor.
(https://flic.kr/p/CGQErc)DSC_0964 (https://flic.kr/p/CGQErc) by Jon Vogel (https://www.flickr.com/photos/152929963@N07/), on FlickrTo get things lined up, I cut and filed a notch in the floor, to which I will add silicone gel, when I'm ready to make everything permanent:
(https://flic.kr/p/22ibzVJ)DSC_0966 (https://flic.kr/p/22ibzVJ) by Jon Vogel (https://www.flickr.com/photos/152929963@N07/), on FlickrI know what you're thinking... "Holy crap! Jonathan, that's going to be the world's fastest spinning plow blade."
Yes, well this is the part of the project I'm noodling with right now.
I'm using a 9v battery to power the motor and headlight. I considered adding pick ups to the wheels, along with a decoder, to run off track power. Instead, this will operate either DC or DCC and have a toggle switch to do the old on/off thing:
(https://flic.kr/p/22ibzwN)DSC_0967 (https://flic.kr/p/22ibzwN) by Jon Vogel (https://www.flickr.com/photos/152929963@N07/), on FlickrIf my math is correct, I can use a 30 ohm resistor (2 watts?) to let the motor receive about 3 volts. That about the minimum current needed to get the motor running. I considered using two AA batteries, but they would require replacement too often. Anyway...
Here's the plot twist...
I went out Xmas shopping yesterday and intended to stop at one of three Radio Shacks located near my house. I needed a micro mini toggle switch, a 9v battery connector, and some resistors. All three Radio Shacks were gone! In fact the nearest one, still open, is nearly 50 miles away. Nervousness and depression came over me like a tidal wave. I hate shopping on line. In fact I was going to call this thread 'R.I.P. Radio Shack!'
Perhaps, I'm being a bit over-dramatic. I really, really hate shopping on line.
So, here I sit... waiting for parts to come in the mail. While I'm waiting, if anyone out there is real handy with electrical algebra, feel free to knock me in the head and tell me the right resistor size to use. Imma tinkerin' here...
Regards,
Jonathan
Title: Re: Snowplow Project
Post by: WoundedBear on December 10, 2017, 08:45:52 AM
Post by: WoundedBear on December 10, 2017, 08:45:52 AM
Right on Jon. Good work. If I could ever get some of my projects done and back to the railroad, I would post more pics.
Maybe after the holidays.
Sid
Maybe after the holidays.
Sid
Title: Re: Snowplow Project
Post by: dutchbuilder on December 10, 2017, 09:58:07 AM
Post by: dutchbuilder on December 10, 2017, 09:58:07 AM
There are motors for sale with a build in reduction gear.
maybe an idea?
I know you hate the internet but have a look at banggood or dealextreme.
Those Chinese are dirt cheap and the shipping costs are free.
Ton
maybe an idea?
I know you hate the internet but have a look at banggood or dealextreme.
Those Chinese are dirt cheap and the shipping costs are free.
Ton
Title: Re: Snowplow Project
Post by: J3a-614 on December 10, 2017, 09:58:55 AM
Post by: J3a-614 on December 10, 2017, 09:58:55 AM
You're right, Jonathan, you have an Athearn rotary plow.
The prototype was built very late in the history of the Lima Locomotive Works under license from Alco (which held the Leslie rotary plow patents). They used Shay engines to power the wheel, a very different arrangement than normally used on a rotary. They were built as steam plows meant to live in a diesel world and were oil fired, with fuel and water from a tender supplied by the railroad. Boiler orientation was reversed from normal because of this (normally the firebox was at the rear, like a locomotive, which made sense when plows, like locomotives, were coal burners).
Four were built (two for Union Pacific, and one each for Soo and Rock Island). I believe both UP plows have been preserved, surviving to the end of service with steam power. Most if not all other surviving rotaries had the steam equipment replaced with electric motors, their power coming from a B-unit that had its motors removed and wiring altered to supply the plow.
http://tycotrain.tripod.com/athearn-rollingstock-resource/id147.html
http://limalocomotiveworks.com/rotary_snow_plows.html
http://www.tycoforums.com/tyco/forum/topic.asp?TOPIC_ID=11735
Check out the former C&O tender from a 2-8-8-2 with this UP plow.
https://donstrack.smugmug.com/UtahRails/Union-Pacific/UP-Snow-Plows/i-RFXK2zh
https://donstrack.smugmug.com/UtahRails/Union-Pacific/UP-Snow-Plows/
http://www.trainweb.org/highdesertrails/up/UPRotary.jpg
In action a steam rotary sounded like a locomotive, in particular a geared engine:
https://www.youtube.com/watch?v=XtiCOBfvc-I
If B&O didn't have rotaries, they should have. Other eastern roads did.
http://www.trainsarefun.com/lirr/mow/193%20RotaryMorris%20Park5-1963JimGillin.jpg
Have fun!
Title: Re: Snowplow Project
Post by: Terry Toenges on December 10, 2017, 10:27:57 AM
Post by: Terry Toenges on December 10, 2017, 10:27:57 AM
Good job on it. I can relate to your lack of Radio Shacks. I'm 50-60 miles from anything I seem to need in the big city. The internet has become a way of life for me now. Amazon and Ebay keep my wallet drained. Will you be dumping snow on your track to watch it in action?
Title: Re: Snowplow Project
Post by: jonathan on December 10, 2017, 11:21:29 AM
Post by: jonathan on December 10, 2017, 11:21:29 AM
Thanks for the feedback, Gents.
I will be donating this to the club layout, as a novelty item. Won't fit my layout scheme.
I was intending to push this with a 'B' unit. So, seems that can be prototypical. Yay. Had also considered putting a tender shell over a small diesel frame like the 44-tonner. More trouble than it's worth perhaps.
I will check out the motors with reduction gears. I was wondering if there was such a thing. Although, I'm trying to keep this a low-cost project.
Interesting how how other folks have done something very similar with these plows.
Regards,
Jonathan
Title: Re: Snowplow Project
Post by: J3a-614 on December 10, 2017, 11:58:27 AM
Post by: J3a-614 on December 10, 2017, 11:58:27 AM
Actually, even the B-unit can be a dummy. It powers the plow, but doesn't move itself. Movement comes from locomotives pushing, just as in steam days. The rotaries that still operate today have a control stand in them to operate the locomotives behind them.
Said B-unit might be painted like the plow (in other words, it might be in a maintenance of way scheme), or it still be in road colors (this was common earlier, the B-unit getting its motors installed again and going back to helping pull trains after the snow season). This suggests some fun with sound decoders if you want to spend the dough--nah, let the club guys do that!!
Modern rotary footage from the beginning of this year. Note that the old SP plow here still has steam from a steam generator (such as used in a passenger diesel). That steam is useful for heating for the crew and thawing out frozen equipment and melting ice buildup--and in the past at least, still was used to blow a real steam whistle.
https://www.youtube.com/watch?v=RjBQ3MaBYiU
https://www.youtube.com/watch?v=VNOfnBqhEdQ
https://www.youtube.com/watch?v=MYerlBZNBBI
https://www.youtube.com/watch?v=NTpKizlTO6A
And here's your fictional history. . .this rotary is the last Lima plow, the one that was supposed to have been built for stock and cancelled!!
Have fun!
Title: Re: Snowplow Project
Post by: Len on December 10, 2017, 12:45:59 PM
Post by: Len on December 10, 2017, 12:45:59 PM
Digi-Key has all kinds of low voltage motors available. Just set the filters for DC and the voltage and speed you're looking for:
https://www.digikey.com/products/en/motors-solenoids-driver-boards-modules/motors-ac-dc/178
Len
https://www.digikey.com/products/en/motors-solenoids-driver-boards-modules/motors-ac-dc/178
Len
Title: Re: Snowplow Project
Post by: rstroud on December 11, 2017, 01:15:34 AM
Post by: rstroud on December 11, 2017, 01:15:34 AM
Very cool piece of equipment!!
Title: Re: Snowplow Project
Post by: jonathan on December 16, 2017, 07:10:17 AM
Post by: jonathan on December 16, 2017, 07:10:17 AM
An update:
The end is in sight, for this project.
Silicone gel (caulk) to mount the motor to the frame:
 (https://flic.kr/p/21d6sQx)DSC_0983 (https://flic.kr/p/21d6sQx) by Jon Vogel (https://www.flickr.com/photos/152929963@N07/), on Flickr
I used two 30 ohm resistors to get the inductor to spin at a reasonable rate. The resistors get quite warm after a minute. So I'm wondering if I did anything wrong:
 (https://flic.kr/p/22xZq9F)DSC_0981 (https://flic.kr/p/22xZq9F) by Jon Vogel (https://www.flickr.com/photos/152929963@N07/), on Flickr
Found a really tiny, supermicro mini-switch to use:
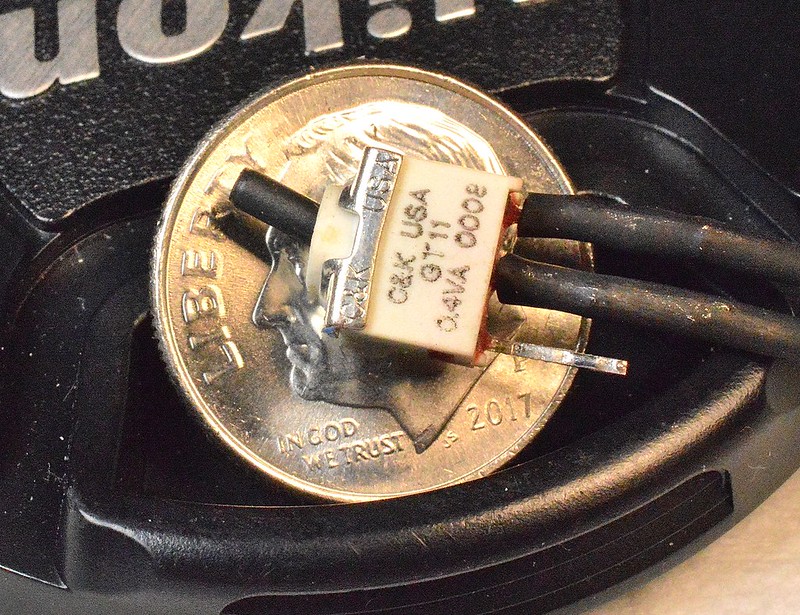 (https://flic.kr/p/22xZpBZ)DSC_0986 (https://flic.kr/p/22xZpBZ) by Jon Vogel (https://www.flickr.com/photos/152929963@N07/), on Flickr
Using some 5-minute epoxy and a 5/32 drill bit, I mounted the switch through the exhaust stack, making it near invisible... well... once I add a bit of paint and weathering to the switch:
 (https://flic.kr/p/21d6saV)DSC_0988 (https://flic.kr/p/21d6saV) by Jon Vogel (https://www.flickr.com/photos/152929963@N07/), on Flickr
 (https://flic.kr/p/22xZppz)DSC_0989 (https://flic.kr/p/22xZppz) by Jon Vogel (https://www.flickr.com/photos/152929963@N07/), on Flickr
 (https://flic.kr/p/21d6rLt)DSC_0990 (https://flic.kr/p/21d6rLt) by Jon Vogel (https://www.flickr.com/photos/152929963@N07/), on Flickr
Waiting on a 9v battery connector. Then I can finish up the wiring and get this project on the layout.
Regards,
Jonathan
The end is in sight, for this project.
Silicone gel (caulk) to mount the motor to the frame:
(https://flic.kr/p/21d6sQx)DSC_0983 (https://flic.kr/p/21d6sQx) by Jon Vogel (https://www.flickr.com/photos/152929963@N07/), on FlickrI used two 30 ohm resistors to get the inductor to spin at a reasonable rate. The resistors get quite warm after a minute. So I'm wondering if I did anything wrong:
(https://flic.kr/p/22xZq9F)DSC_0981 (https://flic.kr/p/22xZq9F) by Jon Vogel (https://www.flickr.com/photos/152929963@N07/), on FlickrFound a really tiny, supermicro mini-switch to use:
(https://flic.kr/p/22xZpBZ)DSC_0986 (https://flic.kr/p/22xZpBZ) by Jon Vogel (https://www.flickr.com/photos/152929963@N07/), on FlickrUsing some 5-minute epoxy and a 5/32 drill bit, I mounted the switch through the exhaust stack, making it near invisible... well... once I add a bit of paint and weathering to the switch:
(https://flic.kr/p/21d6saV)DSC_0988 (https://flic.kr/p/21d6saV) by Jon Vogel (https://www.flickr.com/photos/152929963@N07/), on Flickr (https://flic.kr/p/22xZppz)DSC_0989 (https://flic.kr/p/22xZppz) by Jon Vogel (https://www.flickr.com/photos/152929963@N07/), on Flickr (https://flic.kr/p/21d6rLt)DSC_0990 (https://flic.kr/p/21d6rLt) by Jon Vogel (https://www.flickr.com/photos/152929963@N07/), on FlickrWaiting on a 9v battery connector. Then I can finish up the wiring and get this project on the layout.
Regards,
Jonathan
Title: Re: Snowplow Project
Post by: Len on December 16, 2017, 09:26:57 AM
Post by: Len on December 16, 2017, 09:26:57 AM
For supplying current to motors, you really should use 'Power Resistors'. They are designed to be under constant load of up to 1 amp, or higher. The circuit board resistors you're using really aren't. They aren't super expensve, and you can get them from many places. This is one: https://www.circuitspecialists.com/pw10-30.html
Len
Len
Title: Re: Snowplow Project
Post by: dutchbuilder on December 16, 2017, 02:45:47 PM
Post by: dutchbuilder on December 16, 2017, 02:45:47 PM
I personally would use a voltage regulator like a LM317 but as you have enough 30 Ohm resistors, i would take two resistors parallel = 15 Ohm and use four of these groups in series to create 60 Ohm.
The power dissipation is divided over eight in stead of two resistors.
Ton
The power dissipation is divided over eight in stead of two resistors.
Ton
Title: Re: Snowplow Project
Post by: jonathan on December 16, 2017, 11:16:32 PM
Post by: jonathan on December 16, 2017, 11:16:32 PM
Thanks much for the tip. I ordered the power resistors (not pricey). I'm a novice when it comes to electrical things. In my case, a little knowledge is dangerous. :) not in a hurry, so don't mind waiting for the right part.
I was concerned my current set up might cause a meltdown.
Regards,
Jonathan
I was concerned my current set up might cause a meltdown.
Regards,
Jonathan
Title: Re: Snowplow Project
Post by: Len on December 17, 2017, 04:55:29 AM
Post by: Len on December 17, 2017, 04:55:29 AM
With the power resistors you can use the loco chassis as a 'heat sink' to dissipate any heat. Use original J-B Weld Epoxy (not the fast setting Kwik type, it's not as heat resistant) to fasten them to the metal chassis.
Len
Len
Title: Re: Snowplow Project
Post by: jonathan on December 23, 2017, 07:28:07 AM
Post by: jonathan on December 23, 2017, 07:28:07 AM
OK... the power resistors and battery connector finally arrived. Been doing a bit of testing and soldering.
The frame is not metal on this model. I used a penny as a heat sink. However, the power resistor does not get near as warm as the "regular" resistors, I had previously used:
 (https://flic.kr/p/22MePX6)DSC_0995 (https://flic.kr/p/22MePX6) by Jon Vogel (https://www.flickr.com/photos/152929963@N07/), on Flickr
Here, I panned back to get a shot of the electronics. Just a bit of insulating and tidying up to complete:
 (https://flic.kr/p/21GM6G1)DSC_0992 (https://flic.kr/p/21GM6G1) by Jon Vogel (https://www.flickr.com/photos/152929963@N07/), on Flickr
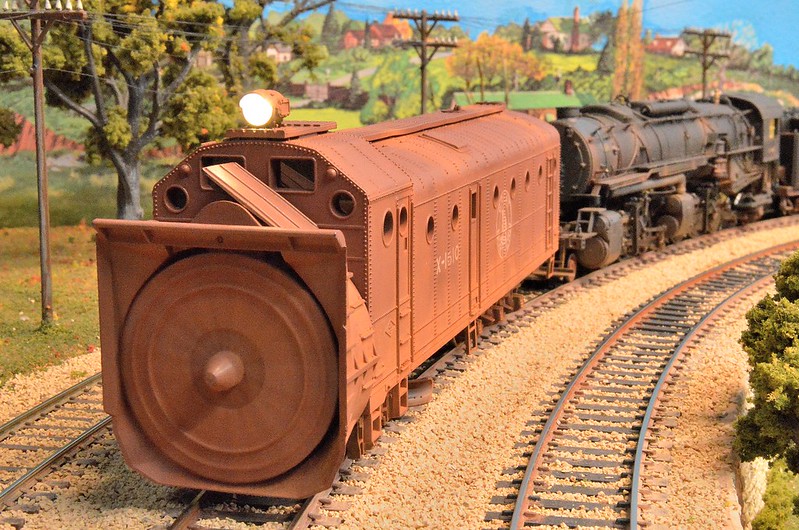
And now, some final shots... Put the snowblower on the front of a train, to run it around, making sure the car tracks alright:
 (https://flic.kr/p/EDZe6C)DSC_0996 (https://flic.kr/p/EDZe6C) by Jon Vogel (https://www.flickr.com/photos/152929963@N07/), on Flickr
Finally, a couple shots of the motor and headlight switched 'on':
 (https://flic.kr/p/22MePxP)DSC_0998 (https://flic.kr/p/22MePxP) by Jon Vogel (https://www.flickr.com/photos/152929963@N07/), on Flickr
 (https://flic.kr/p/EDZdNd)DSC_1000 (https://flic.kr/p/EDZdNd) by Jon Vogel (https://www.flickr.com/photos/152929963@N07/), on Flickr
Not gonna prepare a youtube video just to watch a spinning blade, but you get the idea.
Regards,
Jonathan
The frame is not metal on this model. I used a penny as a heat sink. However, the power resistor does not get near as warm as the "regular" resistors, I had previously used:
(https://flic.kr/p/22MePX6)DSC_0995 (https://flic.kr/p/22MePX6) by Jon Vogel (https://www.flickr.com/photos/152929963@N07/), on FlickrHere, I panned back to get a shot of the electronics. Just a bit of insulating and tidying up to complete:
(https://flic.kr/p/21GM6G1)DSC_0992 (https://flic.kr/p/21GM6G1) by Jon Vogel (https://www.flickr.com/photos/152929963@N07/), on FlickrAnd now, some final shots... Put the snowblower on the front of a train, to run it around, making sure the car tracks alright:
(https://flic.kr/p/EDZe6C)DSC_0996 (https://flic.kr/p/EDZe6C) by Jon Vogel (https://www.flickr.com/photos/152929963@N07/), on FlickrFinally, a couple shots of the motor and headlight switched 'on':
(https://flic.kr/p/22MePxP)DSC_0998 (https://flic.kr/p/22MePxP) by Jon Vogel (https://www.flickr.com/photos/152929963@N07/), on Flickr (https://flic.kr/p/EDZdNd)DSC_1000 (https://flic.kr/p/EDZdNd) by Jon Vogel (https://www.flickr.com/photos/152929963@N07/), on FlickrNot gonna prepare a youtube video just to watch a spinning blade, but you get the idea.
Regards,
Jonathan
Title: Re: Snowplow Project
Post by: Len on December 23, 2017, 10:01:30 AM
Post by: Len on December 23, 2017, 10:01:30 AM
Looking good. The power resistor has more mass to dissipate the heat, so your less likely to melt anything.
Len
Len
Title: Re: Snowplow Project
Post by: J3a-614 on December 23, 2017, 10:14:27 AM
Post by: J3a-614 on December 23, 2017, 10:14:27 AM
Glad to see her done; I may try to scrounge a motor and battery and such to do the same with my own sitting in its box! :)
What do you plan to use for a tender or B-unit? An oil tender would be PERFECT!!
Or, as Doctor Beaker used to say on the old Jerry Anderson animated puppet sci-fi kids' show "Supercar," "Satisfactory. Most satisfactory!"
https://en.wikipedia.org/wiki/Supercar_(TV_series)
http://www.imdb.com/title/tt0054567/
A bit--no, wildly--off topic, but how many of you remember this?
https://www.youtube.com/watch?v=QTW3sEOaPqU
Title: Re: Snowplow Project
Post by: Trainman203 on December 23, 2017, 10:20:02 AM
Post by: Trainman203 on December 23, 2017, 10:20:02 AM
I live on the Gulf Coast. It snowed last week for the first time in 10 years. That's reallly too frequent, its usually 15-20 years apart. And the worst places were 2". Everything closed. No one knows how to drive in it. Today it's 70 outside. More typical.
My layout is locally set. So the last thing I need is a snow plow. What I need to figure out is how to make a weed spray train that looks like it's spraying.
Anyone have any other operating MOW ideas?
My layout is locally set. So the last thing I need is a snow plow. What I need to figure out is how to make a weed spray train that looks like it's spraying.
Anyone have any other operating MOW ideas?
Title: Re: Snowplow Project
Post by: jonathan on December 23, 2017, 10:39:50 AM
Post by: jonathan on December 23, 2017, 10:39:50 AM
As always, thanks for the comments.
I am thinking of poking around for an oil (or coal) tender to add to this. No hurry though... may find an old one laying around the club layout. That's where this car is going.
HA! I remember how much I loved those puppet shows; supercar & thunderbirds... I tried watching an episode about a year ago. Funny how time makes the magic wear off some things. :)
I have developed a fondness for MOW rolling stock. Though I don't try to put together specific trains... Just throw stuff together that I think is cool.
Regards,
Jonathan
Title: Re: Snowplow Project
Post by: Len on December 23, 2017, 12:12:43 PM
Post by: Len on December 23, 2017, 12:12:43 PM
Trainman - A brush cutter to keep the kudzu at bay:

Or an old Nalco weed sprayer:

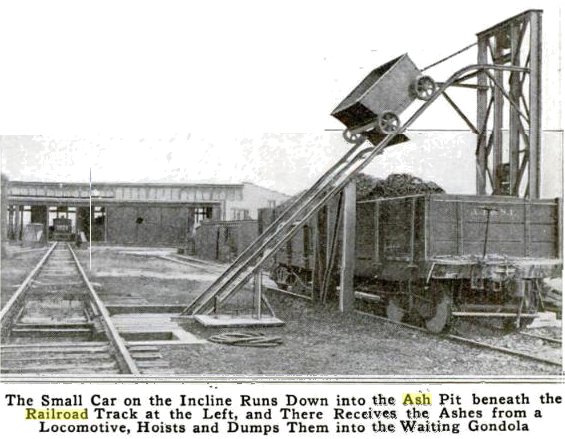
Or an ash lift:
Len
Or an old Nalco weed sprayer:
Or an ash lift:
Len
Title: Re: Snowplow Project
Post by: Trainman203 on December 23, 2017, 06:26:41 PM
Post by: Trainman203 on December 23, 2017, 06:26:41 PM
When I was first model railroading in the early 60's, both the T&NO and the MP were using lots of older heavyweight passenger equipment in MOW service . The T&NO cars were Harriman cars and painted silver, the MP cars were old section sleepers painted boxcar red.
Title: Re: Snowplow Project
Post by: Trainman203 on December 24, 2017, 01:21:34 PM
Post by: Trainman203 on December 24, 2017, 01:21:34 PM
That Nalco thing looks like an old steam engine tender. For many years repurposed tenders were part of all MOW consists.
Title: Re: Snowplow Project
Post by: RAM on December 24, 2017, 04:26:51 PM
Post by: RAM on December 24, 2017, 04:26:51 PM
Trainman203, I don't think anyone knows how to drive in the snow any more. They have a big snow up north, and what do you see on tv? Cars and truck all over place. Jonathan, It is easy to make an oil tender out of a cold tend. Len, I see that little ash car is automatic. That third rail keep the door shut, and as soon as the third rail ends the door opens and dumps the ash.
Title: Re: Snowplow Project
Post by: dutchbuilder on January 04, 2018, 03:43:11 PM
Post by: dutchbuilder on January 04, 2018, 03:43:11 PM
Jonathan , your topic inspired me to make my own snowplow in 0n30.
http://www.amerikaanse-treinen.nl/forum/index.php?topic=1311.msg36316;topicseen#msg36316
It's in Dutch but have a look at the pictures.
The model was drawn and cut with a Silhouette Cameo cutting plotter.
Ton
http://www.amerikaanse-treinen.nl/forum/index.php?topic=1311.msg36316;topicseen#msg36316
It's in Dutch but have a look at the pictures.
The model was drawn and cut with a Silhouette Cameo cutting plotter.
Ton
Title: Re: Snowplow Project
Post by: Terry Toenges on January 04, 2018, 06:12:11 PM
Post by: Terry Toenges on January 04, 2018, 06:12:11 PM
Ton - You designed the whole thing and made it? That's great work.
Title: Re: Snowplow Project
Post by: dutchbuilder on January 05, 2018, 06:50:28 AM
Post by: dutchbuilder on January 05, 2018, 06:50:28 AM
Inspired by this topic and using plans for the real RGS and D&RGW plow published in the Narrow Gauge and Short Line Gazette in 2000.
I used the plans as a lead to adapt them for a 2-6-6-2 tender chassis.
I used 0.5mm styrene in layers to make the model.
It's also the thickest material i can cut with the cnc machine.
It saves a lot of time using this plotter and as a spinoff it is reproducible.
Here is the translation of the main text:
During the holidays i started designing and building again.
Before that I had a creative dip.
That happens sometimes.
I had a 2-6-6-2 tender leftover from a T conversion and I got a brainwave to make a snow plow.
Why that tender?
Because the wheel sets have pickups so that I can motorise the cutting head.
The housing drawing was not that difficult, it has become a routine job with that cutting plotter program.
But then the cutting head and the housing, that was quite a challenge to draw.
Especially the milling head was a multi-day project.
See the result here.
If you alternate the last two pictures in the Windows viewer, you get an idea of how the cutting head turns.
Ton
Title: Re: Snowplow Project
Post by: jonathan on January 05, 2018, 07:21:28 AM
Post by: jonathan on January 05, 2018, 07:21:28 AM
Ton,
That is amazing work!
Will you use a motor with a reduction gear, or another method?
Impressive!
Regards,
Jonathan
That is amazing work!
Will you use a motor with a reduction gear, or another method?
Impressive!
Regards,
Jonathan
Title: Re: Snowplow Project
Post by: jbrock27 on January 05, 2018, 07:22:40 AM
Post by: jbrock27 on January 05, 2018, 07:22:40 AM
This is very cool!
As always, excellent work JV!
As always, excellent work JV!
Title: Re: Snowplow Project
Post by: dutchbuilder on January 05, 2018, 08:06:22 AM
Post by: dutchbuilder on January 05, 2018, 08:06:22 AM
Quote from: jonathan on January 05, 2018, 07:21:28 AM
Ton,
That is amazing work!
Will you use a motor with a reduction gear, or another method?
Impressive!
Regards,
Jonathan
I've been lazy and used a straight motor from an old cdrom player.
The rotation is acceptable at 3V.
I'm thinking of using a 3V regulator behind a Blackstone Tsunami dcc sounddecoder for motor control.
I tried to use the Tsunami in a 0n30 locomotive but it isn't strong enough.
For this application it should be good enough.
Sound decoder---bridge rectifier---3V regulator.
Ton
Title: Re: Snowplow Project
Post by: dutchbuilder on January 06, 2018, 03:59:15 PM
Post by: dutchbuilder on January 06, 2018, 03:59:15 PM
Have a look in my topic about the rotary plow from message #23.
I added some pictures with the painted plow.
Ton
I added some pictures with the painted plow.
Ton
Title: Re: Snowplow Project
Post by: Jhanecker2 on January 06, 2018, 05:17:32 PM
Post by: Jhanecker2 on January 06, 2018, 05:17:32 PM
To Dutchbuilder : Nice work I did see the painted pictures further down in your #23 reply John2
To Jonathon : I remember those old shows as well some were pretty entertaining at the time . Some of the shows from the Fifties & Sixties had amazingly stilted dialog , but that comes from growing older I guess . Though the films from the Thirties & Forties were much better in that respect , must have been aimed for an old audience . John,
To Jonathon : I remember those old shows as well some were pretty entertaining at the time . Some of the shows from the Fifties & Sixties had amazingly stilted dialog , but that comes from growing older I guess . Though the films from the Thirties & Forties were much better in that respect , must have been aimed for an old audience . John,
Title: Re: Snowplow Project
Post by: Jhanecker2 on January 06, 2018, 05:29:15 PM
Post by: Jhanecker2 on January 06, 2018, 05:29:15 PM
To Trainman 203 : Don't feel bad about drivers in your area not knowing how to deal with snow . I live near Chicago where it snows significantly & often most years , we have the same problem with drivers . People think that AWD will save their butts from doing really dumb stuff . Physics does Not change for anybody , you have to be aware of the environment and other drivers . Your insurance company will explain the expensive results of inattention for reality.
John2.
John2.
Title: Re: Snowplow Project
Post by: ebtnut on January 18, 2018, 10:45:00 PM
Post by: ebtnut on January 18, 2018, 10:45:00 PM
Jonathon: I know it's the wrong category, but bear with me - Re: the USRA Mike, I believe you said there was room in the front of the boiler for more weight if you pull off the smokebox front. Is there anything I need to be careful about in doing that, like wires to the headlight? I ran the loco on the McKeesport club layout over the holidays and was disappointed at its pulling power on the branch that has DCC. The grade is about 2.5 - 3% and it would only take 5 cars up the hill. The club over-weights their rolling stock at bit, IMO, but even so, I'd like to get some more cars behind her.
Title: Re: Snowplow Project
Post by: jonathan on January 19, 2018, 07:05:31 AM
Post by: jonathan on January 19, 2018, 07:05:31 AM
No worries, ebt.
I did not remove the smokebox front. I lifted the whole shell, which was pretty easy as I recall. I used two 1/2-ounce fishing sinkers. The sinkers fit easily into the smokebox area. There are headlight wires to be mindful of, but there's enough slack in the wire to work with. I also shaped some lead and filled the domes, too. Finally put a small amount of weight under the cab roof. This greatly improved the pulling power of the Mike. Also shifted the balance. The loco is a bit back-heavy when delivered as new.
The USRA Lights are just too light... ;D Once the weight is added, they become really good runners and pullers.
Regards,
Jonathan
Title: Re: Snowplow Project
Post by: ebtnut on January 19, 2018, 09:11:47 AM
Post by: ebtnut on January 19, 2018, 09:11:47 AM
Jonathon: OK, that sounds great. Thanks for the quick turnaround.