Thanks Trainman for your really detailed response. I thought that i had read in the MR review that the deocder was SoundTraxx but I still can't find it. (old age) However, the MR video makes if a selling point right from the Getgo. The one remaining question in my mind is whether Current Keeper can be added to the Sound Value and I've sent an email to Soundtraxx with this question. I se in their comments on factory installed Soundtraxx that as you've pointed out in detail on the Bachmann, its up to the manufacturer to decide what features they want.
- Welcome to Bachmann Online Forum.
News:
Please read the Forum Code of Conduct >>Click Here <<
This section allows you to view all posts made by this member. Note that you can only see posts made in areas you currently have access to.
Pages1
#2
HO / Re: 2-8-2 - Reviews?
January 23, 2016, 08:22:48 AM
I'm trying to decide whether to buy the Light Mikado 2-8-2 with Sound Value or without and install my own sound decoder. Its certainly cheaper and easier to go with Sound Value. I have installed a sound decoder in the Bachmann 2-6-0 Prairie so I'm not concerned about my abilities.
I'm trying to asses how good the Sound value version is. The MR Feb issue review was pretty vague. The main thing that stands out is the maximum speed is pretty low, but with a small layout this isn't a real issue.
Normally MR tells the manufacturer of the sound decoder and not only did it not but there is no picture of the tender with shell off to see what it looks like. Bachmann has a tender exploded view in its on-line reference but the decoder looks nothing like the brand name ones. It does show a really nice sized speaker mounted in the floor which would be plus.
If the soundvalue decoder its a Soundtraxx and maybe other known manufacturers, then I can probably add a current keeper or equivalent. I found this helped on my Digitrax 8 bit sound encoder installed in the Prairie. The messiest part was running wires from the locomotive to the tender where the encoder is installed. At first the wires probably caused my tender to derail. I only held the decoder down with tape and it was a bit of a tight fit because there is a screw post all the way up the middle from the tender chassis. I was able to move the decoder and get a less generous loop in the wires. I also had to cut down some parts of the locomotive shell at the back and the tender at the front to get the wires through.
The upshot of this is that buying the soundvalue version already deals with electrical connections between the loco and tender Does anyone know if the non-DCC version has the same connector as the Sound value and then my work is only in the tender itself.
I suspect that there is no current keeper in sound value. If not does anyone know if its possible to add one from one of the manufacturers that make them?
If I go with my own, I'll probably select the econami from Soundtraxx.
Appreciate any pictures or thoughts
#3
HO / Re: A photo interlude
May 15, 2015, 09:26:13 PM
Both the models and the photography look great. thanks for sharing.
Tim
Tim
#4
HO / Re: NEW HO 2-6-2 disassembly?
May 15, 2015, 09:24:28 PM
Ok Len, I realized that when you said to click below the italics I that you meant what I now see is a picture icon and it worked in my preview. the brackets you mention are there as pointed out in the instructions are already there with the cntrl V just placing the picture web address in the middle. I'm going to add a couple of other photos as well
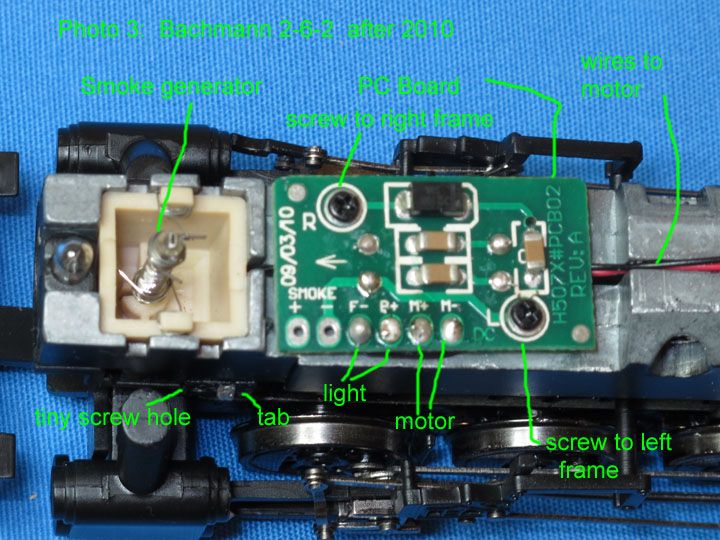

I think that I am going to leave the PC board in place but unsolder the motor wires and lead them into a connector going to a Digitrax series 6 sound decoder in tender. I can attach a wire to the each of the screws to get the track power which will also go to connector for tender. I'll leave the light and smoke alone right now to get track power and later decide to connect the light to the light function of the decoder. I'll remove the light wires from the PC board. I'll have to make sure the decoder output for the light matches the voltage level of the light and probably need a resistor. Once I do that, I can just remove the PC board entirely and just attach wires with its screws to the two sides of the split frame, unless I decide to keep smoke.
Sorry that photo 4 is not in better focus but my camera which allowed me to do manual focus in the past is not responding to it now.
There is a picture on one of the early posts showing an on/off switch for smoke. None exists on this version
I hope this will be helpful to anyone wanting to add decoder to the newer Bachmann 2-6-2. I'll post more when I get the decoder installation done or run into problems.
Tim
#5
HO / Re: NEW HO 2-6-2 disassembly?
May 15, 2015, 05:00:53 PM
Thanks to Rich for post on relay circuit for smoke control by DCC. It confirms my suspicion that current is more than 100ma. I tried attaching photos but the response is folder is full. I'm trying to follow the Photobucket instructions web address given by Len.http://i300.photobucket.com/albums/nn5/BarnumTim/Model%20railroad/IMG_4942%20-%20showing%20screw%20holes%20and%20tabs%20-%20web%20size_zpsnsxgglev.jpg
http://i300.photobucket.com/albums/nn5/BarnumTim/IMG_4948%20top%20view%20showing%20pc%20board%20mounted%20photo%202%20small%20for%20web_zps9igwscqb.jpg
I must be missing something because all I get is the above when I hit preview. However if someone copies the web address between the 's then my picture will show up.
Hope someone can tell me what I'm doing wrong.
In the meantime I unscrewed the circuit board and can see the bottom side. there are two wire wound resistors which without removing them measure 14 ohms. The heater for the smoke is 99ohms
#6
HO / Re: NEW HO 2-6-2 disassembly?
May 15, 2015, 07:37:48 AM
Hi Jeff,
If I was wanted to have no wires going from the engine to the tender, I'd follow your suggestion. However, I decided to go to DCC because of sound and I already expected to have wires going to the tender. I have a Bachmann Spectrum Consolidation DCC ready I bought many years ago with a removable 8 pin plug which already has some wires.
Its interesting that the miniature connectors are so expensive. I ended buying one from crusader rail services at the last Timonium show which is a TCS JST7 in line. (7 pins) It was cheaper than connectors with fewer pins. I'm not sure where I'm going to put the connector. right now probably sitting in the cab, but I love other ideas.
I also may want to get some smoke some day. My old Lionel engine had it. I know its kind of stupid and I'll probably try it once and never fill it again. I certainly don't want to run the engine at high speed to get smoke on my little 4 x 6 layout.
Tim
#7
HO / Re: NEW HO 2-6-2 disassembly?
May 14, 2015, 05:27:10 PM
Hi Dan,
thanks for the thoughts but I can definitely say this 2-6-2 is different. There is no screw from the top. If there had been, I would not have been able to remove the shell or I'd have some broken plastic. I see that I can attach files which I assume includes low res pictures, so I'll take some tomorrow and post them.
My understanding is that Bachmann had redesigned the 2-6-2 in recent times with a can motor which this definitely has. I bought mine from Star Hobby in Annapolis, MD and they seem to have a large stock but only Southern and Pennsylvania. Being a northerner, I opted for the later especially since I like black on my steam locomotives rather than green. I have no way of knowing when the change was made or when Star Hobby receive them. But its a terrific runner and I'm excited about putting DCC on it. It has no problem with my 18" curves and #4 code 83 Atlas remote snap switches whereas a most of my others do.
Yes I know I should have bought better switches but I was cheap. I've ordered a Central Valley switch kit no 5 and hope with it being curvable I can replace my no4 snap. In my early adult life (a long time ago) I actually built code 70 switches from scratch but they were ones with only a single pivot and the frog closed to the opposite side from the switch. I don't know if a prototype has ever existed but it seems to me having a closing frog and all the moving rail a solid piece is not only easier to make but less likely to cause trouble.
Tim
#8
HO / Re: NEW HO 2-6-2 disassembly?
May 14, 2015, 05:07:25 PM
Hi Len,
Just saw your reply after I got the boiler off. Is there a way to add photos to a reply? I think folks seeing what the drive/motor mechanism looks like without the locomotive shell would really help in figuring how to attack the removal. After several frustrating tries of getting one side loose and then it snapping back as I got the other side loose, I think what worked is that I wiggled front and back a lot as far apart as possible and then tried to hold the open side down while using screwdriver on the closed side. Toothpick sounds like good idea to hold the first side slipped out of the tab.
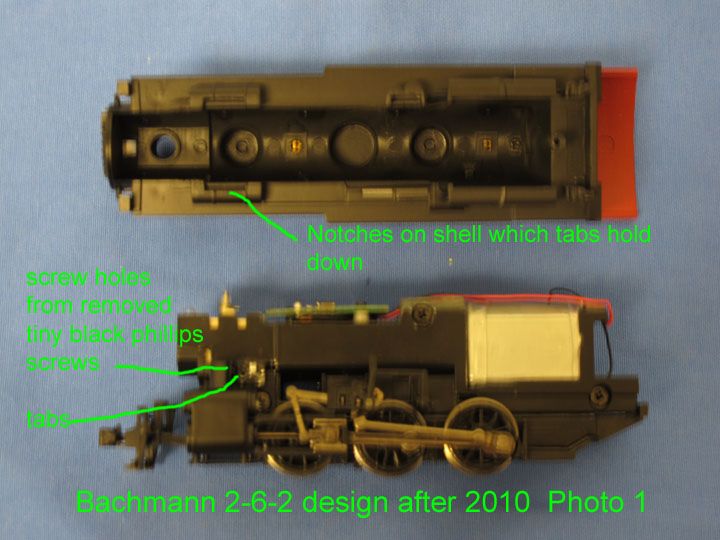
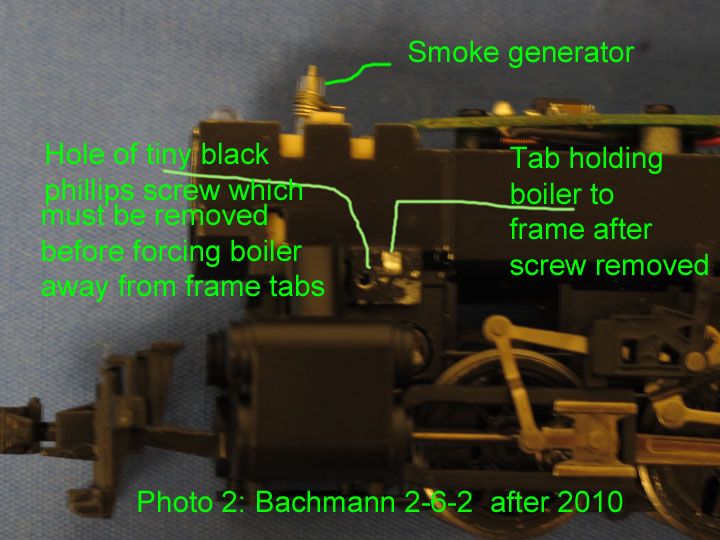
From the sides Jonathan pointed out that there are tabs to be seen just behind the little screws (not shown on drawing). I assumed they were little spring tabs and if I pushed them from the side they would release. But they are sort of wedges cast into the frame that allow the boiler to slip easily on and drive the rest of crazy trying to remove. I finally realized that I could tell the difference between the plastic of the boiler and the metal of the frame as I had scraped a bit of paint off the metal while poking around with the screwdriver.
I had already loosed the back and raised it as much as I could and worked to keep it up.
Anyway what really blew my mind is that there is a small circuit board on top of the frame.just behind the smoke generator. There is no hint of a circuit board in the exploded view drawing that Bachmann included with the engine. The date on the circuit board is09/03/10 and next to the drawing number is Rev A for I'm sure the first revision. What may be great about this is that the board shows 4 soldered spots in a row labeled F-, B+, M- and M+. Its a two sided board so I'll have to remove the two screws holding it down and look at the underside to trace the connections . It appears that the screws attaching it to frame have one to the right and one to the left. Plus there are red and black wires from the motor to this board (on the underside but I bet they are M- and M+ ) Maybe this is some form of DCC ready which Bachmann decided to do without informing anyone.
I'm not enough of an electrical engineer to figure out what the 3 brown and one black components are. There isn't a connector to plug anything in to but I'll have to see if soldering to the 4 labeled posts is feasible.
I dont know anything about smoke units. I saw a youtube where he fellow said the voltage had to be up (I'm sure the get enough voltage) for it to smoke. I wonder what the current draw is and whether the smoke can be controlled by one of the spare DCC connections .
I'll report on the circuit board when I unscrew it but just wanted to thank Jonathan and Len for their help in getting the shell off. Hopefully my details may help the next person.
Tim
Just saw your reply after I got the boiler off. Is there a way to add photos to a reply? I think folks seeing what the drive/motor mechanism looks like without the locomotive shell would really help in figuring how to attack the removal. After several frustrating tries of getting one side loose and then it snapping back as I got the other side loose, I think what worked is that I wiggled front and back a lot as far apart as possible and then tried to hold the open side down while using screwdriver on the closed side. Toothpick sounds like good idea to hold the first side slipped out of the tab.
From the sides Jonathan pointed out that there are tabs to be seen just behind the little screws (not shown on drawing). I assumed they were little spring tabs and if I pushed them from the side they would release. But they are sort of wedges cast into the frame that allow the boiler to slip easily on and drive the rest of crazy trying to remove. I finally realized that I could tell the difference between the plastic of the boiler and the metal of the frame as I had scraped a bit of paint off the metal while poking around with the screwdriver.
I had already loosed the back and raised it as much as I could and worked to keep it up.
Anyway what really blew my mind is that there is a small circuit board on top of the frame.just behind the smoke generator. There is no hint of a circuit board in the exploded view drawing that Bachmann included with the engine. The date on the circuit board is09/03/10 and next to the drawing number is Rev A for I'm sure the first revision. What may be great about this is that the board shows 4 soldered spots in a row labeled F-, B+, M- and M+. Its a two sided board so I'll have to remove the two screws holding it down and look at the underside to trace the connections . It appears that the screws attaching it to frame have one to the right and one to the left. Plus there are red and black wires from the motor to this board (on the underside but I bet they are M- and M+ ) Maybe this is some form of DCC ready which Bachmann decided to do without informing anyone.
I'm not enough of an electrical engineer to figure out what the 3 brown and one black components are. There isn't a connector to plug anything in to but I'll have to see if soldering to the 4 labeled posts is feasible.
I dont know anything about smoke units. I saw a youtube where he fellow said the voltage had to be up (I'm sure the get enough voltage) for it to smoke. I wonder what the current draw is and whether the smoke can be controlled by one of the spare DCC connections .
I'll report on the circuit board when I unscrew it but just wanted to thank Jonathan and Len for their help in getting the shell off. Hopefully my details may help the next person.
Tim
#9
HO / Re: NEW HO 2-6-2 disassembly?
May 14, 2015, 03:41:59 PM
Thanks Jonathan. Looked at all of your posts and your photo bucket. Great work although I didn't see anything on exaactly how to remove the boiler that augmented your post to this discussion
I found the metal tabs and started by pushing on them from the side without any progress. When I can get light enough to see the break between the metal of the drive unit and the boiler with the engine upside down. I've been able to insert a screwdriver between the crack and get a little movement but haven't figure out how to spread both sides of the boiler away from the mechanism at the same time. I'll keep working on it and post any thing I find that helps
Although have picked this engine for my first DCC decoder installation and haven't done any yet, I don't understand why I need to pickup power from the tender if I can attach a wire to each side of the frame. I saw in another MRR forum that someone took out the phosphor bronze(?) tabs bringing power from the wheels to the frame and then ran wires back. I am assuming I can use Kapton tape to insulate the motor from the frame but since I haven't got it apart yet I don't know if I'll run into metal screws which hold the motor and can't be replaced by plastic ones.
#10
HO / Re: NEW HO 2-6-2 disassembly?
May 14, 2015, 01:27:14 PM
The original question asked how to remove the boiler from the Bachmann 2-6-2 to install a sound decoder. Perhaps the person already bought one as I did. Also I've heard that the manufacturer sound decoder may not be as good or versatile as those available for after market installation.
I recently bought mine and its my best running loco. I have the exploded view drawing the same as on the website. But it only shows the boiler/cab assemble or shell sitting alone at the top. There are no screws shown to connect the boiler. I have removed the pilot and trailing wheels. I removed the screw at the rear of the engine attaching the wheels cover plate to the engine. I also removed two tiny phillips screws on either side of the boiler near the front. They aren't even shown in the Bachmann exploded view diagram. I tried one of the large screw screws at the front that is shown even though it appears its use is to hold the 2 halves of the frame together, but it had no effect.
Once I removed the rear screw, I found I could pull down the rear of the drive mechanism from the cab/boiler enough to perhaps pull it back over a metal piece at the rear. However it only moves a little bit and wiggle as hard as I could, I can't get anything else to move.
Any body know how to proceed. Is there anyone to contact at Bachmann. Whats the point of providing an exploded view drawing and parts list if you can't even get the boiler of the drive mechanism.
Pages1