News:

Please read the Forum Code of Conduct   >>Click Here <<

Main Menu
Menu

Show posts

This section allows you to view all posts made by this member. Note that you can only see posts made in areas you currently have access to.

Show posts Menu

Topics - jonathan

#21
HO / Bachmann Sound Value E7
April 10, 2017, 07:17:59 PM
The sound value E7 has turned out to be a really nice locomotive.  What follows are my additions to the detailing, to give it a little wow factor... I hope.

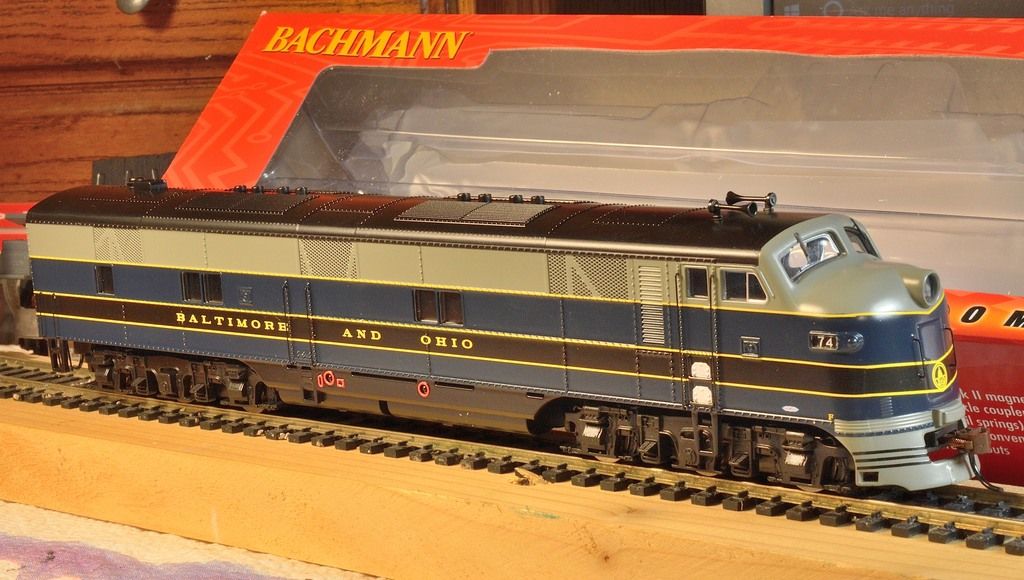
Here the E7 as purchased:


I programmed a new address for it and increased the volume of the horn just a little.

The shell comes off with four screws between the trucks and fuel tanks.


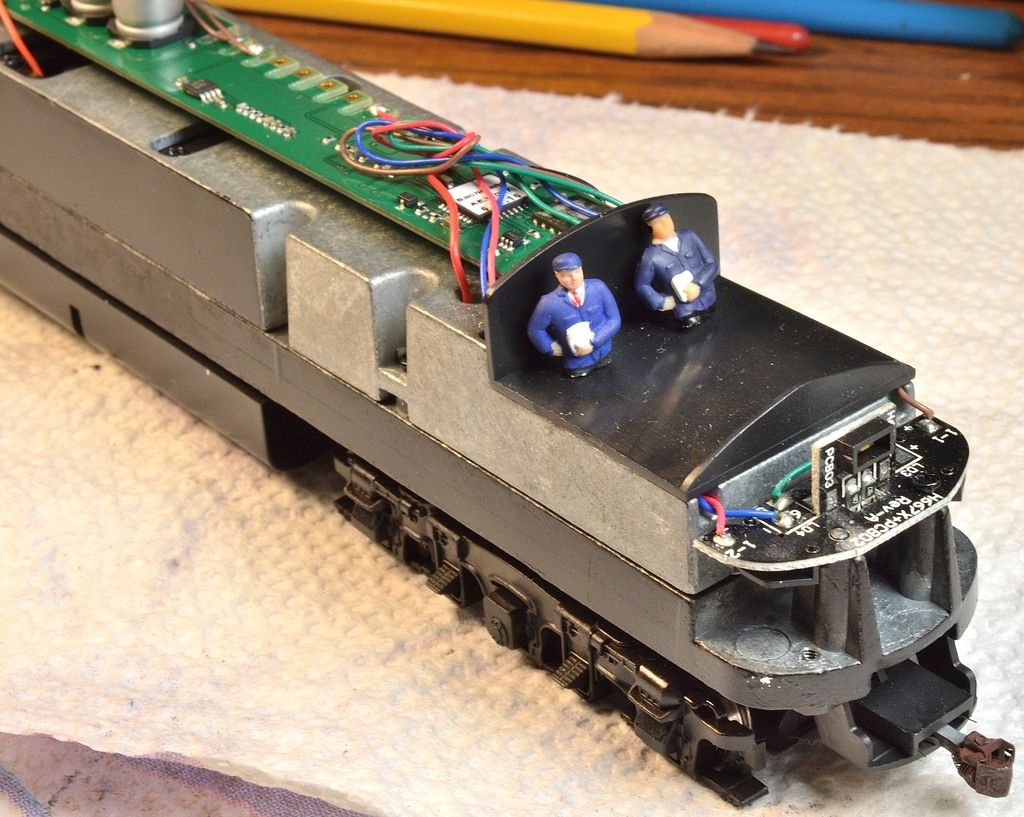
There is no crew, so I cut down a couple of conductors (got too many of them anyway).  Honestly, it's hard to see inside.  One could probably use a grandma with a sack of groceries and get away with it.

Here's the back with speaker enclosure:


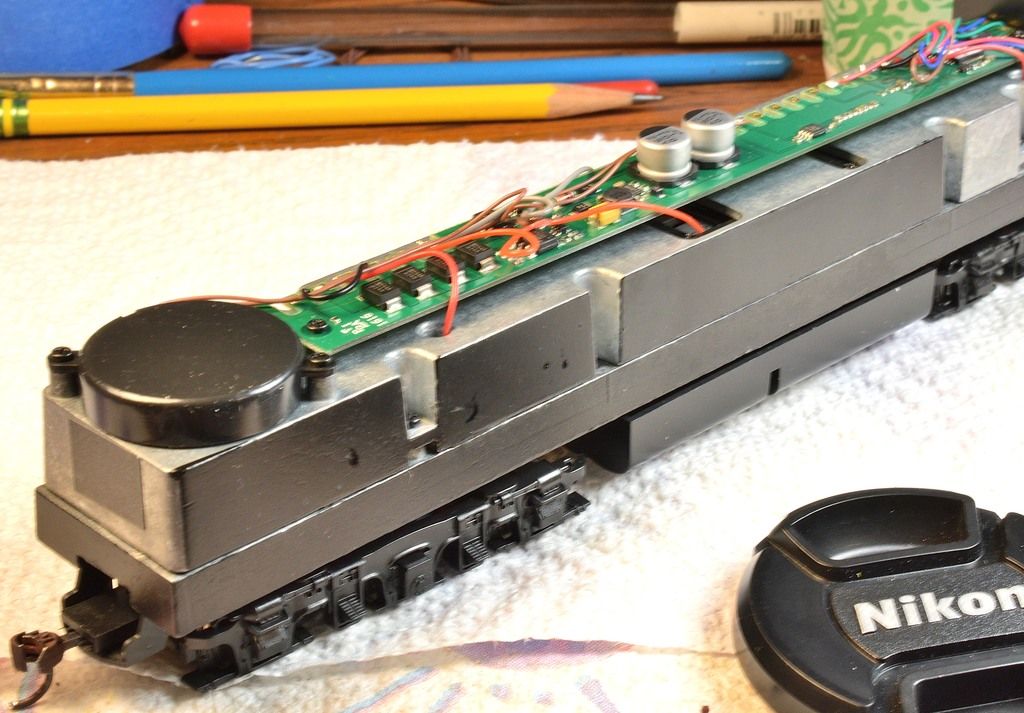
You can see the frame is nearly a solid chunk of metal. It's quite heavy.

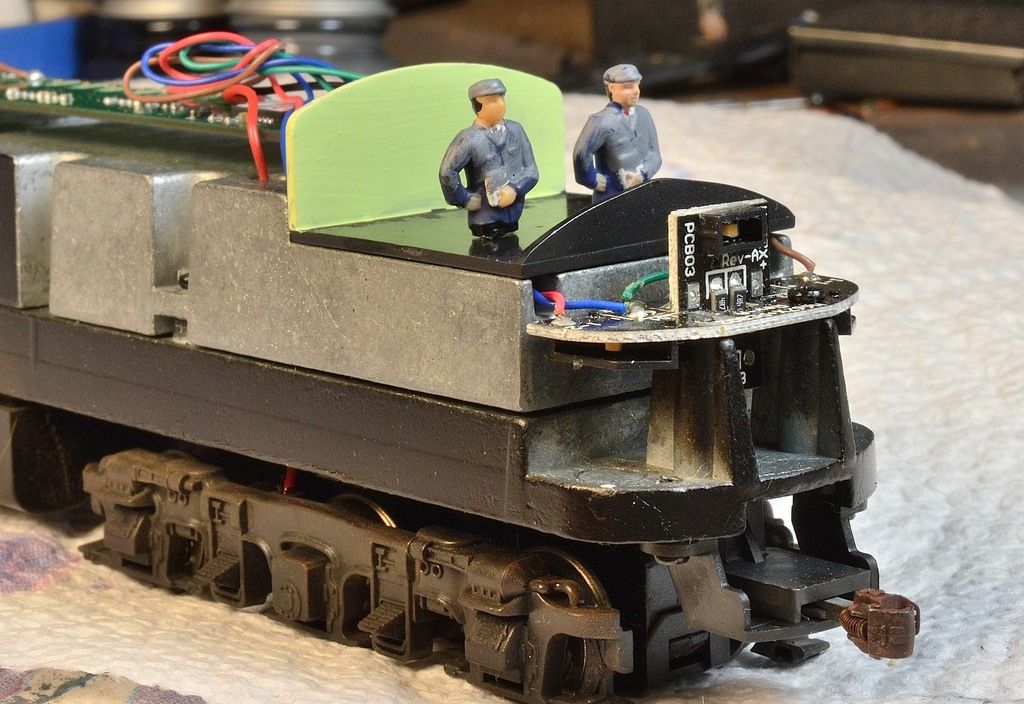
I've installed kadees; a scale head in front and regular size in back.  

The crew is mounted with pins drilled through the torso's.  I also painted the back wall a minty green which seems about right.

The couplers, trucks and fuel tanks are weathered a bit.  

In this photo you can also see one of the SMDs that light the number boards:


That's about all that's needed for the frame.

Next comes work on the shell.  Will post some more pix as I make progress.

Regards,

Jonathan
#22
HO / Bachmann F7A and F7B DCC Ready
March 24, 2017, 08:12:11 PM
Once in a great while, I stray from my beloved steamers to work on a diesel project.

I've got the DCC ready F7A and F7B, which are quite economical.  Both tested well, but did sound a little dry.  Unusual, since Bachmann locos are usually lubed to the gills:


The shells come off with four screws underneath, on either side of the fuel tank.  If one is careful, it's possible to remove the F7A shell without removing the front coupler.

I removed the dummy plug on the B unit and plugged in a decoder.  Then took a photo so some new to DCC can see what we keep talking about.  Notice the guts of both locomotives are identical, save for the headlight and crew figures:


A great plus is the pre-formed spot for a speaker if one wishes to add sound.

I've also replaced all the couplers with Kadees.  This required a bit of filing on the couplers, as well as filing out the coupler box to accept the spring.  Requires about a minute of filing for each coupler, so not a big job:


I put on a scale head coupler on the the front of the A unit and cut off the trip pin.  This is for looks and to make room for the details which come later.

That's all I have so far.  More to follow...

Regards,

Jonathan
#23
HO / Tinkering with the Baby Trainmaster
December 20, 2016, 04:53:40 AM
The recent thread about the H16-44, made me dig out my two diesels and inspired me to start this project.

There are two holes on the top of these locos that are just itching to get some flashing lights:


To get ready, I had to renumber one of these locos (I had two #928's), give the shell a shot of dullcote (gonna weather it) and set it aside:


The real project begins with the light board. I used a fine sharpie to mark the board, so I know where the front, right, and left (+-) are located. I also drilled four holes to mount the resistors I'll need for the flashing LEDs:


I used 560K ohm resistors.  Hope it's enough:


Next, I soldered some leads to the pick up tabs... red is positive - yellow is negative:


Finally, added the wires to the back:


That's as far as I've gotten.  The 3mm red flashing LEDs should arrive today or tomorrow.  To be continued...

Regards,

Jonathan

Addendum:  OOPS! I ran the wires through the screw holes.  Not to worry I fixed it.  I'll go wipe the egg off my face now.   ;D
#24
HO / Building a New Layout
August 13, 2016, 12:49:59 PM
After 10 years of working on a layout in my garage, I finally got tired of the summer heat and cold of winter.

Thus, I cleared a space in the basement... essentially rearranged the furniture and got rid of a ton of junk. You know how basements can get...

Here are a couple of shots of the new benchwork under construction.

I used 1X3's... which sounds small at first, but things are starting to get rigid as I add the angle pieces:


I'm building two 4X8 platforms.  They will be tied together to form an 'L' shaped 14X8 layout.  I've begun some track plans which call for a modified figure 8 (triple track), with two small yards for engine and car service. 


I'm very excited about the new LED shop lights.  I'm using those for lighting the layout as you can see (one in place already). They're pricey, but worth it I think.

The sub-roadbed will be L-girder construction with 1X3 supports and plywood for the sub-roadbed.  I hope L-girder is the right term.  It's been a while since I cared about layout construction.

Will recycle everything off my old layout for trackwork and scenery.

Regards,

Jonathan
#25
HO / USRA 2-8-2 Mikado Sound Value
July 04, 2016, 09:43:41 PM
Folks,

I have been saving my pennies, and searching for a Bachmann USRA Mikado for quite some time.  I finally pulled the trigger and my 2-8-2 should be arriving tomorrow, according to the package tracker.

Some of you are aware I tend to take a lot of pics, and share my projects as I work on them.  This is no exception.  I intend to make this loco look as close to the B&O Q-3 as I possible can.  This will take a while...

To start, I have gathered many needed parts to get this loco's details up to snuff:


A few more detail parts are in the mail.

My intention is to shave down the loco shell's molded on details and put brass, steel bronze parts on as a replacement.  Why?  Bachmann steamers tend to run very, very well in my experience.  They just need a little tweaking to make them match a prototype.  

Anyway, here's looking forward to a long thread.  Wish me luck.

Regards,

Jonathan
#26
General Discussion / Railfanning
May 01, 2016, 08:07:39 AM
On a recent camping trip, we hit a transportation museum at Fort Eustis, Newport News, VA.  I was pleasantly surprised to find some preserved trains under cover.  There was a Consolidation, 0-6-0 switcher, Army troop and medical transport passenger cars, various freight cars, a Jordan Spreader and a few cabooses.  Quite a find...

Anyway, I took a few pics to share with my fellow foamers. Took lots of photos, just sharing a few...

Regards,

Jonathan


Pay no attention to the guy in the black Price-is-Right T-shirt!


Switcher's Cab:


#27
HO / More Boxcar Projects
October 04, 2015, 06:14:27 AM
It's been a long dry spell of no train shows.  Plus, been busy with life, but I have managed to knock out several new boxcars.  As usual, these are craftsman kits.  I try to upgrade them as I learn new techniques along the way.

Since Scalecoat seems to be the only model railroad paint Company left, I have gotten used to their paint products.  Actually I rather like their boxcar red better than the old Floquil boxcar red. For those who still like to paint their own stuff, Minuteman Models bought up Scalecoat and now carries their paint products. Thankfully, there is still a source for train paint.  :)

Anyway, here are the cars:


These are "flat" kits--meaning the main parts are a series of flat panels that are assembled to make the box shape of the boxcar.  Getting it all to fit smoothly, and look square, is a bit of a challenge.  Seams are sometimes visible, too:


I'm torn between the types of trucks these days, so I did a little of both.

I have been playing with chain lately (40 links per inch). It's pretty tiny stuff. For the brake cylinder and clevis, I drill a #80 hole and insert some .008" brass wire to attach the chain:


For perspective, the fingernail clipper is the one used for babies. Dads, you'll know what I mean:


Looks like this before it's painted:


For future rolling stock, I'm going to replace the plastic chain on the bell cranks:


I can drill a #80 hole in the bell crank and make a hook to secure the chain:


Even at 40 links per inch, the chain looks a bit large, but I can live with it:


Hope this is useful to anyone to who likes playing with super tiny parts.

Regards,

Jonathan

Addendum:  If one clicks on the photograph, one will be linked to the photo in photobucket. Where it is possible to expand and getter a better look at the details... Just sayin' jv
#28
HO / Loco Project
July 13, 2015, 08:01:46 PM
Yes, another project to share.  Gotta keep my hands busy... still waiting for the USRA Mikados to hit the streets.

Anyway, this is a brass B&O Q-4b 2-8-2.  Rather that start from the beginning, here are some progress shots:

Locomotive mechanism:

Installed a new motor, the old one was too noisy and vibratey. Also modified a kadee coupler to fit in the front.

Rear angle showing the wiring.  Needed leads for the headlight and a reverse light plug:


Another angle:


All the truck parts need to be painted separately:


The tender:


Drilled a hole for the reverse light:


The loco shell:


Finally, all the little wheels were brush painted:


Will share more as I make progress.

Regards,

Jonathan
#29
HO / A photo interlude
May 15, 2015, 08:11:44 PM
Had an entire 90 minutes to myself this evening (a rare occurrence).  Spent a little time playing with my camera. These are a few photos that turned out OK I think.  Featured are Bachmann's USRA 0-6-0, 2-8-0 Consolidation, and a Heavy Mountain--all modified, but still recognizable.  Also a bobber caboose turns up that is a B'mann as well.  There is a brass loco (0-10-0) that just had to get in the way of the Connie a couple of times. Enjoy... or not.  :)

Regards,

Jonathan


Addendum
One can click on the photo and link to a larger photo.  However, on photobucket, getting to the big picture is not always obvious (not user friendly).

I mention this because I'm now using a high resolution DSLR.  The pix really do look much better blown up to their intended size.  just sayin'...  :)
#30
HO / Upgrading a Bridge.
May 09, 2015, 08:26:27 PM
OK folks, my scenery juices are flowing after all the posts about bridges.  So I've started a new thread as I begin the process of upgrading a bridge.  This is the one I've made reference to:


It's a Model Power Bridge over EZ track.  Here's the bridge removed--you can see how I cut the bridge deck and rolled it over the EZ track:


Here's the EZ track without the bridge--it still supports trains, so it will hold for now:


Eventually I will cut the EZ track when I'm ready to install the new track and bridge. So...

First, I need to construct the track that will sit on the bridge deck.  I like to set the railroad ties much closer together than model track.  Thus, it will look much closer to some prototypes I have seen.  I use code 100 track on this loop so I can run old equipment--Varney, Rivarossi and the like.  Anyway, here are a few shots of my progress.


As a description, I need mostly straight track, plus a couple inches of 22" radius track to cross the gap over the tracks below.  I take some scrap track and slide off the ties.  Cut all the little plastic tabs that separate the ties.  I slide all the ties together until the gap is a toothpick width.  Then glue the ties in place.  The track pieces are also soldered together, as you can see.  I jam a toothpick in the nail holes that are not needed, glue and trim them.  A little weathering will cover everything up.

I won't be able to construct guard rails until the new track is in place.

That's it for now.  I'm trying to a select a proper wooden truss bridge to install. When I get a good bridge.  I'll update this thread.  Hopefully, this will help some others who are considering some bridge work.

Regards,

Jonathan
#31
HO / Sharing Projects
April 26, 2015, 06:47:34 AM
Just for fun,  here are several resin kit boxcars I've been building for about two weeks now.  I have to keep my hands busy while I'm waiting to dig into the USRA Mikado's.

The underframes are done and the shells are primed and ready for paint.

Reading wood DS box car, lasted until 1956:


Side shot with underframe:


Florida East Coast Insulated, "modernized" box car.  This one lasted until 1965.  Note the sinkers and leftover junk I use for weighting the cars:

Also, this car had a really strange brake stand set up (Wine?)  There were no good photos, and the instructions were less than helpful. Hopefully I constructed it right.  The handle might need to be pointing down instead of up.

Same car side shot with underframe:


New York Central box car--another wood car that a few survived to the mid '50's:


NYC box car side shot and underframe:


A Savanah & Atlanta box car.  This car was sold to the F.E.C. when the S&A was going under.  Which is why this car looks so much like the F.E.C. car above.


I recently scored a couple cans of Scalecoat II boxcar Red, which is the other reason I started this project.  Oh... and I really don't feel like working on scenery just now.

I painted the boxcar red this morning.  As soon as the camera recharges I'll post a couple pics of that.

Regards,

Jonathan
#32
HO / Snowed in Again
March 05, 2015, 09:50:33 AM
Entertaining myself until it's time to shovel snow.

Just finished one of my winter projects:


Soon it should be warm enough to clean up the garage layout and get things running.

Some say I'm a little obsessed when it comes to B&O box cars.  Here's half of said cars, all built from kits.  The M-27f is scratch-bash:


30 Cars just didn't make a good photo.  ;D

Okay, now time to get out and shovel.

Regards,

Jonathan
#33
HO / HO Photography
December 29, 2014, 05:31:41 AM
I have been interested in learning the art of modeling photography.  After all, someday I will not have the eyesight or dexterity to continue to build models. But shooting photos is an ability we can continue as we get older.

I finally got myself an entry-level DSLR and have started the basics.

This is a craftsman kit boxcar I am close to completing and used it as a test subject.

First is a standard point-and-shoot-type photo:


Then a standard flash:


Then an enhanced, more subtle kind of flash that doesn't overwhelm:


What I'm REALLY after is depth of field or aperture.  The f-stop on the camera is set to f36 on this shot, in order to be able to bring the background into focus:


Didn't work out so great.

Here's another attempt up close:


With the enhanced flash:


Now the big f-stop to get the depth:


For the last shot, I set a timer delay, hit the shutter and walked away from the camera while it took the picture.  Anyway, just sharing an interest I just started.

Regards,

Jonathan
#34
HO / Dullcote Over Windows
November 06, 2014, 05:00:53 AM
A little background to go with my question:

This is a staging yard.  Doesn't get used much. I normally have a lot of rolling stock on the 8 tracks.  The longest ones holding passenger cars. Which explains the Union Station up top:


Unfortunately, I can't hide the yard in another room or some other clever means.  I am forced to put scenery on it, which I have been doing, slowly, over the past several years.  AND, I keep changing my mind and fiddling with the scenery elements.

I have a turnaround track I wish to hide behind the scenery.  I am putting in some half-buildings as part of the backdrop as you can see in these photos:


What I would like to do is put lighting inside the background buildings, at the same time, hiding the turnaround track.  My initial thought is to spray dullcote over the buildings, including the window glazing.  My guess is the glazing will just turn foggy, but still let some light through.  An added bonus being no worries about inside details.

Has anybody ever done this?

Regards,

Jonathan
#35
General Discussion / Antique Norfolk Southern in Cleveland
September 22, 2014, 09:47:44 AM
I made a trip to Cleveland this weekend to participate in an ALS Walk fundraiser at Progressive field.  First time I made it through Cleveland in daylight hours.

On the drive in, we passed a railroad yard with a long string of old passenger cars decorated for Norfolk Southern.  They appeared to be completely rebuilt, very shiny, in a shade of brown with black rooves.  Seemed to be in a WWII era paint scheme, but I could be wrong about that.  Unfortunately, I was driving, so could not whip out my camera for a photo op.  Anyone know why such a site would occur in Cleveland?  Really was a pleasant, and completely unexpected surprise.

Anyone who has driven in and around the Cleveland area can attest to the spaghetti bowl of tracks around the river and downtown area.  If only I had the opportunity to stop and shoot some photos.  I certainly will take advantage the next time I happen through there.  One could literally get ten different bridge types in one photo if one wanted to. I counted at least three different types of lift bridges alone.  Amazing stuff.

Regards,

Jonathan
#36
HO / Yet another Locomotive Project
September 07, 2014, 08:53:04 AM
I figure it's going to be another six to eight months before I get a chance to work on the upcoming Sound Value USRA Mikado.  So to keep my hands busy, I'm working on another brassie.  Just thought I'd share a bit.

This is an OMI S-1a 2-10-2 or Big Six:


I held out for the more expensive (ouch) version of this model because of the detail and blind driver.  Radius is a concern:  24" is the best I can do with the available space.  Even with the blind driver this loco does not like 24" radius curves.  So....

I took a file to the frame around the first and fifth driver wells, and cut a notch to give the drivers more side-to-side motion:


This actually worked... I think.  ;D  The locomotive is not completed, yet.  But I have pushed the frame/wheels around the layout to make sure it can make the curves.

For such a pricey model, I was surprised at all the bad solder joints. As an example, several parts of the tender frame came off in my hands while I disassembled.  Perhaps you can see the fresh solder where I repaired this part in the upper left corner of the photo:


Haven't gotten to the boiler, yet. I know there are numerous joints needing attention.

Anyway; progress to date...

Primer:


Tender frame:


Drilled for headlight and reverse light:


Driver frame:


In this photo, can you see how the axle blocks, on driver's one and five, are moved in just a bit?


Cleaned lubed and rewired the motor assembly.  While not used, it is 25 years old after all:


This will be the coal load one day:


Just this morning, I added decals to the tender.  Still need to be treated with microsol and so on.  But you get the idea:


Will post more as I make progress.

Regards,

Joanthan


#37
HO / Night Lights
July 25, 2014, 03:22:51 PM
One goal, I've been working on slowly, is to have enough scale lighting on my layout so I can turn off the room lights and watch the layout run... oh, and still be able to see the action.

This is turning out to be a loooong-term project, working on little bits and pieces at a time. I know I have over 100 lamps and LEDs around the layout now, but it looks like it will take hundreds more.

Anyway, this is the head of one of my yards.  Using LEDs, resistors and scratchbuilt streetlamps, I'm starting to see progress in this area.

First is a shot, using flash, so one can see the contents of the scene:


Now a series of shots, looking at the scene using only the layout lights:


I had a tough time getting the camera to focus under these dark conditions.  One day I will get permission to get a fancy DSLR from she who must be obeyed.  :)

The lamps consist of 0603 SMDs, magnet wire, 1K ohm resistor, 1/16" aluminum tubing, and brass lamp shades.  My homemade lampshades just weren't cutting it, so I broke down and got the premade shades.

Regards,

Jonathan
#38
General Discussion / Help with the Newsletter Link?
July 18, 2014, 01:05:59 PM
Folks,

I just received my email July 2014 newsletter.  I can see the newsletter, but I can't get the links to work... specifically, the link that takes you to the .pdf with all the new product announcements.

Since there are so many "guests" online at the moment--just thinking someone else had been able to open it, and can share with the group.  I see the "n" scale folks are getting a sounded Berk and a few other goodies.

Anyone?

Regards,

Jonathan
#39
HO / Paint Discovery Inspires a Project
July 04, 2014, 06:18:56 AM
At a recent club meeting, the president brought a large box of donated stuff that we all picked through, looking for treasure.  I grabbed up an unopened spray can of Floquil Boxcar Red... just knew I had to do something with it.  May be my last chance to use this color.

Sooo... I picked of a couple of F&C boxcar kits to work on.  It was high time I took on something other than B&O, to fill out my trains with other stock.

First up is a Reading cocoa bean car--a 36', 1910-built boxcar, converted to a covered hopper in 1937 I think. It must have smelled great all the time.  It carried cocoa beans, then transferred shells to soap factories (cocoa butter); finally it carried soap towards the end of its career. It may, or may not, have seen B&O rails, as Hershey re-sold, and shipped, cocoa beans to smaller chocolate producers around the country, who couldn't afford to buy huge bulk quantities of beans from overseas.

Photos aren't great, as I still haven't cracked the lighting code:


Next is another Reading Boxcar; an Automobile carrier.  I don't know anything about the Reading RR, except what the Monopoly Man has told me.  :) I just like the way this car looks. Actually, the Reading produced some very handsome locomotives as well.  Anyway:


All this from picking a can of paint from a junk box!

Regards,

Jonathan
#40
HO / Engine House Project
May 31, 2014, 07:27:33 PM
A couple of years ago I won a raffle at a train show which included some nice structure kits... one was a two-stall engine house.  I built the kit but it turned out too big for my yard.  Finally I got around to building a space for this engine house.

What follows are a series of photo showing the progress on the construction.  I used insulating foam to build a platform, some flat paneling to raise the fascia, and finally a combo of extra codes 83 and 100 track.  Needless to say I got pretty good at smoothly marrying the two codes together.  

The wiring is done and I've started the scenery.  Don't have any tortoise machines, yet, but we'll get there by-and-bye.

Will post the final pics when it's done:


There will be lighting, inside and out.

Regards,

Jonathan