Title: Sheldon's Layout
Post by: Grumpy468 on July 07, 2020, 11:38:04 AM
Post by: Grumpy468 on July 07, 2020, 11:38:04 AM
Good Morning everyone. I will introduce myself. I am Sheldon, I live on the prairies here in Canada. I grew up in a CNR train station in a small town, my dad was the station agent there from 1966 till 1975. We lived in the train station, and it was a pretty different upbringing to say the least. I am 57 now, and have been into my layout since Mar 2019. I am very good friends with Wounded bear, and Sid has been responsible for getting me into the hobby and has been my mentor. Sorry buddy have to blame someone.. LOL.
I have to say i love the hobby and i have a job that affords me plenty of time to work on my layout. I work from home so any free time i have is spent in the basement.
Regards Sheldon.
I have to say i love the hobby and i have a job that affords me plenty of time to work on my layout. I work from home so any free time i have is spent in the basement.
Regards Sheldon.
Title: Re: Sheldon's Layout
Post by: Grumpy468 on July 07, 2020, 11:50:45 AM
Post by: Grumpy468 on July 07, 2020, 11:50:45 AM
This is a 12 x 8 x 4 L shape layout.

Title: Re: Sheldon's Layout
Post by: Grumpy468 on July 07, 2020, 11:52:23 AM
Post by: Grumpy468 on July 07, 2020, 11:52:23 AM

Title: Re: Sheldon's Layout
Post by: Grumpy468 on July 07, 2020, 11:53:46 AM
Post by: Grumpy468 on July 07, 2020, 11:53:46 AM


Title: Re: Sheldon's Layout
Post by: Grumpy468 on July 07, 2020, 11:56:00 AM
Post by: Grumpy468 on July 07, 2020, 11:56:00 AM
The Cork went down nice and easy. Was tedious marking the track with pencil first.


Title: Re: Sheldon's Layout
Post by: Grumpy468 on July 07, 2020, 11:59:06 AM
Post by: Grumpy468 on July 07, 2020, 11:59:06 AM
Was a long busy weekend of ballasting, but well worth it in the end. I actually mixed a couple of colours to get some of the effects i wanted.


Title: Re: Sheldon's Layout
Post by: Grumpy468 on July 07, 2020, 12:05:21 PM
Post by: Grumpy468 on July 07, 2020, 12:05:21 PM


Title: Re: Sheldon's Layout
Post by: Grumpy468 on July 07, 2020, 12:35:12 PM
Post by: Grumpy468 on July 07, 2020, 12:35:12 PM


Title: Re: Sheldon's Layout
Post by: Grumpy468 on July 07, 2020, 12:40:41 PM
Post by: Grumpy468 on July 07, 2020, 12:40:41 PM


Title: Re: Sheldon's Layout
Post by: jonathan on July 07, 2020, 12:54:39 PM
Post by: jonathan on July 07, 2020, 12:54:39 PM
Welcome Sheldon!
Off to a great start, indeed! Great to see another layout on the rise. Appreciate the photos of your progress.
Looking forward to more shots as you build.
Regards,
Jonathan
Off to a great start, indeed! Great to see another layout on the rise. Appreciate the photos of your progress.
Looking forward to more shots as you build.
Regards,
Jonathan
Title: Re: Sheldon's Layout
Post by: Grumpy468 on July 07, 2020, 01:38:28 PM
Post by: Grumpy468 on July 07, 2020, 01:38:28 PM
Thank you Jonathan. i have such a long ways to go.
Title: Re: Sheldon's Layout
Post by: WoundedBear on July 07, 2020, 01:42:53 PM
Post by: WoundedBear on July 07, 2020, 01:42:53 PM
Hey buddy! Good to see you finally posting.
Sheldon and I have known each other for about 20 years now and talk on the phone almost daily. The other big thing him and I have in common is our sickness for horsepower.
Keep on posting man. There aren't enough people posting layout pics here.
Sid
Sheldon and I have known each other for about 20 years now and talk on the phone almost daily. The other big thing him and I have in common is our sickness for horsepower.
Keep on posting man. There aren't enough people posting layout pics here.
Sid
Title: Re: Sheldon's Layout
Post by: Terry Toenges on July 07, 2020, 02:40:05 PM
Post by: Terry Toenges on July 07, 2020, 02:40:05 PM
Another "man of the motor" so to speak? I really like the layout with all the curvy stuff.
Title: Re: Sheldon's Layout
Post by: Kemptown Branch on July 07, 2020, 03:26:00 PM
Post by: Kemptown Branch on July 07, 2020, 03:26:00 PM
You're layout looks amazing! Can't wait to see more!
Title: Re: Sheldon's Layout
Post by: Ken Huck on July 07, 2020, 04:40:43 PM
Post by: Ken Huck on July 07, 2020, 04:40:43 PM
OH Boy ! More photos to peruse. Hi Sheldon, can't wait to see more.
Thanks for posting.
Ken
Thanks for posting.
Ken
Title: Re: Sheldon's Layout
Post by: Grumpy468 on July 07, 2020, 06:28:16 PM
Post by: Grumpy468 on July 07, 2020, 06:28:16 PM


Title: Re: Sheldon's Layout
Post by: Grumpy468 on July 07, 2020, 06:43:52 PM
Post by: Grumpy468 on July 07, 2020, 06:43:52 PM


Title: Re: Sheldon's Layout
Post by: Grumpy468 on July 07, 2020, 06:46:23 PM
Post by: Grumpy468 on July 07, 2020, 06:46:23 PM
My version of a switching yard, train house and fuel depot.


Title: Re: Sheldon's Layout
Post by: Grumpy468 on July 07, 2020, 06:48:57 PM
Post by: Grumpy468 on July 07, 2020, 06:48:57 PM
Picture overload for one day. I have not started any landscaping yet as i keep adding things to the layout. I moved one building and everything in my head changed. lol. I have more stuff coming, I ordered a graveyard, More fencing, going to be building my own power poles, i have transformers coming plus all the railroad crossings.
Title: Re: Sheldon's Layout
Post by: Grumpy468 on July 07, 2020, 07:11:01 PM
Post by: Grumpy468 on July 07, 2020, 07:11:01 PM
I made the motors and generators inside the lite and power house, out of a cardboard tube and some blocks of wood.


Title: Re: Sheldon's Layout
Post by: jonathan on July 07, 2020, 07:29:33 PM
Post by: jonathan on July 07, 2020, 07:29:33 PM
Sensory overload! ;D
Still trying to figure out your track plan. Did I detect a sneaky little reverse loop hidden between your dead end sidings?
Always fun to see the wiring underneath.
I can tell we have built some of the same structures. Though most of mine did not make the cut on the latest layout. They'll probably end up as fascia in the background. Enjoying your photos.
Regards,
Jonathan
Title: Re: Sheldon's Layout
Post by: Grumpy468 on July 07, 2020, 07:44:30 PM
Post by: Grumpy468 on July 07, 2020, 07:44:30 PM
No i do not have a reverse loop, we talked about one, then decided a different route in the end. I had so much open space after my initial design that i added more tracks and created a few new industrial areas. I need a bigger layout it seems, but i dont have enough time, life and energy to finish a bigger one?
Title: Re: Sheldon's Layout
Post by: Grumpy468 on July 07, 2020, 07:51:28 PM
Post by: Grumpy468 on July 07, 2020, 07:51:28 PM
I painted everything with a dark camo paint to get the effect i wanted,


Title: Re: Sheldon's Layout
Post by: Grumpy468 on July 07, 2020, 08:02:05 PM
Post by: Grumpy468 on July 07, 2020, 08:02:05 PM
The Walthers refinery is going on the large white pad by the oil tank.


Title: Re: Sheldon's Layout
Post by: Grumpy468 on July 07, 2020, 10:56:24 PM
Post by: Grumpy468 on July 07, 2020, 10:56:24 PM
Quote from: Ken Huck on July 07, 2020, 04:40:43 PM
OH Boy ! More photos to peruse. Hi Sheldon, can't wait to see more.
Thanks for posting.
Ken
Hey Ken thank you, Hope you are doing well enjoying your hobby as well.
Title: Re: Sheldon's Layout
Post by: Grumpy468 on July 07, 2020, 11:14:49 PM
Post by: Grumpy468 on July 07, 2020, 11:14:49 PM
This picture was taken in 1971, i have the book. The photographer was making a book of Western Canadian train stations. I was 9 yrs old in this picture, this is where i grew up. This is My sister, cousin and myself plus out family dog.

Title: Re: Sheldon's Layout
Post by: Grumpy468 on July 09, 2020, 01:02:46 AM
Post by: Grumpy468 on July 09, 2020, 01:02:46 AM


Title: Re: Sheldon's Layout
Post by: jonathan on July 09, 2020, 06:08:48 AM
Post by: jonathan on July 09, 2020, 06:08:48 AM
IIRC I used 2-pound test fishing line for the barbed wire on top of the chain link fence. I think it was because those little plastic fence posts seemed weak, and I didn't want to break them using actual wire. Been a while, but I know I had a good reason for doing it that way... looks great.
Regards,
Jonathan
Regards,
Jonathan
Title: Re: Sheldon's Layout
Post by: Trainman203 on July 09, 2020, 08:48:40 AM
Post by: Trainman203 on July 09, 2020, 08:48:40 AM
Sheldon your structures are great. Beautifully weathered. I recognize the Walthers kits which I have some of but yours look so much better than mine. I even recognize the Revell engine house of old. I really like the electric substation, which kit is that?
Title: Re: Sheldon's Layout
Post by: WoundedBear on July 09, 2020, 09:58:06 AM
Post by: WoundedBear on July 09, 2020, 09:58:06 AM
Quote from: Trainman203 on July 09, 2020, 08:48:40 AM
Sheldon your structures are great. Beautifully weathered. I recognize the Walthers kits which I have some of but yours look so much better than mine. I even recognize the Revell engine house of old. I really like the electric substation, which kit is that?
Did the Revell Engine House become the Walthers Engine House? I know Sheldon, Jon and I all have the same engine house on our layouts.
There was an article in NGSLG a while back about the Revell kits and they never mentioned the molds being bought or sold .
Sid
Title: Re: Sheldon's Layout
Post by: Grumpy468 on July 09, 2020, 10:05:30 AM
Post by: Grumpy468 on July 09, 2020, 10:05:30 AM
Quote from: WoundedBear on July 09, 2020, 09:58:06 AMQuote from: Trainman203 on July 09, 2020, 08:48:40 AM
Sheldon your structures are great. Beautifully weathered. I recognize the Walthers kits which I have some of but yours look so much better than mine. I even recognize the Revell engine house of old. I really like the electric substation, which kit is that?
Did the Revell Engine House become the Walthers Engine House? I know Sheldon, Jon and I all have the same engine house on our layouts.
There was an article in NGSLG a while back about the Revell kits and they never mentioned the molds being bought or sold .
Sid
Thank you for the kind words, everything to this point has been a Walthers kit. Be cool if Revell was making Ho Scale structures.
Title: Re: Sheldon's Layout
Post by: Grumpy468 on July 09, 2020, 10:46:10 AM
Post by: Grumpy468 on July 09, 2020, 10:46:10 AM
I took a saw blade and dragged it across the pieces with the grain to make them look like wood. I also took a pounce wheel to make rows of nail holes.


Title: Re: Sheldon's Layout
Post by: Len on July 09, 2020, 01:44:12 PM
Post by: Len on July 09, 2020, 01:44:12 PM
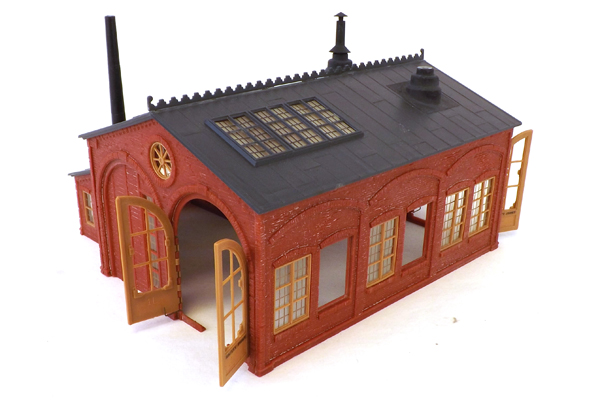
This is the old Revell two stall engine house:
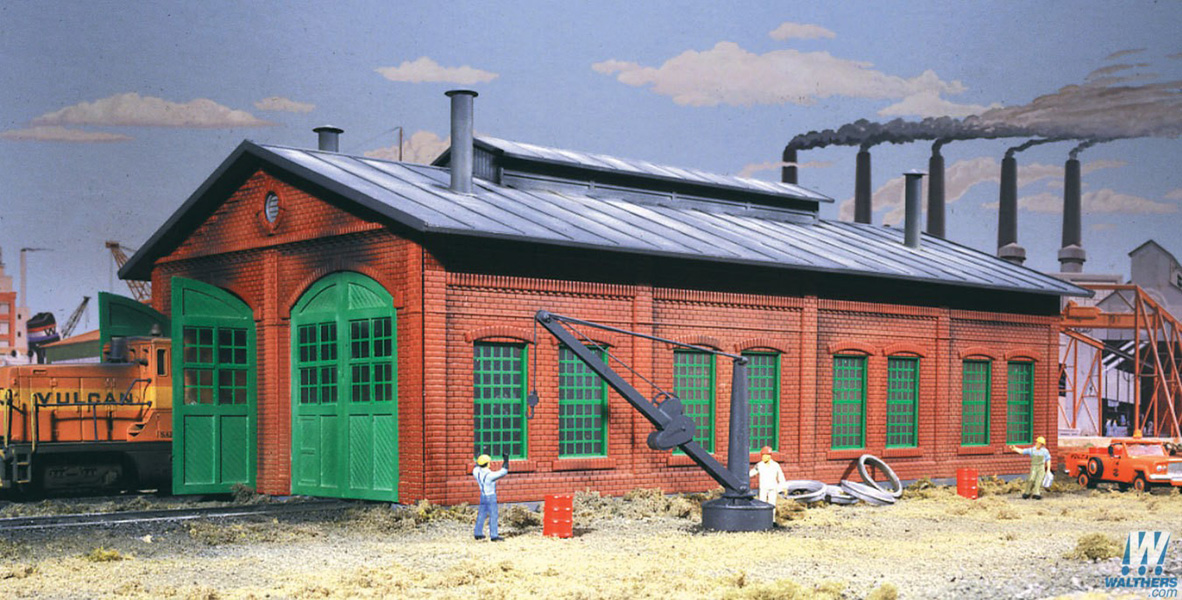
And this is the Walthers version:
While both are 'brick' and somewhat similar, I'd say the differences are significant enough to say they used different tooling.
Len
And this is the Walthers version:
While both are 'brick' and somewhat similar, I'd say the differences are significant enough to say they used different tooling.
Len
Title: Re: Sheldon's Layout
Post by: Trainman203 on July 09, 2020, 05:11:33 PM
Post by: Trainman203 on July 09, 2020, 05:11:33 PM
They are very similar. The longer Walthers one is more usable. Revell's biggest engine was an F-unit, all they cared about getting completely inside.
Those are very cold weather type structures. Although letting an engine out in winter was a lot worse than when your mother yelled st you to shut the door. 💨❄️🥶😂.
Those are very cold weather type structures. Although letting an engine out in winter was a lot worse than when your mother yelled st you to shut the door. 💨❄️🥶😂.
Title: Re: Sheldon's Layout
Post by: Grumpy468 on July 10, 2020, 12:40:10 AM
Post by: Grumpy468 on July 10, 2020, 12:40:10 AM
I cut the doors different lengths to give a real feel to the doors being open at different heights.


Title: Re: Sheldon's Layout
Post by: Grumpy468 on July 10, 2020, 12:42:07 AM
Post by: Grumpy468 on July 10, 2020, 12:42:07 AM
This is going to be a small pub with a smoking car port out back.


Title: Re: Sheldon's Layout
Post by: Grumpy468 on July 10, 2020, 01:05:56 AM
Post by: Grumpy468 on July 10, 2020, 01:05:56 AM
I love these stall motors, a bit tricky to work with but great once installed.


Title: Re: Sheldon's Layout
Post by: Grumpy468 on July 10, 2020, 01:09:12 AM
Post by: Grumpy468 on July 10, 2020, 01:09:12 AM
I made these, was my first attempt at small wood.


Title: Re: Sheldon's Layout
Post by: Grumpy468 on July 10, 2020, 01:12:30 AM
Post by: Grumpy468 on July 10, 2020, 01:12:30 AM
I have a pretty bright flashlite in this one just wanted to see what it would look like. Will go with a couple of LED bulbs when i get to the lighting.


Title: Re: Sheldon's Layout
Post by: Grumpy468 on July 11, 2020, 09:20:20 PM
Post by: Grumpy468 on July 11, 2020, 09:20:20 PM
Well i dipped my toe into the landscaping pool today. Its tricky at the same time very exciting. Looking forward to adding more slowly as i go. Now i have a clear definition of where the road is going to be,


Title: Re: Sheldon's Layout
Post by: WoundedBear on July 11, 2020, 09:31:19 PM
Post by: WoundedBear on July 11, 2020, 09:31:19 PM
Nice pictures.....now we need some 'splainin' Lucy. ;D
Sid
Sid
Title: Re: Sheldon's Layout
Post by: Grumpy468 on July 12, 2020, 03:00:41 PM
Post by: Grumpy468 on July 12, 2020, 03:00:41 PM
Made my own ground coverage today. A couple local lumber yards gave me a few bags of saw dust. I went to the dollar store, bought 2 big plastic containers, Gales florist has fabric dye for $1.87 a box. Found an old bed sheet, filled it with sawdust, dipped in the dye till i was happy with the colour. The darker stuff was made first, then i got a lighter batch as the dye was running out, a happy accident if you will. I have a box of brown dye, i need to go back and get a few more colours.


Title: Re: Sheldon's Layout
Post by: Grumpy468 on July 14, 2020, 11:24:19 AM
Post by: Grumpy468 on July 14, 2020, 11:24:19 AM
This is tricky, trying to make trees look right etc.


Title: Re: Sheldon's Layout
Post by: WoundedBear on July 14, 2020, 12:34:21 PM
Post by: WoundedBear on July 14, 2020, 12:34:21 PM
You're right about trees. They have to be some of the costliest and hard to make items on a layout. Especially if you want a believable tree.
And you can never have enough of them, it seems.
Sid
And you can never have enough of them, it seems.
Sid
Title: Re: Sheldon's Layout
Post by: jonathan on July 14, 2020, 01:56:41 PM
Post by: jonathan on July 14, 2020, 01:56:41 PM
True enough.
There are never enough trees. Great start, though. 3 down, 997 to go. ;D
Regards,
Jonathan
There are never enough trees. Great start, though. 3 down, 997 to go. ;D
Regards,
Jonathan
Title: Re: Sheldon's Layout
Post by: Trainman203 on July 14, 2020, 02:34:55 PM
Post by: Trainman203 on July 14, 2020, 02:34:55 PM
Tree types can really set your layout geographically. A lot of people have conifers that look like Christmas trees, which would be out of place on my layout.
Title: Re: Sheldon's Layout
Post by: Grumpy468 on July 14, 2020, 04:05:31 PM
Post by: Grumpy468 on July 14, 2020, 04:05:31 PM
Quote from: jonathan on July 14, 2020, 01:56:41 PM
True enough.
There are never enough trees. Great start, though. 3 down, 997 to go. ;D
Regards,
Jonathan
Oh i know my brain is working overtime now
Title: Re: Sheldon's Layout
Post by: Grumpy468 on July 14, 2020, 04:10:29 PM
Post by: Grumpy468 on July 14, 2020, 04:10:29 PM
Quote from: Trainman203 on July 14, 2020, 02:34:55 PM
Tree types can really set your layout geographically. A lot of people have conifers that look like Christmas trees, which would be out of place on my layout.
We have a mix of Elm trees, pine trees, just adding what i see here in my countryside.
Title: Re: Sheldon's Layout
Post by: Grumpy468 on July 16, 2020, 07:26:59 PM
Post by: Grumpy468 on July 16, 2020, 07:26:59 PM
well big step today, spoke to buddy Sid, and i decided i have better start from the middle and work my way out. I spent the afternoon finalizing my main street buildings etc, and will get the main street paved, and have gravel tapering off as we reach the edges of main street. Baby steps here i still have to figure out one area? at least i can get the bases nailed down and glued in place. Get the holes drilled for the lites in the building down the road. So much to think about.
Title: Re: Sheldon's Layout
Post by: Grumpy468 on July 22, 2020, 01:21:08 AM
Post by: Grumpy468 on July 22, 2020, 01:21:08 AM
Well i spoke to Wounded bear, and i took everything off the layout and decided to get going on my main street, and then work my way out to the corners. Less chance of leaning over something and breaking it. The putty is Dap spackle, it goes on pink dries white to let you know when you can work on it. All the white foam board is nothing more than a form which will be removed when its all dry, i will cut it out and then fill those areas with dirt etc .I found a place at my buddy Jims shop to get some real gravel road material that when i sift out will be the right colour. So going to take a shovel and 5 gallon pail tomorrow and grab a bunch. I need the dust more than anything.


Title: Re: Sheldon's Layout
Post by: Grumpy468 on July 22, 2020, 08:28:00 AM
Post by: Grumpy468 on July 22, 2020, 08:28:00 AM
Another hobby i have been into since i was 16, this took 4 years to build. It started life as a 20,000 original 6 cylinder car.


Title: Re: Sheldon's Layout
Post by: Grumpy468 on July 22, 2020, 08:31:23 AM
Post by: Grumpy468 on July 22, 2020, 08:31:23 AM
Also into model car building, I had the sprint car since i was 15, blew it completely apart and redid it last year.


Title: Re: Sheldon's Layout
Post by: jonathan on July 22, 2020, 11:30:47 AM
Post by: jonathan on July 22, 2020, 11:30:47 AM
Boys and their toys, man. :)
Regards,
Jonathan
Regards,
Jonathan
Title: Re: Sheldon's Layout
Post by: Terry Toenges on July 22, 2020, 11:50:26 AM
Post by: Terry Toenges on July 22, 2020, 11:50:26 AM
Are you trying to be sneaky with hood lettering on the Duster? :)
Title: Re: Sheldon's Layout
Post by: WoundedBear on July 22, 2020, 11:59:44 AM
Post by: WoundedBear on July 22, 2020, 11:59:44 AM
This is why Sheldon and I are good friends. Our interests are the same.
It's amazing how the skills we learn in one hobby can transfer over and become beneficial in another hobby.
Terry.....that whole Duster is sneakier than it looks. Usually a 426 wedge motor is a tall deck, or RB block. His is built from a low deck 383.
Sid
It's amazing how the skills we learn in one hobby can transfer over and become beneficial in another hobby.
Terry.....that whole Duster is sneakier than it looks. Usually a 426 wedge motor is a tall deck, or RB block. His is built from a low deck 383.
Sid
Title: Re: Sheldon's Layout
Post by: jonathan on July 22, 2020, 12:13:23 PM
Post by: jonathan on July 22, 2020, 12:13:23 PM
Had a green '71 Duster once. Didn't look much like that... It was the king of gravel roads.
Regards,
Jonathan
Regards,
Jonathan
Title: Re: Sheldon's Layout
Post by: Grumpy468 on July 22, 2020, 01:11:19 PM
Post by: Grumpy468 on July 22, 2020, 01:11:19 PM
Thank you guys. Yes the duster is a wolf in sheep's clothing. We took a 383 block from a 68 Roadrunner, and we machined in a stock steel 440 crank my engine builder had laying around. bored the motor out .030 and you have a 426 cubic inch wedge motor that fits under the stock hood. lol It makes 525 Horsepower and 552 lb feet of torque. It is a fun car to drive.
I blame Sid for my railroad addiction, lolol . He helped me become a better model car kit builder etc, and i took to model railroading like a duck to water. Winters are bloody long here, i really enjoy the train layout. This [ast winter went by very fast because of it.
I blame Sid for my railroad addiction, lolol . He helped me become a better model car kit builder etc, and i took to model railroading like a duck to water. Winters are bloody long here, i really enjoy the train layout. This [ast winter went by very fast because of it.
Title: Re: Sheldon's Layout
Post by: Terry Toenges on July 22, 2020, 03:02:51 PM
Post by: Terry Toenges on July 22, 2020, 03:02:51 PM
My first car was a '68 Roadrunner with a 383 that I got in Nov. '67. Back then, everyone said I had a factory freak because it was so quick. We had a stretch of highway (that dead ended just under the overpass). There was sign for the turn off to Hwy 55 that was a quarter mile from that. That was our drag strip. I used to beat just about everything I raced except the hemi's.
Title: Re: Sheldon's Layout
Post by: Grumpy468 on July 23, 2020, 09:29:54 PM
Post by: Grumpy468 on July 23, 2020, 09:29:54 PM
Took some time today and redid these tanks, i wasnt happy with them. I think this is better.


Title: Re: Sheldon's Layout
Post by: Grumpy468 on July 24, 2020, 02:53:12 PM
Post by: Grumpy468 on July 24, 2020, 02:53:12 PM
Just wanting to make a statement.
I am not posting all these pictures for any reason other than to show what i am working on thats it. Everyone has their own type of style, and way of doing things. I love this hobby, and i will put all the skill and effort into it that i have.
I have a couple train orders coming in the next couple of weeks, buildings, accessories and landscape materials. I need to sit down, look at the layout and come up with a bit of a plan. At the same time, move one building on the layout and all my ducks are not in a row anymore and the damn thing takes on a new look. lolol
Happy Modelling everyone.
Sheldon.
Title: Re: Sheldon's Layout
Post by: WoundedBear on July 24, 2020, 06:14:10 PM
Post by: WoundedBear on July 24, 2020, 06:14:10 PM
One of my biggest obstacles in building my layout is indecision.
It takes a long time for me to finalize a scene and commit to building it. This corner I have been working on has been years in the making.
I put different structures in place and try them out. Then I move chit all around and find something that had never even crossed my mind the first time around.
Then I have builder's remorse for a while after, thinking if I did it "right" or not.
Sid
Title: Re: Sheldon's Layout
Post by: Terry Toenges on July 24, 2020, 08:39:17 PM
Post by: Terry Toenges on July 24, 2020, 08:39:17 PM
I do so know that feeling. I'll imagineer something in my head for months before actually starting on it. Then every step of the way, where there's a decision to be made, I'll analyze it and analyze it and then hope I like which route I decide to go.
Title: Re: Sheldon's Layout
Post by: Grumpy468 on July 24, 2020, 08:56:44 PM
Post by: Grumpy468 on July 24, 2020, 08:56:44 PM
There are many ways to do this, some guys use a track planning software, I looked at layouts i liked and then copied one with a few changes to it. I knew i was building a 1965-1975 Saskatchewan prairie layout, so it was going to be flat. lol Model what you know i was told. So once the track was down, i ended up adding a bunch more track to an open area, it turned out correct, lol sometimes you get lucky.
Then i went a bit gung ho on building structures. I had an idea of what businesses i wanted in my town, and same for the industrial areas. Adding buildings to the layout started to give it life, then all the accessories come into play, telephone and poler poles, street lites etc. I spent a lot of time online looking at other layouts and catalogues to see what would fit? Next thing you know i am adding large sections of plywood to 3 corners to allow for more buildings, lolol.
Then i wanted to add another 8 feet to one end, but that would have removed the couch and entire sitting area of the basement, and may have added 5-10 years onto the layout? I have to put on the brakes, lol
I will just build what i have, detail the crap out of it and make it look as good as i can, then i can spend the rest of my time playing trains.
Title: Re: Sheldon's Layout
Post by: Ken Huck on July 24, 2020, 10:07:27 PM
Post by: Ken Huck on July 24, 2020, 10:07:27 PM
Not to change the subject or anything but, was one of those 'tanks'
scratch built from an old broom handle and painted red ?
Ken
scratch built from an old broom handle and painted red ?
Ken
Title: Re: Sheldon's Layout
Post by: Grumpy468 on July 24, 2020, 10:11:33 PM
Post by: Grumpy468 on July 24, 2020, 10:11:33 PM
No it wasnt, i didnt notice the groves in it till after it was panted. I guess it was just a poor mold they were using.
Title: Re: Sheldon's Layout
Post by: Grumpy468 on August 02, 2020, 12:24:08 PM
Post by: Grumpy468 on August 02, 2020, 12:24:08 PM
Well i have been a bit busy on my main street. trying to make it not look like new pavement. I added buildings back on so i could get some context for myself to see what has to be done yet.


Title: Re: Sheldon's Layout
Post by: Grumpy468 on August 02, 2020, 12:31:05 PM
Post by: Grumpy468 on August 02, 2020, 12:31:05 PM
A little ******* off the Tamiya tape pulled off the grey wash along the yellow line, so i have been trying to touch it up. It does give the road a beat up look that i was hoping for. I didnt want a perfect street.
Title: Re: Sheldon's Layout
Post by: jonathan on August 03, 2020, 07:50:03 PM
Post by: jonathan on August 03, 2020, 07:50:03 PM
Looks like that will be a great scene when it's done. Great work.
Regards,
Jonathan
Regards,
Jonathan
Title: Re: Sheldon's Layout
Post by: Grumpy468 on August 03, 2020, 08:14:30 PM
Post by: Grumpy468 on August 03, 2020, 08:14:30 PM
Thank you ,it's a lot of work, i am waiting for my fusion fibre to show up so i can start on the back lanes and ditches.
Title: Re: Sheldon's Layout
Post by: Grumpy468 on August 08, 2020, 04:36:34 PM
Post by: Grumpy468 on August 08, 2020, 04:36:34 PM
I am happy with the end result. It looks like a weathered road,
Title: Re: Sheldon's Layout
Post by: Grumpy468 on August 10, 2020, 11:27:58 AM
Post by: Grumpy468 on August 10, 2020, 11:27:58 AM
I ordered a couple of Walthers kits, i need some tanks on my layout for various things. I drove around here to local propane companies and oil companies to get a look at the tanks. So now i need to decide how to proceed with weathering? A wash or dry brushing, or a combination of both.


Title: Re: Sheldon's Layout
Post by: WoundedBear on August 10, 2020, 04:09:02 PM
Post by: WoundedBear on August 10, 2020, 04:09:02 PM
The yellow one has got to be a Superior Propane facility.
Sid
Sid
Title: Re: Sheldon's Layout
Post by: Grumpy468 on August 10, 2020, 04:42:22 PM
Post by: Grumpy468 on August 10, 2020, 04:42:22 PM
Yes. lol I gave them all a wash so far of a slightly different shade of what they are, looks good . I am now watching you tube videos to figure out the rest. lol
Title: Re: Sheldon's Layout
Post by: Grumpy468 on August 11, 2020, 01:00:46 AM
Post by: Grumpy468 on August 11, 2020, 01:00:46 AM
They are all done. Finished in matt clear. You can see the progression. Paint and powders.


Title: Re: Sheldon's Layout
Post by: Len on August 11, 2020, 01:29:34 AM
Post by: Len on August 11, 2020, 01:29:34 AM
I hope those are supposed to represent abandoned tanks. They'd never pass a pressure test of safety inspection if allowed to get that corroded.
Len
Len
Title: Re: Sheldon's Layout
Post by: Grumpy468 on August 11, 2020, 09:23:27 AM
Post by: Grumpy468 on August 11, 2020, 09:23:27 AM
Yeah this is model trains, no inspection's required.
Title: Re: Sheldon's Layout
Post by: Grumpy468 on August 22, 2020, 10:38:02 AM
Post by: Grumpy468 on August 22, 2020, 10:38:02 AM
Been building the out buildings for the propane / butane tanks etc, the kits were sort of screwy, both cam with sheds, yet the roof was missing off of one of them so i made a cardboard roof and finished it with cedar trim.


Title: Re: Sheldon's Layout
Post by: Grumpy468 on August 22, 2020, 10:42:24 AM
Post by: Grumpy468 on August 22, 2020, 10:42:24 AM
The rest of them. I cut the overhead door to be able to leave it open. The tanks are done.


Title: Re: Sheldon's Layout
Post by: Trainman203 on August 22, 2020, 12:14:58 PM
Post by: Trainman203 on August 22, 2020, 12:14:58 PM
There's a lot of those bottle gas tanks out in the country down here. I've never seen one with any weathering on it. Makes minute flaws in these pressure vessels harder to see. They are scrupulously maintained by the gas company. Things may be different up north, please tell me if so.
Title: Re: Sheldon's Layout
Post by: jonathan on August 22, 2020, 01:58:36 PM
Post by: jonathan on August 22, 2020, 01:58:36 PM
Nice outbuildings!
I'm obsessed with brick structures. I can't do anything else, until I've put mortar between the bricks. Can't help myself.
Nice photos, too.
Regards,
Jonathan
I'm obsessed with brick structures. I can't do anything else, until I've put mortar between the bricks. Can't help myself.
Nice photos, too.
Regards,
Jonathan
Title: Re: Sheldon's Layout
Post by: Grumpy468 on August 22, 2020, 02:02:09 PM
Post by: Grumpy468 on August 22, 2020, 02:02:09 PM
Thank you Jonathan. I try to do mortar on most of my brick work. These ones i just left natural.
Title: Re: Sheldon's Layout
Post by: OLDERTIMER on August 22, 2020, 06:59:50 PM
Post by: OLDERTIMER on August 22, 2020, 06:59:50 PM
Your another one around here I'd like to emulate. Nice work, Sheldon, Paul
Title: Re: Sheldon's Layout
Post by: Grumpy468 on August 22, 2020, 07:11:50 PM
Post by: Grumpy468 on August 22, 2020, 07:11:50 PM
Thank you for the compliments Paul. I have been getting mentored by Wounded bear, "Sid" he has been a long distance tutor.
Title: Re: Sheldon's Layout
Post by: Grumpy468 on August 23, 2020, 05:54:20 PM
Post by: Grumpy468 on August 23, 2020, 05:54:20 PM
Well Wounded bear got me to order Fusion fibre, so i got a 2.5 lb bag. I wasnt sure what to do with it, but it's pretty straight forward once you get going. It's a great base layer to support all the landscaping materials. and this saves on them as well. I spent 6 hours in the basement today to get this little bit done.


Title: Re: Sheldon's Layout
Post by: Grumpy468 on September 14, 2020, 04:46:18 PM
Post by: Grumpy468 on September 14, 2020, 04:46:18 PM
Been busy with work and fabrication landscaping stuff. My first attempt at standing wild grass.


Title: Re: Sheldon's Layout
Post by: Grumpy468 on September 14, 2020, 04:50:07 PM
Post by: Grumpy468 on September 14, 2020, 04:50:07 PM
Worked on my downtown back alley stuff. First the fusion fibre gets laid down and levelled as best i can then add the materials slowly building up.


Title: Re: Sheldon's Layout
Post by: Grumpy468 on September 14, 2020, 04:53:32 PM
Post by: Grumpy468 on September 14, 2020, 04:53:32 PM
There was a big rock sitting in the middle, decided to surround it with trees shrubs etc.


Title: Re: Sheldon's Layout
Post by: Grumpy468 on September 14, 2020, 04:55:35 PM
Post by: Grumpy468 on September 14, 2020, 04:55:35 PM
Then i added a single tree behind the Hotel, changed the whole look of things.


Title: Re: Sheldon's Layout
Post by: Grumpy468 on September 14, 2020, 04:58:07 PM
Post by: Grumpy468 on September 14, 2020, 04:58:07 PM
And then started on one other area.


Title: Re: Sheldon's Layout
Post by: Grumpy468 on September 14, 2020, 05:01:16 PM
Post by: Grumpy468 on September 14, 2020, 05:01:16 PM
My matte medium showed up, so now i am going got make 12 super trees that i got, once those are done, i will go back and look at the areas i finished the basics on and add the wild grass and new trees if needed? Every time i add something, the layout takes on an entire new look, then the brain kicks in and things change, lolol. This is why i love this hobby, my layout will never be finished?
Title: Re: Sheldon's Layout
Post by: Grumpy468 on September 14, 2020, 05:03:58 PM
Post by: Grumpy468 on September 14, 2020, 05:03:58 PM
Some more area work done.


Title: Re: Sheldon's Layout
Post by: Len on September 14, 2020, 05:08:13 PM
Post by: Len on September 14, 2020, 05:08:13 PM
Looks like the hotel may have some foundation problems as that tree in back grows bigger. Might want to see about having an arborist move it a bit further away.
Len
Len
Title: Re: Sheldon's Layout
Post by: Grumpy468 on September 14, 2020, 05:23:53 PM
Post by: Grumpy468 on September 14, 2020, 05:23:53 PM
Yeah it's perfect where it is, where i live the tree roots are in the sewer lines and bouncing off the basement walls. Just a fact of life.
Title: Re: Sheldon's Layout
Post by: RAM on September 14, 2020, 09:22:52 PM
Post by: RAM on September 14, 2020, 09:22:52 PM
one thing that stands out when I look at your layout. That is why the space on the outside of the rails on road crossings?
Title: Re: Sheldon's Layout
Post by: Grumpy468 on September 14, 2020, 11:56:46 PM
Post by: Grumpy468 on September 14, 2020, 11:56:46 PM
I have no idea what you're talking about.
Title: Re: Sheldon's Layout
Post by: Terry Toenges on September 15, 2020, 10:42:02 AM
Post by: Terry Toenges on September 15, 2020, 10:42:02 AM
Are you going to continue the roads on the other side of the crossings? In some, you have the road leading to the crossing, then the crossing and nothing on the other side.
Title: Re: Sheldon's Layout
Post by: RAM on September 15, 2020, 11:38:40 AM
Post by: RAM on September 15, 2020, 11:38:40 AM
The next time get to a railroad crossing, take a good look at it. then look at the way you make yours. You will see that there is not a gap on the outside of the rails.
Title: Re: Sheldon's Layout
Post by: Grumpy468 on November 15, 2020, 08:36:31 PM
Post by: Grumpy468 on November 15, 2020, 08:36:31 PM
Been a bit busy, life gets in the way. here is what i have gotten done.


Title: Re: Sheldon's Layout
Post by: jonathan on November 16, 2020, 03:58:40 AM
Post by: jonathan on November 16, 2020, 03:58:40 AM
Nice progress. I have that engine house on my layout.
Regards,
Jonathan
Regards,
Jonathan
Title: Re: Sheldon's Layout
Post by: graywolf on November 16, 2020, 07:15:31 AM
Post by: graywolf on November 16, 2020, 07:15:31 AM
Hi Grumpy that is a nice looking engine shed ---can you tell me who makes it?
Title: Re: Sheldon's Layout
Post by: Grumpy468 on November 16, 2020, 08:41:15 AM
Post by: Grumpy468 on November 16, 2020, 08:41:15 AM
Graywolf, that is a Walthers kit.
Title: Re: Sheldon's Layout
Post by: Grumpy468 on November 16, 2020, 08:42:19 AM
Post by: Grumpy468 on November 16, 2020, 08:42:19 AM
Thank you Jonathan, i have been doing more landscaping and things are starting to take shape.
Title: Re: Sheldon's Layout
Post by: Ken Huck on November 18, 2020, 04:06:06 PM
Post by: Ken Huck on November 18, 2020, 04:06:06 PM
Those sure are some nice looking crossings.
Thanks for the pics.
Ken
Thanks for the pics.
Ken
Title: Re: Sheldon's Layout
Post by: Grumpy468 on November 18, 2020, 05:57:13 PM
Post by: Grumpy468 on November 18, 2020, 05:57:13 PM
I added an extra board to fill in the gaps, Wounded bear and myself split a whole bunch of scale lumber, it has come in handy.
Title: Re: Sheldon's Layout
Post by: Grumpy468 on December 08, 2020, 07:24:09 PM
Post by: Grumpy468 on December 08, 2020, 07:24:09 PM
Back to the houses. I am stuck right now, so i put everything back on the layout to see what the overall look is, need to continue with the landscaping. Still working from the middle out. But i am placing my company houses in my residential are to get some ideas on how to move forward.


Title: Re: Sheldon's Layout
Post by: jonathan on December 09, 2020, 09:50:24 AM
Post by: jonathan on December 09, 2020, 09:50:24 AM
Sheldon,
You do a really nice job modeling those structures. Congrats!
Last year, I went to one of those tourist attractions where they offer train rides with old steam, mostly Shays.
They have preserved the small railroad town and people actually live in the old company houses. One thing that struck me was how close together they were built. Of course, I only have one example to go by. But that's one thing I would consider when planning the scenery for that area.
There was also a short, white picket fence running in front of all the houses, but I have no idea if that was preservation or a modern dalliance. And... that was West Virginia. Perhaps it looked a little different in Canada. :)
Regards,
Jonathan
Addendum: I also remember the walkways were wood planks in front of the homes, not cement. Weird.
Title: Re: Sheldon's Layout
Post by: Len on December 09, 2020, 10:21:51 AM
Post by: Len on December 09, 2020, 10:21:51 AM
I think picket fences and wood plank walkways, except maybe near the bosses houses, are dressing things up a bit for a 'company town'. This was more the reality in West Va.

Len
Len
Title: Re: Sheldon's Layout
Post by: Grumpy468 on December 09, 2020, 11:01:28 AM
Post by: Grumpy468 on December 09, 2020, 11:01:28 AM
Good Morning guys. Thank you for the positive replies. Yes i am going to be taking a lot of time to consider lot sizes, parking and fences. As well as wooden walkways. I bought Some different fencing kits, as well as 300 wooden match sticks and a roll of florist wire for making fences. At this time i am just trying to get a feel for the space i have. Thank you for the picture of the company row houses Len.
Title: Re: Sheldon's Layout
Post by: Taz54904 on December 10, 2020, 12:38:34 PM
Post by: Taz54904 on December 10, 2020, 12:38:34 PM
Just incredible! Wow your layout and attention to detail are awesome!
Title: Re: Sheldon's Layout
Post by: Grumpy468 on December 10, 2020, 05:54:17 PM
Post by: Grumpy468 on December 10, 2020, 05:54:17 PM
Thank you for the kind words. My good friend and mentor WoundedBear from this site, has been guiding me along. I guess i am a good student. I drove 8 hours last summer to spend a few days with him at his place. We have been car buddies, drag race buddies for 20 years. Then he got me into model railroading, and i really enjoy it. Sid has a beautiful layout which he has been working on for the past 10 years. His attention to detail is incredible.
I love doing it, it makes me feel good, and i forget about life for awhile when i am in the basement. :)
I love doing it, it makes me feel good, and i forget about life for awhile when i am in the basement. :)
Title: Re: Sheldon's Layout
Post by: Grumpy468 on December 20, 2020, 12:38:47 PM
Post by: Grumpy468 on December 20, 2020, 12:38:47 PM
It's been 1 week since Sid has passed away. I sat on the bench every day working on something, wishing my Friend was still here. There was one day i couldn't bring myself to go down there, every time i look at my layout i think of Sid.
May God Bless you and keep you Sid. Thank you for teaching me as much as you did, i will never forget you.


May God Bless you and keep you Sid. Thank you for teaching me as much as you did, i will never forget you.
Title: Re: Sheldon's Layout
Post by: Grumpy468 on January 19, 2021, 12:03:49 AM
Post by: Grumpy468 on January 19, 2021, 12:03:49 AM
Sat down on the bench today, have not been down on that side of the basement since Sid passed away. I took a break and worked on model cars for a while. Time to get back to the train layout, i have lots to do and it is very relaxing . So i decided to make my own rural fencing, I am going to need a lot of it. I bought 300 wooden matches and a roll of florists wire. Here is my first attempt.


Title: Re: Sheldon's Layout
Post by: Grumpy468 on January 20, 2021, 08:46:32 AM
Post by: Grumpy468 on January 20, 2021, 08:46:32 AM
First section in place.


Title: Re: Sheldon's Layout
Post by: jward on January 20, 2021, 10:08:45 AM
Post by: jward on January 20, 2021, 10:08:45 AM
Do you have a track plan you could post?
Title: Re: Sheldon's Layout
Post by: Grumpy468 on January 20, 2021, 12:05:11 PM
Post by: Grumpy468 on January 20, 2021, 12:05:11 PM
I found a basic track plan online that would work for my table size, then just added to it out of my head to fit the table without too much crowding. I had my mainline done, then had to decided what i was going to do for commercial and industrial services. As my old Friend Wounded bear would say, "You need to justify everything that goes on the layout, it has to be real and have a purpose."
I will see if i can find the link for the basic track plan.
Sheldon.
I will see if i can find the link for the basic track plan.
Sheldon.
Title: Re: Sheldon's Layout
Post by: Grumpy468 on January 20, 2021, 12:05:48 PM
Post by: Grumpy468 on January 20, 2021, 12:05:48 PM
Here is what i have done in 2 years as of today.


Title: Re: Sheldon's Layout
Post by: jonathan on January 21, 2021, 06:55:52 AM
Post by: jonathan on January 21, 2021, 06:55:52 AM
Careful... we almost got a shot of your face on the mirror. ;D
Enjoying your progress. Was looking for easy fence ideas.
Regards,
Jonathan
Enjoying your progress. Was looking for easy fence ideas.
Regards,
Jonathan
Title: Re: Sheldon's Layout
Post by: Grumpy468 on January 21, 2021, 04:04:32 PM
Post by: Grumpy468 on January 21, 2021, 04:04:32 PM
Be lucky i had pants on. hahahahaha
Title: Re: Sheldon's Layout
Post by: jward on January 22, 2021, 03:24:49 PM
Post by: jward on January 22, 2021, 03:24:49 PM
Thanks. Those photos help me see how it all fits together.
Title: Re: Sheldon's Layout
Post by: Grumpy468 on January 22, 2021, 11:10:49 PM
Post by: Grumpy468 on January 22, 2021, 11:10:49 PM
Quote from: jward on January 22, 2021, 03:24:49 PM
Thanks. Those photos help me see how it all fits together.
You're welcome. Glad you like what i have done.
Title: Re: Sheldon's Layout
Post by: Grumpy468 on February 02, 2021, 10:05:11 PM
Post by: Grumpy468 on February 02, 2021, 10:05:11 PM
Got my landscape flowers last week, so i started to slowly place them. They really add details to the layout, subtle but they catch your eye.


Title: Re: Sheldon's Layout
Post by: Grumpy468 on February 12, 2021, 08:55:39 PM
Post by: Grumpy468 on February 12, 2021, 08:55:39 PM
Well i got out of my slump today and got back into creating on the layout. i did an 18" section of grid road today with fence. Started to add flowers and fence pieces around the layout today as well. A little bit at a time.


Title: Re: Sheldon's Layout
Post by: jonathan on February 12, 2021, 09:55:08 PM
Post by: jonathan on February 12, 2021, 09:55:08 PM
Noice!
Regards,
Jonathan
Regards,
Jonathan
Title: Re: Sheldon's Layout
Post by: Grumpy468 on February 12, 2021, 11:47:53 PM
Post by: Grumpy468 on February 12, 2021, 11:47:53 PM
Thanks Jonathan. I still need to detail the gravel road once everything dries. I am going to try pastel chalk i bought. Will turn it into a powder then brush it on?
Title: Re: Sheldon's Layout
Post by: jward on February 13, 2021, 06:37:36 AM
Post by: jward on February 13, 2021, 06:37:36 AM
Looking at your work I am amazed that it's mostly Atlas snap track. You've done a really great job ballasting the track and blending it into its surroundings. Sid taught you well.
Title: Re: Sheldon's Layout
Post by: Grumpy468 on February 13, 2021, 10:25:48 AM
Post by: Grumpy468 on February 13, 2021, 10:25:48 AM
Thank you. I really Miss Sid. :'( :'( He was a fountain of knowledge.
Title: Re: Sheldon's Layout
Post by: Grumpy468 on February 15, 2021, 11:00:59 AM
Post by: Grumpy468 on February 15, 2021, 11:00:59 AM
Picked away at all weekend, and i have it close to where i want it now. I am struggling to get my gravel roads to look right? Any suggestions would be welcome.


Title: Re: Sheldon's Layout
Post by: jward on February 15, 2021, 11:10:00 AM
Post by: jward on February 15, 2021, 11:10:00 AM
You've got them looking pretty good. The only thing I see missing are the potholes. SO many people seem to use ballast for gravel roads but it's really way too big. What ever you used was fine enough to get the packed dirt look where the wheels travel, and the loose gravel off to the sides and in the center.
Title: Re: Sheldon's Layout
Post by: jonathan on February 15, 2021, 12:36:45 PM
Post by: jonathan on February 15, 2021, 12:36:45 PM
Your gravel roads look better than anything I've attempted. Gravel roads are surprisingly hard to model.
Regards,
Jonathan
Regards,
Jonathan
Title: Re: Sheldon's Layout
Post by: Grumpy468 on February 15, 2021, 06:26:17 PM
Post by: Grumpy468 on February 15, 2021, 06:26:17 PM
Thank you. I use a combination of Woodland scenics, and real gravel. I bought and made some strainers to sift and get different sizes of road material and landscaping materials. I also use real twigs and dried leaves. I bought 2 different colour pallets of pastel chalk. I use a fine saw blade and scrape the pastel into a powder, then use that on the roads etc buildings.


Title: Re: Sheldon's Layout
Post by: Grumpy468 on February 17, 2021, 11:00:14 AM
Post by: Grumpy468 on February 17, 2021, 11:00:14 AM
Well i need to sit at the bench and get the last of the big kits started, will take a bit of a break from landscaping . I have the Walthers, United Petroleum refinery kit for my layout. I was going over the instructions and looking at the kit. There is going to be at least a 3 month build time here. Should take me right to the May long weekend, when i plant all my flowers and get the yard going. :D :D :D
Title: Re: Sheldon's Layout
Post by: Ken Huck on February 17, 2021, 04:04:39 PM
Post by: Ken Huck on February 17, 2021, 04:04:39 PM
It's all coming together nicely Sheldon, Now I guess I get to play "catch up".
Thanks for all the pics.
Ken
Thanks for all the pics.
Ken
Title: Re: Sheldon's Layout
Post by: jward on February 17, 2021, 08:09:44 PM
Post by: jward on February 17, 2021, 08:09:44 PM
You've discovered one way to keep things fresh. If you have numerous projects to work on, you can vary what you work on so you don't burn out on any one thing.
Title: Re: Sheldon's Layout
Post by: Grumpy468 on February 17, 2021, 08:59:17 PM
Post by: Grumpy468 on February 17, 2021, 08:59:17 PM
Quote from: Ken Huck on February 17, 2021, 04:04:39 PM
It's all coming together nicely Sheldon, Now I guess I get to play "catch up".
Thanks for all the pics.
Ken
Thanks Ken. Sid would send me pics all the time, That is where i got a lot of ideas from. I think it is important to share ideas and pictures in this hobby. That is one good thing about the internet.
Title: Re: Sheldon's Layout
Post by: Grumpy468 on February 17, 2021, 09:10:41 PM
Post by: Grumpy468 on February 17, 2021, 09:10:41 PM
Quote from: jward on February 17, 2021, 08:09:44 PM
You've discovered one way to keep things fresh. If you have numerous projects to work on, you can vary what you work on so you don't burn out on any one thing.
Well i build model cars as well, and i did 6 of those in a row, and got burnt out on that. So i am taking a break from that room and model bench. lol I find the Trains more open and free, the rules are less restrictive.
I am into home audio as well as reptiles. i have 7 snakes so they keep me entertained as well. This is Jonesy my texas rat snake, he is a sweetheart.


Title: Re: Sheldon's Layout
Post by: Grumpy468 on February 23, 2021, 03:41:00 PM
Post by: Grumpy468 on February 23, 2021, 03:41:00 PM
Well i sat down at the bench this afternoon to start on the refinery build. There is a sheet of brass etching, and i have never worked on a kit this detailed. This is going to take me a while to figure out and build. Also i am working with a medium based glue so it sets up real fast. Sanding fitting more sanding the brass and more fitting. I am going to model this after out local refinery here who is a customer of mine. So i have a front row seat to the best model reference in the province. This kit will change the skyline of my layout, then maybe i will get some insight and vision to how i want to landscape other areas?


Title: Re: Sheldon's Layout
Post by: jonathan on February 23, 2021, 04:25:48 PM
Post by: jonathan on February 23, 2021, 04:25:48 PM
Looks like fun!
Stupid question time. When I paint brass, I etch it first... so it will hold paint. Of course, that's with a loco. Do you have to treat the brass parts to hold paint on a stationary model?
Regards,
Jonathan
Stupid question time. When I paint brass, I etch it first... so it will hold paint. Of course, that's with a loco. Do you have to treat the brass parts to hold paint on a stationary model?
Regards,
Jonathan
Title: Re: Sheldon's Layout
Post by: Grumpy468 on February 23, 2021, 08:03:25 PM
Post by: Grumpy468 on February 23, 2021, 08:03:25 PM
I am not sure? I need to read the instructions some more.
Title: Re: Sheldon's Layout
Post by: Grumpy468 on February 23, 2021, 08:26:26 PM
Post by: Grumpy468 on February 23, 2021, 08:26:26 PM
there is nothing about paint prep in the instructions, i will just spray it with etching primer then paint.
Title: Re: Sheldon's Layout
Post by: Grumpy468 on February 25, 2021, 07:13:30 PM
Post by: Grumpy468 on February 25, 2021, 07:13:30 PM
Slow and tedious. Only made 2 mistakes so far, got it corrected fast before the glue set up. lolol


Title: Re: Sheldon's Layout
Post by: jonathan on February 25, 2021, 07:51:51 PM
Post by: jonathan on February 25, 2021, 07:51:51 PM
Gonna be sharp. Those little details are tough but really make the model. Great stuff.
Regards,
Jonathan
Regards,
Jonathan
Title: Re: Sheldon's Layout
Post by: Grumpy468 on February 26, 2021, 08:51:28 PM
Post by: Grumpy468 on February 26, 2021, 08:51:28 PM
OMG i am beat, lol i got all 15 sections built this week, now to primer and start the paint process.
Title: Re: Sheldon's Layout
Post by: Grumpy468 on February 27, 2021, 10:35:00 AM
Post by: Grumpy468 on February 27, 2021, 10:35:00 AM
Primed and painted all the parts last night, sometimes you get lucky and happy accidents happen. I placed all the pieced upside down, to paint the bottoms first. i let that dry, when i flipped everything over, i was amazed that only the railings had been completely painted, and the deck floors were still primer grey. :D :D :D. I am now deciding to leave them that way i think to give it some contrast. . This is a couple shots of my refinery area, the tank car loading area.


Title: Re: Sheldon's Layout
Post by: Grumpy468 on March 06, 2021, 05:38:03 PM
Post by: Grumpy468 on March 06, 2021, 05:38:03 PM
Getting going on the refinery kit...


Title: Re: Sheldon's Layout
Post by: Grumpy468 on March 06, 2021, 05:41:53 PM
Post by: Grumpy468 on March 06, 2021, 05:41:53 PM
A few more.


Title: Re: Sheldon's Layout
Post by: Grumpy468 on March 06, 2021, 05:43:10 PM
Post by: Grumpy468 on March 06, 2021, 05:43:10 PM
Lucky to have them as a customer, i get a birds eye view of a real refinery.
Title: Re: Sheldon's Layout
Post by: Grumpy468 on March 08, 2021, 11:24:44 AM
Post by: Grumpy468 on March 08, 2021, 11:24:44 AM
Got some work done over the weekend, also did a section of landscaping between the 2 lines. Will add more to it as time goes on, just wanted to get an idea of what the grass between the tracks would look like. Started on the refinery, need to set it on the layout to se what i can do with the extra pipe kit? I need a bigger layout, this one is too small. lolol


Title: Re: Sheldon's Layout
Post by: Grumpy468 on March 09, 2021, 08:02:02 PM
Post by: Grumpy468 on March 09, 2021, 08:02:02 PM
Making progress, Still need to weather before gluing it all together. I am at the point where i need to get my led lighting in place before assembly, so need to figure out lites?


Title: Re: Sheldon's Layout
Post by: Grumpy468 on March 12, 2021, 05:06:03 PM
Post by: Grumpy468 on March 12, 2021, 05:06:03 PM
What i got done so far today. Here are some before and after weathering pictures. Taking it slow, the top pipe rack is not glued down, i still have to buy and add lites to it.


Title: Re: Sheldon's Layout
Post by: Grumpy468 on January 20, 2023, 08:01:37 PM
Post by: Grumpy468 on January 20, 2023, 08:01:37 PM
Hey guys i am glad this site is back. I have been busy detailing track. I took everything off the layout that i could and started to detail all the rail ties.
Title: Re: Sheldon's Layout
Post by: Grumpy468 on January 20, 2023, 08:09:24 PM
Post by: Grumpy468 on January 20, 2023, 08:09:24 PM
Wow it has been a long time since i posted anything on here. Get ready for a bunch of pics.


Title: Re: Sheldon's Layout
Post by: Grumpy468 on January 20, 2023, 08:13:00 PM
Post by: Grumpy468 on January 20, 2023, 08:13:00 PM


Title: Re: Sheldon's Layout
Post by: Grumpy468 on January 20, 2023, 08:15:15 PM
Post by: Grumpy468 on January 20, 2023, 08:15:15 PM


Title: Re: Sheldon's Layout
Post by: Grumpy468 on January 20, 2023, 08:17:34 PM
Post by: Grumpy468 on January 20, 2023, 08:17:34 PM


Title: Re: Sheldon's Layout
Post by: Grumpy468 on January 20, 2023, 08:20:26 PM
Post by: Grumpy468 on January 20, 2023, 08:20:26 PM


Title: Re: Sheldon's Layout
Post by: Grumpy468 on January 20, 2023, 08:27:36 PM
Post by: Grumpy468 on January 20, 2023, 08:27:36 PM


Title: Re: Sheldon's Layout
Post by: Terry Toenges on January 20, 2023, 11:33:17 PM
Post by: Terry Toenges on January 20, 2023, 11:33:17 PM
It's nice to see all the layout pics again.
Title: Re: Sheldon's Layout
Post by: Grumpy468 on January 21, 2023, 12:26:06 AM
Post by: Grumpy468 on January 21, 2023, 12:26:06 AM
Thanks Terry.


Title: Re: Sheldon's Layout
Post by: Grumpy468 on January 21, 2023, 08:29:03 AM
Post by: Grumpy468 on January 21, 2023, 08:29:03 AM
I ordered a static grass kit from a hobby shop in Poland. I built it but have not tried it out yet. was waiting until all the track was painted and weathered. It is a high output unit, lol.


Title: Re: Sheldon's Layout
Post by: Grumpy468 on January 21, 2023, 05:05:27 PM
Post by: Grumpy468 on January 21, 2023, 05:05:27 PM
Another 12 feet done today.


Title: Re: Sheldon's Layout
Post by: Grumpy468 on January 22, 2023, 12:03:11 PM
Post by: Grumpy468 on January 22, 2023, 12:03:11 PM
Added powder now, done, just need to add the grass.


Title: Re: Sheldon's Layout
Post by: Grumpy468 on March 04, 2023, 10:33:20 AM
Post by: Grumpy468 on March 04, 2023, 10:33:20 AM
Made 32 trees this week.


Title: Re: Sheldon's Layout
Post by: Grumpy468 on April 15, 2023, 08:40:29 AM
Post by: Grumpy468 on April 15, 2023, 08:40:29 AM
Bought a new woodland scenics static grass machine, way better. Started on a new section.


Title: Re: Sheldon's Layout
Post by: Ken Huck on April 15, 2023, 05:07:13 PM
Post by: Ken Huck on April 15, 2023, 05:07:13 PM
WOWZA ! Looks like you've been more than busy ! Weathering individual ties is tedious. I tried once
on a section (3 Feet) of track. Now, I can say I tried it. That's the one thing that 'ties' an entire layout together (no pun intended). With the new vegetation, it's really looking good.
Thanks for the pics Sheldon.
Ken
on a section (3 Feet) of track. Now, I can say I tried it. That's the one thing that 'ties' an entire layout together (no pun intended). With the new vegetation, it's really looking good.
Thanks for the pics Sheldon.
Ken
Title: Re: Sheldon's Layout
Post by: Grumpy468 on April 15, 2023, 05:23:02 PM
Post by: Grumpy468 on April 15, 2023, 05:23:02 PM
Thanks Ken, I have decided to get at this bigger area first, and work my way out.
Title: Re: Sheldon's Layout
Post by: Grumpy468 on April 16, 2023, 04:04:25 PM
Post by: Grumpy468 on April 16, 2023, 04:04:25 PM
Got this little section done, with a street lite added wired up. I have a large section of track area to deal with? not sure if it will be fence or trees, I may do a split of fence and trees. It's overwhelming to envision at times.


Title: Re: Sheldon's Layout
Post by: Grumpy468 on May 07, 2023, 11:53:23 AM
Post by: Grumpy468 on May 07, 2023, 11:53:23 AM
Built some landscape dividers, I have a couple areas I am not sure what to do with.


Title: Re: Sheldon's Layout
Post by: Ken Huck on May 07, 2023, 04:15:00 PM
Post by: Ken Huck on May 07, 2023, 04:15:00 PM
Lookin' good Sheldon, I like the way you weather 'wood'. Is that wood or plastic, the grain
looks HO scale.
I'm just about finished with my 'trackside' liquid industry. Still have to work a bit more elevation
for the 'loading dock'.
Ken
looks HO scale.
I'm just about finished with my 'trackside' liquid industry. Still have to work a bit more elevation
for the 'loading dock'.
Ken
Title: Re: Sheldon's Layout
Post by: Grumpy468 on May 07, 2023, 04:31:18 PM
Post by: Grumpy468 on May 07, 2023, 04:31:18 PM
Thank you ken, Yes these are wood, laser cut kits. I tried an India ink wash first, then grey dry brushing. after that a black wash, and then powder.
Title: Re: Sheldon's Layout
Post by: 686 Shooter on May 12, 2023, 06:14:34 PM
Post by: 686 Shooter on May 12, 2023, 06:14:34 PM
That looks great! I too am a small town prairie boy.
Title: Re: Sheldon's Layout
Post by: Grumpy468 on May 12, 2023, 10:27:47 PM
Post by: Grumpy468 on May 12, 2023, 10:27:47 PM
Right on. I was on the road a lot for work, my layout is a representation of a combination of small rural towns here.
Title: Re: Sheldon's Layout
Post by: Grumpy468 on June 28, 2023, 09:53:00 PM
Post by: Grumpy468 on June 28, 2023, 09:53:00 PM
Back on the bench. Small areas are so hard to come up with ideas.


Title: Re: Sheldon's Layout
Post by: Ken Huck on June 29, 2023, 08:15:49 AM
Post by: Ken Huck on June 29, 2023, 08:15:49 AM
Those little buildings look like some of the builddings I've been in before.
Your 'weathering' is excellent !
Thanks for posting.
Ken
Your 'weathering' is excellent !
Thanks for posting.
Ken
Title: Re: Sheldon's Layout
Post by: Grumpy468 on June 29, 2023, 12:27:52 PM
Post by: Grumpy468 on June 29, 2023, 12:27:52 PM
Things are coming together now. i am starting to build some barbed wire fence to go in between the trees.


Title: Re: Sheldon's Layout
Post by: Grumpy468 on June 30, 2023, 11:30:29 AM
Post by: Grumpy468 on June 30, 2023, 11:30:29 AM
I am still not done, mored details to add, at the same time, i dont want to overdo it.


Title: Re: Sheldon's Layout
Post by: Grumpy468 on June 30, 2023, 11:36:56 AM
Post by: Grumpy468 on June 30, 2023, 11:36:56 AM
Pics dont seem to load? try again.
Title: Re: Sheldon's Layout
Post by: Grumpy468 on July 01, 2023, 02:57:42 PM
Post by: Grumpy468 on July 01, 2023, 02:57:42 PM
This happened today. Not sure how much more I will add.


Title: Re: Sheldon's Layout
Post by: Grumpy468 on July 01, 2023, 06:56:51 PM
Post by: Grumpy468 on July 01, 2023, 06:56:51 PM
The street lites add a nice touch.


Title: Re: Sheldon's Layout
Post by: Grumpy468 on July 09, 2023, 12:28:14 AM
Post by: Grumpy468 on July 09, 2023, 12:28:14 AM
More static grass and outhouses.


Title: Re: Sheldon's Layout
Post by: Grumpy468 on July 09, 2023, 03:13:02 PM
Post by: Grumpy468 on July 09, 2023, 03:13:02 PM
I put a couple of my main street buildings on to see what else i need to add for landscaping. a bunch of ideas came out.


Title: Re: Sheldon's Layout
Post by: Grumpy468 on July 10, 2023, 09:24:46 PM
Post by: Grumpy468 on July 10, 2023, 09:24:46 PM


Title: Re: Sheldon's Layout
Post by: Grumpy468 on July 23, 2023, 02:18:37 PM
Post by: Grumpy468 on July 23, 2023, 02:18:37 PM
Continue working on the downtown area, from the middle out. Getting let lighting done on the inside and outside of the buildings. Adding power poles and more trees to finish off that area.


Title: Re: Sheldon's Layout
Post by: Grumpy468 on July 25, 2023, 10:53:04 PM
Post by: Grumpy468 on July 25, 2023, 10:53:04 PM
On holidays this week, started adding power poles more lites, and completed a laser cut office kit.


Title: Re: Sheldon's Layout
Post by: Ken Huck on July 26, 2023, 04:24:52 PM
Post by: Ken Huck on July 26, 2023, 04:24:52 PM
That is one nicely weathered 'yard office.
Well done !
Ken
Well done !
Ken
Title: Re: Sheldon's Layout
Post by: Grumpy468 on July 26, 2023, 07:10:55 PM
Post by: Grumpy468 on July 26, 2023, 07:10:55 PM
Thank you Ken. Hope you are doing well.
Title: Re: Sheldon's Layout
Post by: Grumpy468 on July 30, 2023, 05:34:39 PM
Post by: Grumpy468 on July 30, 2023, 05:34:39 PM
I built the holding bin a month ago, figured out how to do the dirt piles this morning.


Title: Re: Sheldon's Layout
Post by: Grumpy468 on August 03, 2023, 07:38:56 PM
Post by: Grumpy468 on August 03, 2023, 07:38:56 PM
Started on the 2 story Chinese restaurant this week. Wood kits are challenging.


Title: Re: Sheldon's Layout
Post by: Ken Huck on August 03, 2023, 10:13:46 PM
Post by: Ken Huck on August 03, 2023, 10:13:46 PM
The signs look great. Now take some 220 grit sandpaper, or finer, and lightly sand over the
signs. That'll give them a nice weatgered look.
Also: The previous "yard office" you put up, is that an AMB product ?
Ken
signs. That'll give them a nice weatgered look.
Also: The previous "yard office" you put up, is that an AMB product ?
Ken
Title: Re: Sheldon's Layout
Post by: Grumpy468 on August 08, 2023, 01:02:30 AM
Post by: Grumpy468 on August 08, 2023, 01:02:30 AM
Some landscaping details left to add.


Title: Re: Sheldon's Layout
Post by: Grumpy468 on August 09, 2023, 10:33:52 PM
Post by: Grumpy468 on August 09, 2023, 10:33:52 PM
Started to add fence, trees and crossing signs. will start detailing more tomorrow.


Title: Re: Sheldon's Layout
Post by: Len on August 11, 2023, 09:25:18 AM
Post by: Len on August 11, 2023, 09:25:18 AM
The 'Rigid' drill advertising structure looks too modern for the rest of the layout.
Len
Len
Title: Re: Sheldon's Layout
Post by: Grumpy468 on August 11, 2023, 09:29:51 AM
Post by: Grumpy468 on August 11, 2023, 09:29:51 AM
Quote from: Len on August 11, 2023, 09:25:18 AMThe 'Rigid' drill advertising structure looks too modern for the rest of the layout.
Len
HAHAHAHAHAHA.
Title: Re: Sheldon's Layout
Post by: Grumpy468 on August 15, 2023, 01:55:35 AM
Post by: Grumpy468 on August 15, 2023, 01:55:35 AM
Adding more details. Fence trees power pole.


Title: Re: Sheldon's Layout
Post by: Ken Huck on August 16, 2023, 03:49:47 PM
Post by: Ken Huck on August 16, 2023, 03:49:47 PM
You've really got a nice looking 'crossing' scene going there.
Are the signs decals, or what ? They look hand-painted in 1/87scale
Ken
Are the signs decals, or what ? They look hand-painted in 1/87scale
Ken
Title: Re: Sheldon's Layout
Post by: Grumpy468 on August 17, 2023, 12:25:40 AM
Post by: Grumpy468 on August 17, 2023, 12:25:40 AM
yes the are a decal sheet I cut out and glued on, came with the kit.
Title: Re: Sheldon's Layout
Post by: Grumpy468 on August 19, 2023, 12:48:27 PM
Post by: Grumpy468 on August 19, 2023, 12:48:27 PM
Started adding some filler trees. Don't want to interfere with the power lines when I add them to the poles.


Title: Re: Sheldon's Layout
Post by: Grumpy468 on August 20, 2023, 11:54:18 PM
Post by: Grumpy468 on August 20, 2023, 11:54:18 PM
Was an eventful weekend. Still need to add more details. Once I add people and picnic tables, and. barrels.


Title: Re: Sheldon's Layout
Post by: 4311wade on August 21, 2023, 06:46:15 AM
Post by: 4311wade on August 21, 2023, 06:46:15 AM
Awesome layout!
Could you tell me your process for posting photos on this forum? I'm still trying to figure it out.
Thanks.
Could you tell me your process for posting photos on this forum? I'm still trying to figure it out.
Thanks.
Title: Re: Sheldon's Layout
Post by: Yard Master on August 21, 2023, 08:44:26 AM
Post by: Yard Master on August 21, 2023, 08:44:26 AM
Quote from: 4311wade on August 21, 2023, 06:46:15 AMAwesome layout!Hi 4311wade,
Could you tell me your process for posting photos on this forum? I'm still trying to figure it out.
Thanks.
You will need to first upload your photos to an external file/photo uploading service such as Google Drive or Flickr. Then, when writing your post, to add the image you need to click the "Insert an image" icon in the toolbar (next to the YouTube icon) and paste the direct URL for the image in the field. Click "insert" and your image should then appear.
Title: Re: Sheldon's Layout
Post by: Grumpy468 on November 13, 2023, 07:33:33 PM
Post by: Grumpy468 on November 13, 2023, 07:33:33 PM
I have been so busy with work, that I have not had a chance to work on my layout. I am into a lot of tedious stuff now, trees shrubs getting power poles and street lites correct. there are lots of details to get right. poles need to be in the correct direction and location so I can do power drops to buildings etc.


Title: Re: Sheldon's Layout
Post by: Ken Huck on November 14, 2023, 01:20:45 PM
Post by: Ken Huck on November 14, 2023, 01:20:45 PM
That's some nice 'eye candy' you got going Sheldon. Love them poles ! ! !
Ken
Ken
Title: Re: Sheldon's Layout
Post by: Grumpy468 on November 14, 2023, 07:52:27 PM
Post by: Grumpy468 on November 14, 2023, 07:52:27 PM
Added some fence I made, some static grass, and a couple more trees. Slowly filling in a bit at a time.


Title: Re: Sheldon's Layout
Post by: Grumpy468 on November 16, 2023, 07:40:00 PM
Post by: Grumpy468 on November 16, 2023, 07:40:00 PM
Added some more trees, grass and shrubs. I added a few details to the tanks. It just blows me away how much a few details add to the overall look.


Title: Re: Sheldon's Layout
Post by: Grumpy468 on November 17, 2023, 10:44:28 AM
Post by: Grumpy468 on November 17, 2023, 10:44:28 AM
Added 2 more trees behind the main office. that helped fill things in. I am going to slowly add flowers etc see how it looks.


Title: Re: Sheldon's Layout
Post by: Grumpy468 on November 23, 2023, 09:32:45 AM
Post by: Grumpy468 on November 23, 2023, 09:32:45 AM
Adding details makes a big difference.I started adding some extra bottles, barrel's etc. as well as some pallets. I bought some plastic ones, and sat down with scale wood and made a wood one. They take around 30 min to make, but i will start making them.


Title: Re: Sheldon's Layout
Post by: Ken Huck on November 23, 2023, 04:32:24 PM
Post by: Ken Huck on November 23, 2023, 04:32:24 PM
Really looking good with all the little fill ins.
You need a 'burn barrel' or two...
Ken
You need a 'burn barrel' or two...
Ken
Title: Re: Sheldon's Layout
Post by: Grumpy468 on November 24, 2023, 12:46:58 AM
Post by: Grumpy468 on November 24, 2023, 12:46:58 AM
Yes I have lots to add, but doing it slowly.
Title: Re: Sheldon's Layout
Post by: trainman203 on November 24, 2023, 08:12:13 AM
Post by: trainman203 on November 24, 2023, 08:12:13 AM
I like the 3 transformers on the platform between the two poles on the first photo. Was that a kit?
Title: Re: Sheldon's Layout
Post by: Grumpy468 on November 24, 2023, 08:19:14 AM
Post by: Grumpy468 on November 24, 2023, 08:19:14 AM
No that was my own build. I see them a lot out in the country, so i took some pictures and made it. I will tell you this hobby has turned me into a civil engineer. lol I am now pre planning all my power poles on the layout, and getting them lined up and sorted out. I may be taking this a bit too far. lolol
Title: Re: Sheldon's Layout
Post by: Len on November 24, 2023, 10:13:23 AM
Post by: Len on November 24, 2023, 10:13:23 AM
Loving the look of the weathering on your layout. Except for that soda machine. It looks like something found under a pile of junk in the back of a barn on the "American Pickers" TV show. Not something actually in use in the era represented.
That style, with the vertical window stack on the right, was manufactured by Vendco. It came out in 1951, when Coke-Cola finally lifted the 'nickle a bottle' price cap. Prior to that the window stack was on the left. Both styles, with minor differences, were also offered to other drink makers.
The problem is, by contract, the location where the machine was placed had responsibility for maintaining the outside of the machine in good condition. Or at least wiped down of extranious dirt, etc. Some places went so far as to actually wax the outside, as if it were a car. At any rate, if the outside paint was damaged in any way, a replacement machine was supposed to be requested. Unless the distributor had gone out of business, in which case there would be no product available for it, the machine would never be allowed to get into that condition for use by customers.
I don't count rivets, but I did work in a vintage vending machine restoration shop a few years ago. And your "machine' just struck me as wrong. But then, it's your layout. So whatever.
Also, if it's a Coke machine the top should be white:
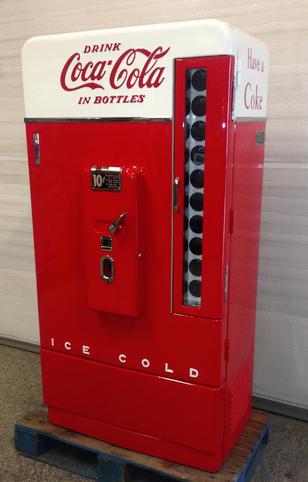
A Royal Crown (RC) machine of that era would be overall yellow and a Dr. Pepper machine would be a light lime green.
Len
That style, with the vertical window stack on the right, was manufactured by Vendco. It came out in 1951, when Coke-Cola finally lifted the 'nickle a bottle' price cap. Prior to that the window stack was on the left. Both styles, with minor differences, were also offered to other drink makers.
The problem is, by contract, the location where the machine was placed had responsibility for maintaining the outside of the machine in good condition. Or at least wiped down of extranious dirt, etc. Some places went so far as to actually wax the outside, as if it were a car. At any rate, if the outside paint was damaged in any way, a replacement machine was supposed to be requested. Unless the distributor had gone out of business, in which case there would be no product available for it, the machine would never be allowed to get into that condition for use by customers.
I don't count rivets, but I did work in a vintage vending machine restoration shop a few years ago. And your "machine' just struck me as wrong. But then, it's your layout. So whatever.
Also, if it's a Coke machine the top should be white:
A Royal Crown (RC) machine of that era would be overall yellow and a Dr. Pepper machine would be a light lime green.
Len
Title: Re: Sheldon's Layout
Post by: Grumpy468 on November 24, 2023, 12:22:48 PM
Post by: Grumpy468 on November 24, 2023, 12:22:48 PM
Quote from: Len on November 24, 2023, 10:13:23 AMLoving the look of the weathering on your layout. Except for that soda machine. It looks like something found under a pile of junk in the back of a barn on the "American Pickers" TV show. Not something actually in use in the era represented.
That style, with the vertical window stack on the right, was manufactured by Vendco. It came out in 1951, when Coke-Cola finally lifted the 'nickle a bottle' price cap. Prior to that the window stack was on the left. Both styles, with minor differences, were also offered to other drink makers.
The problem is, by contract, the location where the machine was placed had responsibility for maintaining the outside of the machine in good condition. Or at least wiped down of extranious dirt, etc. Some places went so far as to actually wax the outside, as if it were a car. At any rate, if the outside paint was damaged in any way, a replacement machine was supposed to be requested. Unless the distributor had gone out of business, in which case there would be no product available for it, the machine would never be allowed to get into that condition for use by customers.
I don't count rivets, but I did work in a vintage vending machine restoration shop a few years ago. And your "machine' just struck me as wrong. But then, it's your layout. So whatever.
Also, if it's a Coke machine the top should be white:
A Royal Crown (RC) machine of that era would be overall yellow and a Dr. Pepper machine would be a light lime green.
Len
Well it is my layout, and it only has to meet my approval not yours? I could care less what you have to say. Happy Modelling.
Title: Re: Sheldon's Layout
Post by: trainman203 on November 24, 2023, 07:25:03 PM
Post by: trainman203 on November 24, 2023, 07:25:03 PM
Those kind of coke machines, juvenile delinquents used to pop the cap off of a bottle while in the machine, let it pour into a cup, and finish off was left in the bottle with a straw.
🫨😱😂😂😂
🫨😱😂😂😂
Title: Re: Sheldon's Layout
Post by: trainman203 on November 24, 2023, 07:27:56 PM
Post by: trainman203 on November 24, 2023, 07:27:56 PM
I believe that a cold bottle of Coca-Cola out of a machine was either six cents or $.10 at the time.
Title: Re: Sheldon's Layout
Post by: Len on November 25, 2023, 07:23:37 AM
Post by: Len on November 25, 2023, 07:23:37 AM
Quote from: trainman203 on November 24, 2023, 07:27:56 PMI believe that a cold bottle of Coca-Cola out of a machine was either six cents or $.10 at the time.
Through 1950 Coca-Cola was capped at 5 cents a bottle. The cap was lifted in 1951, after several lawsuits, and almost immediately the price jumped to 10 cents.
Len
Title: Re: Sheldon's Layout
Post by: Grumpy468 on November 25, 2023, 09:50:38 AM
Post by: Grumpy468 on November 25, 2023, 09:50:38 AM
Quote from: trainman203 on November 24, 2023, 07:27:56 PMI believe that a cold bottle of Coca-Cola out of a machine was either six cents or $.10 at the time.
I remember getting a drink and a chocolate bar for $.25 the drink was 15 and the bar was 10 It was A Canadian thing, back in the late 70's an independent company started Pic a Pop. was not bad, but didnt last.
Title: Re: Sheldon's Layout
Post by: Grumpy468 on November 27, 2023, 10:25:05 AM
Post by: Grumpy468 on November 27, 2023, 10:25:05 AM
This picture was taken in 1971, by a fellow writing a book about depots in Western Canada. The 3 kids in the picture are Me my sister and cousin, and or family dog. We lived in that station from 1967 till 1976.

Title: Re: Sheldon's Layout
Post by: jward on November 28, 2023, 10:57:42 AM
Post by: jward on November 28, 2023, 10:57:42 AM
That must have been a wonderful childhood. My dad never wored for the railroad, but we often visited the towers and stations on the various railroads we came across in our travels. Railroads were incredibly friendly back then, and you could often find an otherwise bored operator in an out of the way location who would tell you tales of the railroad. I think most of them were glad for the company on an otherwise lonely job.
Title: Re: Sheldon's Layout
Post by: Grumpy468 on January 14, 2024, 08:58:10 PM
Post by: Grumpy468 on January 14, 2024, 08:58:10 PM
Started on a long empty stretch. added marker posts, and scenery.


Title: Re: Sheldon's Layout
Post by: Grumpy468 on January 14, 2024, 09:05:12 PM
Post by: Grumpy468 on January 14, 2024, 09:05:12 PM
Started with this.


Title: Re: Sheldon's Layout
Post by: Ken Huck on January 15, 2024, 03:48:42 PM
Post by: Ken Huck on January 15, 2024, 03:48:42 PM
Like them signs, Sheldon. All those 'little' details really bring the entire scene together.
Ken
Ken
Title: Re: Sheldon's Layout
Post by: Grumpy468 on January 15, 2024, 05:27:58 PM
Post by: Grumpy468 on January 15, 2024, 05:27:58 PM
Thank Ken. I am going to make a few more. It is such a long area, I don't want to over do it. Same with vehicles on the road. Less is more can always add more scenery.
Title: Re: Sheldon's Layout
Post by: Grumpy468 on February 03, 2024, 10:53:48 PM
Post by: Grumpy468 on February 03, 2024, 10:53:48 PM
Made a dozen trees today, clipped tiny branches from shrubs and glued branches together. First attempt, and they are more flat by design to fit a certain area.


Title: Re: Sheldon's Layout
Post by: Grumpy468 on February 11, 2024, 10:59:34 PM
Post by: Grumpy468 on February 11, 2024, 10:59:34 PM
Moved some things around on the layout, I am moving the power centre to the front industrial area. Drew it out on the table with pencil crayons, I allowed for a 2.5inch road. Have different types of power poles towers etc for transitioning. We have a few big substations here I can go look at for ideas.


Title: Re: Sheldon's Layout
Post by: Grumpy468 on March 09, 2024, 05:32:22 PM
Post by: Grumpy468 on March 09, 2024, 05:32:22 PM
Got one section of building and street lites done. Started to do more landscaping.


Title: Re: Sheldon's Layout
Post by: Ken Huck on March 09, 2024, 05:40:11 PM
Post by: Ken Huck on March 09, 2024, 05:40:11 PM
WOW ! Those 'lighted' scenes really shine through ! (pun intended)
On your landscapint: What are you using for dirt ? It looks like sand
in one of your photos.
Ken
On your landscapint: What are you using for dirt ? It looks like sand
in one of your photos.
Ken
Title: Re: Sheldon's Layout
Post by: Grumpy468 on March 09, 2024, 05:44:12 PM
Post by: Grumpy468 on March 09, 2024, 05:44:12 PM
I have actual gravel from gravel roads that I have sifted , and I have some bought gravel etc, I try mixing see what I get.
Title: Re: Sheldon's Layout
Post by: Ralph S on March 24, 2024, 07:12:30 PM
Post by: Ralph S on March 24, 2024, 07:12:30 PM
Do you have any plans to connect simulated or actual wires from the substation to the transmission towers?
Title: Re: Sheldon's Layout
Post by: Grumpy468 on March 24, 2024, 07:24:58 PM
Post by: Grumpy468 on March 24, 2024, 07:24:58 PM
Yes I am going to install wire from each power pole to pole to each building etc. The kits come with scale flexible wire.
Title: Re: Sheldon's Layout
Post by: Len on March 25, 2024, 09:09:03 AM
Post by: Len on March 25, 2024, 09:09:03 AM
Be careful not to let the poles and wires get in the way of getting at areas where maint, or deal with derailments, might be required. Had to deal with that on a display layout where the person doing the scenary put poles, wires and rather large trees exactly where he was told not to put them.
Len
Len