News:

Please read the Forum Code of Conduct   >>Click Here <<

Main Menu
Menu

Show posts

This section allows you to view all posts made by this member. Note that you can only see posts made in areas you currently have access to.

Show posts Menu

Messages - Martha

#91


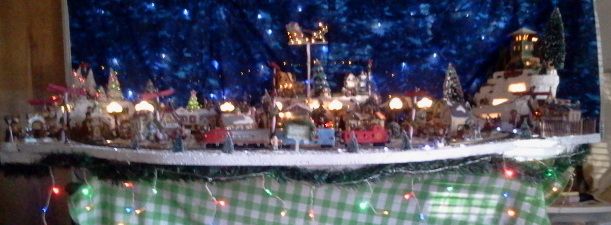
I wanted to share what the platform looks like I will be adding my new EZ track to. This is actually the first platform, I redid it last year with the extruded foam and made it wider. The reason for it not rectangle is I have this on top of entertainment center and need to get around it. Everything has basically been remodeled. Those of you who have gone to youtube and seen the video can see the end result. This year, knowing me, it will be different again.

One NEW thing this year is Prairie.


Isn't she a bute Clark? (what movie?)

Can't wait for my new track so I can get going on this!

thanks to past post on how to add photos to my post.


this is Jamestown in all it's glory last year.
#92
Thanks Jbrock77, once I get the track and set it up and try the terminal joiner, if it doesn't supply enough power I will go and buy the rerailer track with power terminals or add more myself. I saw a very detailed video on doing that. I have started going back and looking for post on this site. Looking for all the neat tricks of the trade.
#93
Good morning all. Seems I have created some confusion here on my track layout and because I have changed my mind (more than once) discussions are still on the old stuff and old the layout. Maybe we can start over from this post on.

I am installing BRAND NEW Bachmann EZ track N/S as soon as it is delivered! On the foam platform I have. This is what I probably should had done a few years back but being a newbie I didn't know any better or even where to go for advice.

I purchased enough to make an oval 36X58. There will be six 18R at each end of the oval and 2 straights each side, total 4 straights. This is basically what I had. If I need to "wiggle" it a tad I have room to do so. By "wiggle" I mean once all the nice new track is joined together and it makes that nice oval shape I can move it N, S, E, W  to keep it correctly aligned and on the platform. I have removed the old brass track and the newly glued down track bed. Luckily I only got a few sections of ballast completed prior to this new development some got on the foam and that will be scraped off giving me a nice clean new surface to layout the new track. Basically starting from scratch. I will glue the EZ track to the platform and will store it that way.

If this new track does not work, well you will hear my fowl words from where ever you are located, sound travels they say!

I will not attempt to replace the wheels as I had thought of doing, it does sound expensive and once this new track is installed the plastic should do fine. If not, well I will go to plan B what ever that might be. I did read from old post about the wheels after I asked my question a few post back. Going to start to do that, go back and read old post. Might save me time from asking too many questions.

I do need help about when it comes to supplying power to the new track. I did not buy a rerailer terminal track as OmniModels only had the steel one and I want it all to stay n/s. I did buy a joiner terminal with the wires attached to use to supply power. Will that be enough or should I use the rerailer track kind or what? At this point I will buy/use whatever you all think. You are the experts in this field.

So to recap what Martha is now doing to her project she is waiting on new Bachmann EZ N/S track to be delivered. Once here she will be installing it and moving on to other things on the village.
#94
jbrock77, my cars I will be using all have those cheap plastic wheels. Would it be worth it to change them out to metal wheels? If so I see they're 36" and 33" size, what ones would I use? what does those sizes mean?

#95
Just spent the last few hours searching, researching, watching videos, re-reading advice here and because I am of a gender that changes their mind quite often in a matter of minutes have decided ( before I change my mind again) to purchase Bachmann EZ Track, Nickel Silver, enough track to make the approximate 58X36 inch oval I currently have. It is purchased and should be here in a couple days, luckily the distribution center is here in Reno. I will just chalk up the wasted road bed I already put down to inexperience. I only used half the roll so maybe I can sell the rest with the rest of the stuff I have accumulated and won't use to someone.

Now I do have questions for the EZ track install, any thing special I need to do to the foam platform? How should I attach it to the foam board, remember it will remain adhered to the foam layout when stored.

I did not purchase the straight terminal rerailer as the only one they had was steel not n/s. I did buy  terminal joiners to supply power. It's one set of joiners with two wires for the power. Now will that be enough or will I need to add more power to the tracks? It was very cheap so if you say I should buy a E Z straight terminal rerailer I will.

If there is any further info I should know about setting up, using, etc this EZ track let me know. My days of brass, steel used flex track, yeah a magnet stuck to the crap (was told it was N/S, liar), foam track bed are gone. I may consider down the road replacing the power supply I have, OH MY GOSH! will my old power supply pack work with the EZ track? PLEASE say YES. For now this is it! No more additions, no more locos, tracks, joiners, and what not! Ha Ha that was a funny sentence. Next I will be asking advice for all the twinkle lights and crossing signals and who knows what.

Okay this nut job is signing off for now!

#96
Good morning, slept on this dilemma, replacing all the track with nickel silver. Still have not made a decision. The advice I am getting is helping but also creating new questions from the comments I have gotten.

Working with flex track. If I connect 4 - 3' pieces will I be able to create an oval shape fairly easy? That would give me about 12' of track? I know the flex track has one rail that does move, if joining all 4 pieces will that moving track "adjust" and create the oval or will I have to cut and join? If I need curved track and flex track to make this oval what radius track do I need and how many and how many straight tracks will I need. Keep in mind I am trying to avoid numerous joints, this seems to be my problem now (maybe that isn't possible-less joints than I have now). Also, once this track is glued down it is not coming off. I store the platform with the track attached. No need to undo things. All I need to do is disconnect the power supply and store it separately.

after watching some videos, would I want to use 22" radius, 18" radius or 9" radius? at the moment I am using 18", six for each end of the oval.
#97
doneldon ask about the brass radius, the curved sections are marked 18R. Jbrock77 The second power rerailer I have doesn't want to work any better than the other but it could just be all the crappy joints I have.

I just spent money on track bed so I won't be buying EZ track even if it is the easiest.

I measured what I have now with a flexible sewing tape measure. It might not be exactly 12 ' but it is close enough for me to know how much track I will need.

The flex track I am looking to purchase is from Omnimodels, a online model everything store. They state it is new, in the original box and is nickel silver. I bought the track bed from this place and it was as stated what I purchased. It states it can be bent to a minimum radius of 18". It is on black ties, which doesn't matter to me.

Jbrock77 I did watch that video and trust me if I had not just bought track bed I would be buying EZ track and snapping it together.

Doneldon - you confused be a tad, mentioning different levels of track? Were you thinking I am combining brass and nickle silver? I know there is 83 and 100 in track (I think that is height of the rail?). What I am doing is all nickel silver flex track all one size. The brass crap I have will be just a distant memory, kind of like an old lover, stuffed in a box or toss in a dumpster.

Now the radius. This is where I am not sure about. What I have now the radius seems to be fine, not so tight the cars can't navigate around the track. The problem I am having NOW is a zillion crappy joints and old crappy track, 2 beat up rerailer/power tracks.

With four pieces of flex track I should be able to make nice smooth radius's with 8 joiners, a nice simple oval should be created right? The question now that comes to mind. The two radius's on each end of the oval is approximately 58 inches from one side to the other side. That is using my flexible sewing tape measure that I laid down the middle of the tracks and measured from one side to the other side of that curve. The flex track is 36" each so two make 72 inches. I would want to lay the two joined pieces of track at the center of that radius, bring them around (both sides) to complete the radius and start my straight track from there. Would that be a correct way to lay it out? OR do I want to off set the two joined tracks to make that radius? What little I have messed with flex track I had (actually turned out to be steel stuff someone sold me as nickel. that bend in the radius might do better not right smack in the center of it. I think I may be over thinking this or just frustrated with it all.  Maybe I should get 5 pieces just in case I need to have extra or need to do a repair down the road?

Sorry if I am sounding like someone who has no idea what I am doing. Oh wait I don't know what I am doing! Its late and I might need to rethink this in the morning. Better sleep on it.

#98
I'm excited I can actually join in on this forum! I am NOT a model railroader, I have a Christmas village with a ho scale train going around it. Trust me there is a difference. Model railroading/trains I had no experience or idea what I was buying or setting up, nor how to do any of it. then I came to this site. (a tad late, had already bought stuff) HOWEVER, these MR guys are great! I actually can give you some advice.

1. don't buy brass tracks. I have had problems with it ever since I bought it (going on 2nd year). I am buying nickel silver flex track just not sure what kind, straights, curves, etc. Go to HO forum here as Jbrock77 suggested. I have gotten tons of advice on that forum and waiting to get advice on the flex track. BTW jbrock77, doneldon and jward ROCK. oh I am told Jonathon ROCKS on electrical, having hit him up... yet.

2. Shop and shop, look and look before buying ask questions too. Once you buy well you are stuck with it and if not happy with it you will never like what it does or doesn't do. I bought a diesel (it was cheap on ebay) It does not fit in with my decor of my village so this year I bought a Bachmann Prairie, she's a bute, steam loco.

3. Plan ahead your layout. Not having enough room to set up a track as you want will only anger you more. Lesson learned.

4. Have fun with it.  Good Luck

Here is my Christmas village from last year and how it came to be.
http://youtu.be/kulQYLP7a0M


#99
I have thrown up another white flag! I believe I have come to the final conclusion that this old brass track mixed in with a piece of nickle silver flex track is done, finished, out of here! 12 curved pieces plus 2 brass straights and one flex straight is just too many joints (32 rail joiners) and too much frustration for this gal! I might be mistaken in this matter but I think I should be replacing it all with nickel silver flex track? Please! What the heck should I do? The total oval is 12 ft. I find most flex track is 3 ft per section so I would need 4 sections right? Do I need a power rail to supply the power or can I just straight wire it as Jbrock77 has discussed? The Brass curves I have now are 9 inches, no idea what radius that is. It takes 6 on each end to make that oval. I have found nickel silver flex track by Model Power for 7 dollars a section (3 ft). Is that a good price? Also will Bachmann EZ track rail joiners work with this flex track? I have lost all patience and a few marbles fighting this track, if it isn't one section it's another, one section it goes fast another slow, it derails at joints that didn't get tight or moved while the glue dried. Glue is the only way I see adhering to the foam and I think less joints the better it is for continuity. So my MR's buddies help! I am sure there is more than one way to go here and to save my sanity. It saddens me when I go to how to's on youtube and see these trains just traveling the rails and they don't derail, stop, go, slow, speed up, spin wheels in place. they just go smoothly down the track and pulling several cars behind it! My possessed monster......
jbrock77 asked about my power supply, its a Bachmann model 6607, old as the hills I think.  I tried to attach a picture of it but said it was too large.
#100
jbrock27, you did give me advice on the soldering, and I had forgotten who had given me it. I mentioned woody as he is new to replying to me and I do appreciate everyone's replies. You, Doneldon and Jward have given me the most advice, help, opinions and ideas and I honestly couldn't have done what I have done without all the help. Still a bit unsure of myself and my soldering abilities. Is there a how to video on how to straight wire the track as you have described? I have the old style power supply box, turn the little plastic dial left or right for forward or reverse. It does have one connection for DC power and one connection for AC power on it  I get the DC side two wires run off of it to the 2 pin connector plug that goes to the rerailer. What do you hook up for at AC Side? Never quite understood that. So you are saying I can solder wire on outside of the rail and connect it to that power supply? hmmm something to think about. rerailer, so that is what it's called. See I keep learning from all of you.
#101
Woody gave good advice on the solder blobs, thanks, now would that method work for un-soldering the joints? This layout has it in for me I'm telling you! Yesterday I noticed one joint on a curve as soon as the left front wheel comes to it, it rises up and off the track. I have looked at it at all angles and can't really see why, then I noticed the opposite side of the track at that joint doesn't look good. I think I warped the track. Also the track just before this one is the power track, sorry guys don't know what it's called. It is the wide plastic thingy with the track in the center and the 2 prong connector hooks to it to supply the rails with power. That one seems to have a problem too. Right smack in the middle of it I finally noticed what appears to be a good deep scratch in the brass. When the loco gets to it, it stops, with a little prodding it will continue on, until it gets to that next joint and then derails. So I have another power track and another curve track I was going to replace and hope that fixed the problem. Now I can't seem to get the tracks undone to replace. I got frustrated and walked away so I wouldn't get angry and tear the crap out of it. The track joints are all soldered, glued down to the track bed and I was working on the ballast when I noticed this problem, not sure how it got by me before this. So any suggestions? First how to get the joints apart and second that power track, would a scratch on the brass be the cause it stops there? It only stops there when I run the train on low speed. Thanks in advance. I know I will get answers and help in solving this new development.

Yesterday I happened to catch this show, never seen it before Extreme Collectors. This one caught my eye as a guy built his home to house his train collection. Here is the link, there is four segments to the show hot wheels, trains, bottles and Mr Peanut collections. Trains starts about 8:01 into the show, just thought I'd share it.

http://youtu.be/bCRIP1wMAeE
#102
re: caboose- they are plastic cheap o wheels. I will check to see if they are damaged, usually happens on the curves and it does seem to be the back set. I have other sets I can change out, ones that probably are in better shape. Thanks for the info will let you know if that was the problem or not. I had the same problem last year and I actually added some weight to it and it seemed to help, probably just help the wheels stay on track a little better. Going to give a look see now. Thanks!
#103
Another weekend spent on the layout. At least this weekend I seemed to have gotten someplace! I glued down the track bed and tried to be lazy and glue the track down as well without soldering the joints. The little solder I had managed on some of the tracks I was blaming for it possibly not working when in fact it was the joints that had separated during the glue down process (or drying process). I pulled up 95% of the track to redo. This time I took the time to go buy some flux paste (red faced to admit I tried doing the soldering without it) and well ....... I have some pretty nice solders or I think they are. I happen to have a sanding block and lightly used it to sand off any solder that got on the top side of the track. The joints I have completed, I can run my finger over the top of tracks and not feel the joints. It feels like one continuous track. I only got 1/4 of it done but now feel good about what I am doing. I was able to get "Prairie" going long enough even pulling a few cars to puff some smoke! Oh she is going to be so darn cool once this is all said and done, I am working on also taping steam loco sound effects to fit in with this layout, just to make it kind of cutesy if or when people stop by to see it.

Note about cars I have, none of them have that little wire below the coupler, just a hard plastic L shaped below it. I think this set I got was around the 70's or 80's when it came out, not sure but it appears old from the boxes and literature that came with it. No matter, they connect, stay together except that darn little red caboose, 50/50 if it will stay on the track, any ideas why? Its so short coupler kind of like a trailer you tow that is short, harder to back up with it, can jack knife very easy. Seen enough of that fun watching novices at the marinas. Seems by the time it gets to the curves it is ready to derail. I could eliminate it but come on, all trains needs a caboose!

Once solder is done, ballast is next. I found at Michaels, granulated sand. it looks similar to a fine/med sand combo from Woodlands Scenics. I got it in white, dug out my coffee mill, something I never used for coffee grinding, and threw in some glass beads, different blues, aquas and some white opalescence ground some fine and some medium, toss them in the bowl of sand, mixed in some silver glitter and I will have one wintery ballast effect.  Can't wait to get to that project.

After that will be the lighting. Everything I have is LED in some form. Most of the stuff is for Christmas villages by lemax or dept 56. They are the ones I would like to control better. they use an adapter to run the power and I did rewire everything with small quick disconnects but there are still so many things spliced together run here and there and one thing I hate is wires showing. I can't eliminate all the wires obviously some are strings of lights but the other wires have to be hidden and easily disconnected once break down of this village happens. I'm sure Jonathon with be hearing from me!

Well better get back to work. Just wanted to give an update. Only 80 days to Thanksgiving, that is when I start all my Christmas decorating. Jamestown I would like done by mid October so I can enjoy it longer.
#104
Layout at a stand still. I can't wrap my mind around that little hump I am adding! Wish I hadn't ripped it out but I wanted to add track bed and ballast, you understand, keep improving, adding stuff as you go type thing. So while my mind is not on it I am sharing my youtube again. I changed to a new channel that will be for my crafts/train stuff. Some how my videos ended up in the company's youtube channel and well, not cool. So here it is.

http://youtu.be/7wdmazwRBZg

you can search me martha jamestown 2014 also, that should get you to it.

I hope Jonathon sees it or reads this as after seeing some of his post/photos Holy Cow he is inventive. I like taking something and turning it into something totally different and he did just that with his lamp post. AND he used some terminology I'd used "spring thingy thing"

Okay so I might of lied about that hump thing. As I sit here typing I can look over and see the poor half built thing just waiting to get completed

Oh another sad thing. I guess my soldering really messed things up as now there is little to no power to the tracks. I noticed globs of solder on the rails which even I know is a no no.  So that is another project. Taking all the track and removing any solder that might be stuck on it, clean it up and practice soldering on scrap track first. Then solder the track. Always a learning adventure in this hobby.
#105
A couple of you have suggested "jonathan, he of the b&o steam engines, would be the one to ask about lighting. he has extensive experience with this" How do I reach him? I am going to need advice fairly soon on the matter (lighting) and hope he or someone else can direct me towards a more suitable set up then I have now. Thanks.