News:

Please read the Forum Code of Conduct   >>Click Here <<

Main Menu
Menu

Show posts

This section allows you to view all posts made by this member. Note that you can only see posts made in areas you currently have access to.

Show posts Menu

Messages - SteveJ

#1
Johnd,

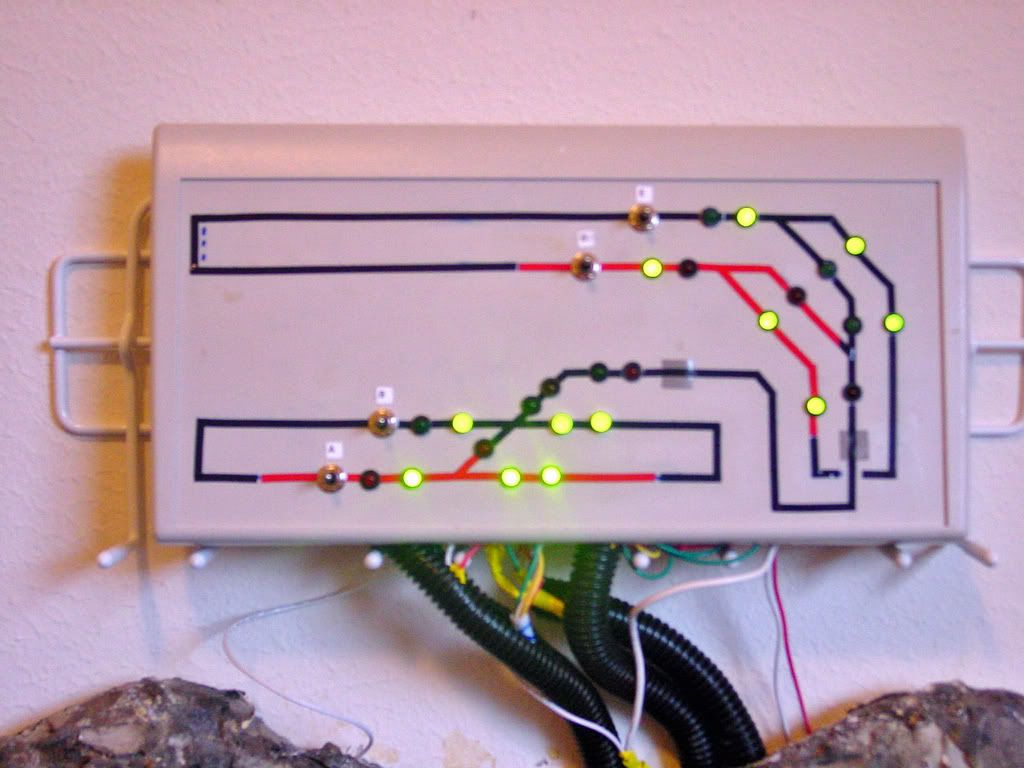
While you are waiting for Jim Banner's tutorial, here is a link to how I wire  lights on our layout.  We use peco turnouts with their PL-10 motor with PL 13 accessory switch. Hope it helps.

http://i219.photobucket.com/albums/cc149/bbrad20/WiringSchematicpanelandlayout-1.jpg

#2
HO / Re: Modular DCC Connectors
April 16, 2008, 09:32:57 AM
Bob,

Thank you for starting and controlling this thread it was most informative and one of the best this month.

Thank you to the collaborators;  Jim, Rich and Harold, I have saved your links.

Steve 
#3
HO / Re: How 'bout a pre-1905 57" driver 2-8-0
April 15, 2008, 01:49:06 PM
Thank you Hunt for reminding people about Harold's reputation in this hobby.  His work and site is a delight to visit. 

Harold's request is  focused, thoughtful and if Bachmann were to market one I would probably buy it. 

#4
Mechengr,

Possibly I gave you this pointer from a previous posting today.  If so the tutorial is to a link that Jim Banner gave to a fellow modeller on Feb 22, 2007 @ 7.47.18 PM.  Title of posting was HO/ Re. "Old Spectrum 2-8-0 runs poorly needs help".  Check the post as it was good.

Here is the link;
http://members.shaw.ca/the.trainman/pesky-pickups/

Steve
#5
HO / Re: Bachmann tender/PECO Turnout "Problem"
March 26, 2008, 01:26:32 PM
Follow Sheldon's pointer it should bring you to the problem area.  I had a similar situation with a dcc/sound spectrum consolidation and Jim Banner told me to check whether the tender was picking up power.

If you search for  Jan 02, 2008 post "Spectrum w/Sound 2-8-0 stalls at Insulfrog" in general dicussion you will get great advice from Jim how to proceed. 

#6
HO / Re: UP 4-8-4 some problems
January 10, 2008, 05:29:18 PM
Frank,

Regarding your point about;
"Second the pilot truck seems a little squirrely. Is there an easy (or difficult) fix for this? I've had it jump rail a few times, we've both checked the connections the EZ track is correctly joined, thought the joins themselves aren't always that smooth".

I wouldn't normally question Gene's solution to remove the spring. My fix for this was not to remove the spring but to bend it a little more, forcing the wheels down unto the rails. 

My son's layout has a EZ track loop that recently starting derailling cars after a year.  It seems that on curves a small misalignment can over time become large misalignment with the continuous striking of the car wheels. a twist with pliers seems to have cured the issue.  Point to me is the track is very well made but we still need to apply some TLC occasionly to stop derailling.
#7
Jim, you are the man.  I took the tender apart and under the sound board found the red wire joint at the rear axle was broken.  It appears from a crush mark that it was pulled out from its soldered joint during assembly. 

Anyway a quick resolder and reassembly of the tender and a retest.  Now the tender drives the loco wheels with the loco held off the track.

I ran it around the layout and it went through all the turnouts without any stalling.

On reflection it is amazing that it didn't stall at the other turnouts. 
#8
Jim,

You are correct with the tender test.  I am getting neither loco wheel movement nor any sound. The connector is completely in however.   I will atempt to bypass the connector this evening and find the bad connection and let you know my progress thank you.

Yukonsam,
Thank you for the link, I put the tape as described before Jim answered but there was no change.
#9
Happy New Year to all,

In the last year I have built a new track with amonst others three Peco #6 curved Insulfrog turnouts.  It all works well with diesel type DCC loco's.  for Xmas my son received his first steam loco with sound.  The loco however stalls at two of the curved frogs and starts again maybe a second later.  The loco will go thru the turnout tender first in either direction without any problems.  My system is DCC with a Digitrax Zepher Command and the new steam loco is our first sound item.
On examination of the wipers I noticed that the second to front set of wheels were not touching the wheels so I followed Jim Banners tutorial posted in Feb 2007 and tried to tease the wipers to touch the wheels. Jim's tutorial is excellent however, my fingers are  still in their apprenticeship phase.  I think I made it worse and now another Atlas #6 (isolated frog type ) turnout is involved with the same symtoms intermittingly.
It is hard to believe that all the wheels need to be touching over a 3/8" short frog. Do I need to order another underframe with the wipers (I actually don't believe that I made the wipers worse I know I did) or should I perserver to get all wipers touching as the cure? 
#10
HO / Re: leds on a your panel
October 29, 2007, 01:54:17 PM
I recently added  in the General discussion scale a "how to" with diagrams and pictures regarding building a panel with leds using Peco PL-10 switch motors and PL-13 accessory switches for an interlock.  I am only a electrical/electronic novice so it is very simple but effective. 

Jim has given you information on the Atlas turnouts, however they can be operated with the Peco's together if you use the optional atlas snap switch.  The LEDs I used were 5mm I believe  (3mm is sufficient) and the resistor is sized on my schematic for 12 Volts.  If you want a different voltage there is a resistor wizard link listed on the schematic that does it all for you.

Good luck

Here is some of the links that are relevant maybe you can use them.

Wiring Schematic
http://i219.photobucket.com/albums/cc149/bbrad20/Slide3.jpg

Wiring diagrams
http://i219.photobucket.com/albums/cc149/bbrad20/Slide5.jpg
http://i219.photobucket.com/albums/cc149/bbrad20/Slide4.jpg

Panel pics
http://i219.photobucket.com/albums/cc149/bbrad20/ControlPanel.jpg
http://i219.photobucket.com/albums/cc149/bbrad20/DSC00215.jpg
#11
General Discussion / Re: radio control for HO
October 24, 2007, 01:41:49 PM
This is a very enjoyable string for a new railroad modeller like myself.  This hobby is served well by Sheldon with his experience and approach to wireless control for his railroad.  This type of thought and determination is very enriching to me.

In my short time 'thinking', 'constructing' and 'thinking' again I realize that simplification is a good mantra when making things work and the pocket book.  I hope you let us follow your development in this subject as it develops. 

Like Mike I anticipate...
#12
Hi Charles,

Yes making the signals was fun although it was a lot of wires.  Regarding the attached data it is for everybody to use, however using the photobucket location may not be the best way to pass info on.  Maybe some one could suggest another way or location were I could put powerpoint slides that can be modified for further use.
#13
We added some reversing Interlock switches a month ago and made a simple control panel to operate them.  The idea to build further to this project with signal masts on the layout with a very simple wiring method was attempted.  It turned out very well. 

The lights signals modelled are based on UP information that I found on the internet and are a partial CTC operation as I have no flashing lights nor yellow lights.   

The cost per signal mast differs a little depending on the # of lights and heads.  Average was less than $8 each and I have enough stuff to make 20 more if I get some more heads.

Attached are some pic's, hope you like them.


I have added some links on 'how to stuff' that will explain everything.  If anybody wants to try this I can send power points that you can modify for your application.  Please email me privately.

http://i219.photobucket.com/albums/cc149/bbrad20/Slide1.jpg
http://i219.photobucket.com/albums/cc149/bbrad20/Slide2.jpg
http://i219.photobucket.com/albums/cc149/bbrad20/Slide3.jpg
http://i219.photobucket.com/albums/cc149/bbrad20/Slide4.jpg
http://i219.photobucket.com/albums/cc149/bbrad20/Slide5.jpg
http://i219.photobucket.com/albums/cc149/bbrad20/ControlPanel.jpg
http://i219.photobucket.com/albums/cc149/bbrad20/ResistorTerminal.jpg
http://i219.photobucket.com/albums/cc149/bbrad20/Signalterminal2.jpg
#14
General Discussion / Re: Simple Turnout Control
September 27, 2007, 11:31:11 AM
Thanks Jim,

It was a fun project.  An earlier reply from Charles made me look further at signals on the layout and I believe I can add all 10 prototypical signal masts with some more resistors, LEDS, and a bunch of little wire.  In the July 2006 Model Railroader mag there was an article how to build your own and the cost should be around $5-6 each.  I am not wiring the same way as the article but it will be as simple.  If anyone is interested and if it works I will send an update in a few weeks.
#15
General Discussion / Re: Simple Turnout Control
September 24, 2007, 05:03:27 PM
I have completed the panel as planned and it worked out just great. I have attached a final asbuilt schematic and some wiring interconnects (I am not an electrical anything) I think they are clear enough how we did it.

My layout evolved from a starter kit 2 1/2 years ago and I moved with my son from DC to DCC  all with Bachmann products.  We added a further track to the original using different supplier turnouts and as we continued we needed some simple automation to reach all the turnouts.  We can still run the original system as is, or use the extension as a larger layout but this needs a little more power as we can get more trains on. The new Bachmann DCC system a year ago would have been a good fit.

The recent adition of two reversing sections with a single switch added complexity that needed extra help so we decided to make a simple panel with lights to help.  We decided that a simple 12vDC sytem instead of using DCC controls was the easiest and simpler way to operate also I got to build something.

This has turned out to be a good hobby for me and my son and a recommend it to any other parent that enjoys making things as well as appreciating trains and them being part of childhood memories.


Attachments on how we did it.

http://i219.photobucket.com/albums/cc149/bbrad20/Slide5.jpg
http://i219.photobucket.com/albums/cc149/bbrad20/Slide4.jpg
http://i219.photobucket.com/albums/cc149/bbrad20/DSC00215.jpg