News:

Please read the Forum Code of Conduct   >>Click Here <<

Main Menu
Menu

Show posts

This section allows you to view all posts made by this member. Note that you can only see posts made in areas you currently have access to.

Show posts Menu

Messages - DAVE2744

#1
HO / Re: Drag brakes and Kadee couplers
May 24, 2017, 11:29:16 PM
Gene- Less than 1 minute to make one spring.  1 to 2 minutes to fine tune it on a car.  I use a piece of track
         mounted on hardwood base for testing.  Tilted to 1 percent grade, car should not roll on its own. Tilted to
         2 percent grade, car should start and roll on its own.  No push required. This keeps all cars similar. My cars
         are all at or slightly above NMRA weight guides.  Note I use only one truck per car with the spring.

         Car Weight:  Cars that are too light, relatively speaking, will have trouble assuring a good couple.
                              This can happen with any brand coupler.

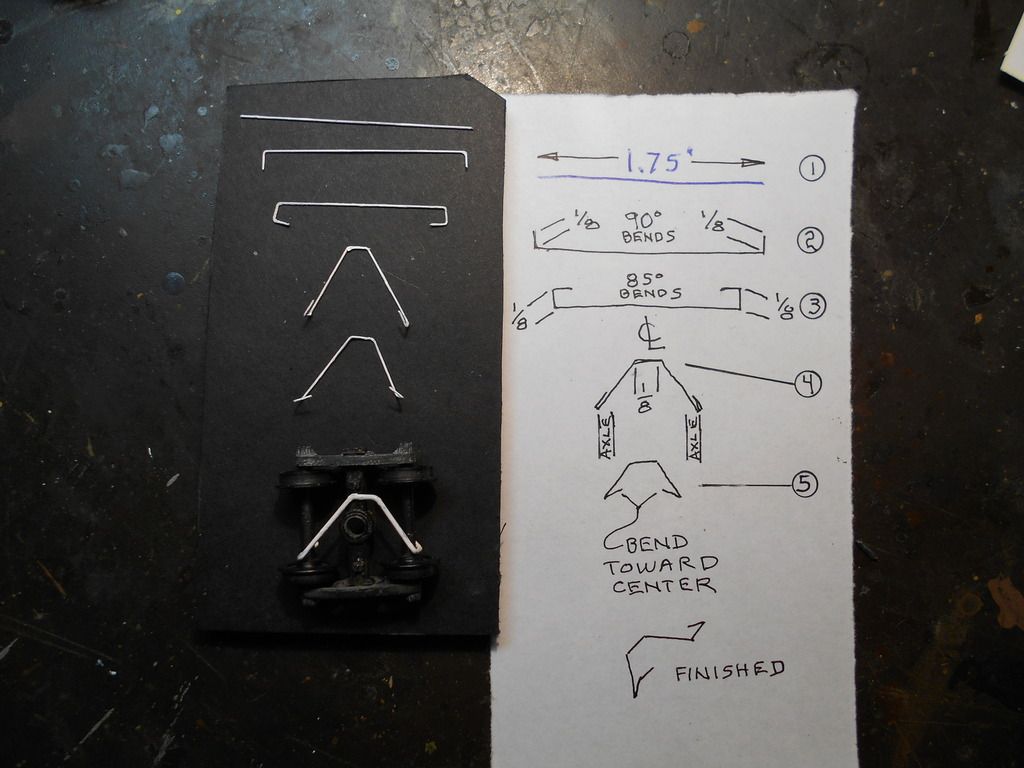
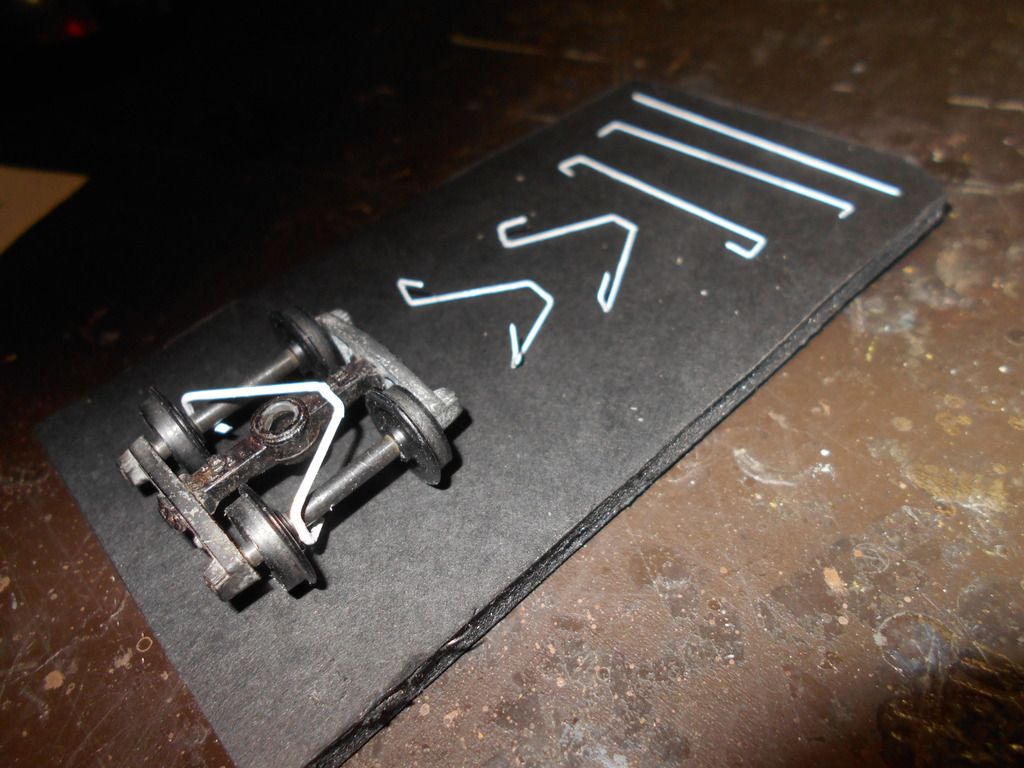
         No glue required.  The tension of the V shape and the slight twist at the ends of the wire "legs"
         keeps them in place.  Mounted on top or bottom makes no difference.  Never had one come off yet.
         In fact, I have to use tweezers to remove them, one axle at a time.

Len - Thanks again for the lead on posting pics.  Was really easy after first one.  I noticed a recent post
        that suggested only 1 pic be attached with originating posting.  Then I should reply to that posting and
        include the remaining pics.  What would be the reason for doing this? Thanks, Dave
#2
HO / Re: Drag brakes and Kadee couplers
May 23, 2017, 12:28:14 AM
Here goes nothin'


http://i930.photobucket.com/albums/ad142/dave2744/Drag%20Brake/DSCN0842_zpswrsoeogy.jpg

http://i930.photobucket.com/albums/ad142/dave2744/Drag%20Brake/DSCN0838_zps5nrfdti9.jpg

The wireform installed on the truck is much thicker, I thought it would show up better in pics. Also, I
only painted the wire white for the same reason. Bare wire cannot be seen on car on layout.

I have installed these things on topside of truck, and on bottom side. Works same.

Cautions:  Keep insulated side of metal wheeled trucks in same orientation in frames. Non-insulated
side should go where the square loop ends of the wires are. Out of 100+ installs, only had 3 shorts
show up, and not right away. Only after cars had been in use awhile did wire touch wheel & short. Found
axle orientation was opposite of each other, 1 axle one way, other axle flipped around.

It's 2330 here, I'm turning in for the night. 0530 rolls around quickly. And my gal needs some TLC.

I'm outta here!
#3
HO / Re: Drag brakes and Kadee couplers
May 22, 2017, 11:21:11 PM
Gene - Took photos the other day with camera.  I can work with those files easily.   

            As soon as I get a chance to read the instructions Len kindly gave me the link to,
            I will attempt to post pics. 

            The pics show step by step, total of 5 bends to wire form, plus installation on truck. 

Len - Thankyou for the link to pics upload instructions.  Will read as soon as I get time.
#4
HO / Re: Scratchbuilt attempts
May 21, 2017, 08:49:53 PM
Terrific work on the car!  I really appreciate the effort required to achieve these kinds of results.  Thanks for sharing,  Dave
#5
HO / Re: Bachman & spectrum slop back tender
May 21, 2017, 08:40:09 PM
You could rob a slopeback from a yard goat engine from Bachmann or other mfg. Then order a set of pre-wired
trucks from Bachmann to make it "electrified".  Of course, some work most likely would be needed to bring up
the quality of looks.  Old  Hobbyline plastic kits could be another source. And they look great.
#6
HO / Re: Drag brakes and Kadee couplers
May 21, 2017, 08:26:53 PM
Gene-I noticed the "scale" coupler, aside from the centering issue, sometimes does not let the face of the
moveable piece to slide along the face of the approaching coupler.  I have tried "burnishing" the surface
with hardwood stick.  Seemed to help somewhat.

I decided to stick with the "standard" size knuckles. more forgiving on the centering issue, and height, and
just about everything else.  Like I said, I'm not real picky about close to scale issues.

I noticed that where the metal has been "upset" to attach the whisker wire to the shank there is sometimes
an increase in the thickness of the shank at that point.  Check yours with a mic or vernier. This might be the
cause of the whisker springs not being able to move the shank into centered position.  I also noticed that
sometimes the whisker does not touch both sides of the draft box at the same time. This means the shank
can wander on its own slightly, either side of the desired centerline postion.  That is some difficult wire to
try to bend, without screwing up the whole works!  Been there, done that.  This usually happened when I tried
to use a non Kadee draft box, that I thought was OK quality wise.  Should have just gone with the K box. I do
not use any other draft box now except Kadee.

Another adjustment I have been experimenting with concerns the centerline of the draft box vs. the center-
line of the car frame.  I find that if there is some offset to the two CLs  the couplers are much more forgiving
in issues of mating, locking, and performance of coupling on a curve, ( within limits of course ).I'm only using
.015" or so offset, toward the trip pin side.  That's ,030" when two cars meet. Only done this to a few cars
that seemed to be having difficulties. 

Of course, slop in the kingpin hole, loose axles in the truck frame,
loose gage on the track, poor wheel geometry, can all contribute to the problem.

I would do pics, but I need step-by-step, ( for dummies ), instructions on getting
pics onto forum.  After I figure how to get pics from phone to computer!  Another
new thread?


#7
HO / Re: 44 ton split axles??
May 21, 2017, 12:22:55 AM
Gene, the free rolling cars would couple about 95% just fine, the rest would roll sooooooo free you would just chase the car down the track! This was with absolutely 100% perfect Kadee couplers. ( easy opening, swing easy, etc.).
With the wire tension in place, even a older Kadee, a little stiff, with flat spring, will work all the time.
I also thought about using styrene.  I knew the tension adjustment would be impossible to control.  The wire form can
be easily adjusted as needed. Also, I wasn't sure if the styrene would hold the tension over time.  BTW, I use only the
new style "whisker" couplers in the Kadee  draft box assembly.  Every time I think another draft box was OK, I ended
up changing it out later.  I will put up with shiny paint, oversize handrails, etc., for awhile, but I just won't tolerate anything short of Kadee cpuplers and Kadee, Rapido or InterMountain metal wheels.  And I am not, as they say, a "finicky" person.  I just like mechanical things to work as intended.

PS. If we go further with this topic, we should probably start a new thread. We've drifted pretty far from "split axles".
#8
HO / Re: 44 ton split axles??
May 20, 2017, 12:26:21 PM
Gene,  work travel really gets in way of hobby! Gotta do something about that!
           "drag brakes".  All my equipment uses Kaydee cplrs, and Kaydee, Rapido
           or Inter Mountain metal wheels.  My railroad consists of several, moveable,
           modules.  The cars are so free rolling, they were all over the place if I even
           bumped the layout only slightly.  It also caused the cplrs to not lock when
           engaged at  realistic slow switching speeds, sometimes.  My solution was to
           installed a small diameter wire, ( .015" ), spring over the axles of 1 truck per car.
           The tension is very light.  Has only decreased my locos pulling ability slightly, not
           enough  to bother me. I run 12-15 car count trains mostly, on level track.
           My branch-line, ( 5% ) grade, runs 3 to 4 cars max.
           NO wheel slippage, NO traction tires.

           Kaydee used to have small coil springs to install on the ends of the axles a while
           back. They still might.  I have a hard enought time getting cplr springs back in,
           can't even imagine what it would take to install a spring on a pointed axle end
           while trying to insert same into truck side frame. That could cause nightmares!

           Hope all that was interesting. Works for me.  Happy modelling, Dave
           
#9
HO / GE44 Tsunami2 1100 w/snd
April 29, 2017, 07:22:00 PM
My previous post was for the first conversion I did on the Bachmann GE44 ton loco.
It used  earlier Tsunami 750 board, but same Current Keeper and RailMaster cube spkr.

CAUTION: Tsunami2 boards have a NEW set of CV listings.  See NEW ref. manual ! !
If you accidentally use old generation CV's&values,  BAD,  BAD  things happen.
 
                               REALLY BAD !

If CV not listed, default is used.
CV   3-40    120-18
       4-40    129-70
      25-10   122-0
      29-18   130-04
      63-40  114-19
      66-30  112-3
      95-30  123-5
                 130-15
                 131-50

Notes:  CV 3,4:  The prototype accelerated very rapidly, and could stop on a dime.
              66,95:  Top end on prototype around 35mph. I limit mine to 15mph. My layout
                          is for yard and local switching, not Class 1 stuff. 10mph restrictions.
                          It allows sound generator to come in before loco hardly moves.

                          Also, on the Tsunami2, from a dead stop, by cranking speed control 1/2 way
                          up or more, prime mover will really sound off with heavy load volume until
                          loco nears speed setting you applied.  If you start to lower speed
                          control back down, "heavy load" sound will diminish immediately.
                          If you move speed control at a slower rate, more gentle prime mover
                          sounds will be heard.  All this happens before the speed of the loco
                          changes much.  Very, very effective.  And, I have not even turned
                          "ON" the new Dynamic Digital Exhaust yet!

                  63:  I used a 1000ohm resistor on each LED.  This brought the briteness
                         down to a more realistic level.  And the value of 40 really does dim
                         headlight properly.
                114: speed step/engine notch, 19 okay for now.
                123: prime mover type-dual Cat D17000, 180hp each. When commanded, each
                        prime mover starts separatley,

                Remember to log your CV values B4 you change them, so you can return to original.

                CAUTION: these values are used on a Tsunami2 1100 using a RailMaster cube speaker!
                I have no idea if/how they would work on a stock Bachmann DCC motor only board.

                CAUTION: Tsunami2 boards use different set of CV's and values from previous versions.
                Obtain and use ONLY THE NEW reference manual.
#10
HO / GE44 Tsunami 750 w/snd
April 29, 2017, 06:27:33 PM
Been very busy, but here are the CV values I use on my upgraded Bachmann 44. 
           New setup: Tsunami 750, Current Keeper, RailMaster cube speaker.

If CV not listed, default is used.
CV  3-20     114-6
       4-30     116-25
      29-18    115-2
      25-10    120-175
      66-40    121-35
      95-40    122-90
                   128-192

Notes:  CV3,4: The prototype accelerated very rapidly, and could stop on a dime.
             66,95: Top end on prototype around 35mph.  I limit mine to 15mph. It allows
                         the sound generator to come in before loco hardly moves. Also, my
                         layout is for yard and local switching, not Class 1 stuff, 10mph restrictions.
              114:  A rapid bell rate drives me nuts! A slow steady ring is more pleasant and
                        "sounds just right".
               116: speed step/engine notch, still playing around with this, as the type of drive
                        on the prototype is completely different than line haul locos.

                Remember to log your CV values B4 you change them, so you can return to original.
 
           CAUTION:, these values are used on a Tsunami 750 using a RailMaster cube speaker!  I
            have no idea if/how  they would work on a stock Bachmann DCC motor only board. 

            Overall, the new installation has been a great success, until I did a second unit
             using the new Tsunami2 1100.  Thinking of swapping the 750 out for a 1100 TSU2
#11
HO / Re: 44 ton split axles??
April 29, 2017, 05:46:07 PM
kamerad47: Just getting around to forum again.  My 2 44's are single motor with dual flywheels.  Gear covers are of
                    the "open" style. All 5 gears partially protrude thru cover plates. One loco I installed a TSU750, Current
                    Keeper and RailMaster cube speaker. The other loco I installed a TSU1100 (Tsunami2), Current Keeper
                    and RailMaster cube speaker.  You sure can tell the difference in the superior performance of motor
                    control and higher quality of sound files of the Tsunami2 vs. the 750. Pain that it might be, I am
                    considering swapping out the 750 'coder. I have a smooth running B'mann  RS3 it could go in.

                    I will post my CV values for these units in another thread.
#12
HO / Re: 44 ton split axles??
April 14, 2017, 02:08:18 AM
TSU1100 Tsunami2 sound install continued.

The biggest challenge was to find room for all the wires.  I cut off the auxillary wires for other
light functions.  All wires needed to be cut as short as possible so they can fit in small crevices
between CurrentKeeper and cube speaker.  Wire splices were done by laying pretinned wires
alongside each other, then soldered together.  Joint is no thicker than wire with insulation. I did
not use shrink tubing. No room for it!  My solution was to apply several thin coats of a liquid
product, that when dried, forms an isulating blanket around joint.  The product is a model
airplane canopy glue, Formula 500, from PACER.It goes on white, but dries clear. My insulated
joints are barely bigger than the original wire.  It has worked perfectly. Is very durable, so
disassembly or vibration is not a problem. 

As I stated in earlier post, this project was successful beyond my wildest dreams. The sound is
very loud, had to tone it down.  The Tsunami2 sound files are outstanding. The two prime movers
start up separately, and are very accurate. This project is a must for these little engines.  They
become first class units, are fun to run, and the slow speed control is perfect.  I will post my CV
in the next post, tommorrow, for my installation.  I run these units at scale realistic speeds, makes
them even more impressive.

They can pull/push 6 or 7 40ft cars on level. All my cars have drag brakes installed so my Kadee
couplers work 100%.  Car weights are close to NMRA std.

Oh, yes, soldering iron was a 25watt pencil tip, solder is 60/40 rosin core .062 inch. Flux is TixFlo
liquid, which I have used for years, ( many, many years), with no problems, period.  When soldering
such fine wire, a very fast heat application with iron, and get out of there fast is required.  Do not
worry about so called "cold" joints.  The currents are so small it just does not matter.  If you can pull
lightly on the joint, and it stays together, it is good to go. I have 18 locos with this type of installation
proceedure, and have absolutely no problems. Been this way for years.

#13
HO / Re: 44 ton split axles??
April 14, 2017, 12:52:21 AM
Sorry to have not seen these posts recently. Very busy with work and girlfriend.  Gotta keep 'em happy! 

Indian-hills: The axles on my units were all split at the "hub" area. The ends where the metal part of the
                    wheels inserts.  The axles ran true enough with the metal wheel stubs inserted.  The Permatex
                    product I used is Threadlocker Blue. # 24206.  Ace hardware carries it.  Comes in a small bottle.
                    It allows disassembly if needed, but has held up very well in use.  I run these 44s every day, with
                    lots and lots and lots of switch activity.  Have had zero failures since application of product.

genetk44:  I do have installation photos.  They are on my android phone.  I would gladly share them, but I
                  need instructions, ( for dummies ), on how to get from phone to forum.  Meanwhile, the installation
                  is challenging, but not undoable. Patience is a must.  I only worked on it a couple hours each time.
                  Overall plan: decoder, TWU1100, sits crosswise snug against roof of cab.  Two window glazings had
                  to be removed to allow decoder to sit flat against roof.  No big deal. vandals probably knocked them
                  out!  Next, the Railmaster sugarcube speaker, DS1436-8, mounts under one hood, snug against top,
                 and about 1/4 inch from end of hood, to leave room for Led & resistor.
                  No cutting or filing required. The CurrentKeeper mounts under the other hood, snug against top, and
                 about 1/4 inch from end of hood, to leave room for led & resistor. Leads from both items are facing
                 center cab. More on this later. 
                 Led lights. I had to install 1000ohm resistors on each to dim the lights down to realistic levels.
                 Hi is now proper brilliance, low is nice and dim. The  resistors are soldered directly in series with the
                 Led tabs. The resistors sit vertically up alongside the  radiator surface. There is NO room to spare.
                 Resustors stay cool, no worry about heat. I'll continue this in the next reply, getting rather long and
                 gal is calling.
#14
HO / Re: DCC Sound at Startup
April 02, 2017, 01:44:09 AM
My work around for this is to "mute" the sound before turning power off to layout.  When power is restored to layout, engine will remain silent forever until "un-muted".
#15
HO / Re: 3 Truck Shay Factory Sound
April 02, 2017, 01:35:17 AM
re gears:  As was stated earlier, the replacement gear frame ass'y is much, much better.  I replaced all 3 trucks on my Shay, and all is well.  I think they are all sold out now.

re sound: I installed a Railmaster sugar cube speaker in front of the dcc board, facing toward the cab.  Tremendous increase in the apparent volume.  So much so, I actually had to lower the master volume some. I also drilled some holes in the coal load. Glued the cube spkr right to the tender floor.