News:

Please read the Forum Code of Conduct   >>Click Here <<

Main Menu
Menu

Show posts

This section allows you to view all posts made by this member. Note that you can only see posts made in areas you currently have access to.

Show posts Menu

Topics - Ken Huck

#1
HO / Ken's Railroad
July 13, 2020, 03:17:55 PM
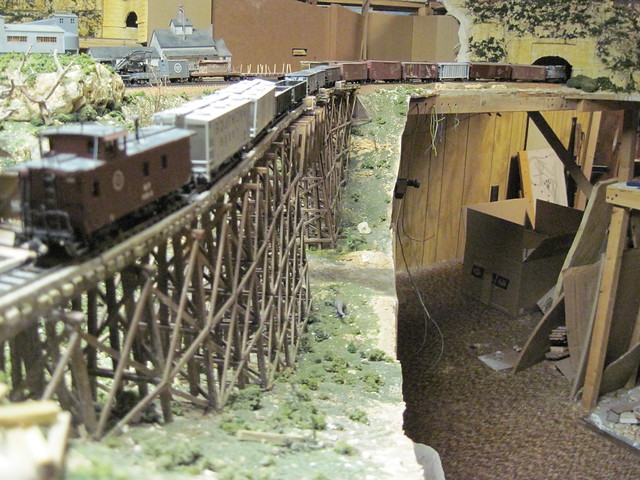
Thought I'd start another THREAD not 'stream' so as not to confuse anyone about my water scenery
application skills.  Here's three pictures of my entire layout.  The camera was about ten and a half from
the distant wall.  The layout is approximately sixteen feet from lest to right.


I tried to get the photos 'side by side' but it didn't work, they would've been pretty close for a panoramic view.

I should've gotten that bottle of glue out of the first pic too. ::) Oh well.

Thanks for looking.

Ken
#2
HO / New Railroad new stream...
July 12, 2020, 04:16:00 PM
You saw in my "Test Photo" stream the 'cribbing' I was working on.

Here it is again, only back filled with the cheapest kitty-litter I could find.


No, I don't have a cat.

This is with plaster fabric installed.


Here is a 'rock face' that I built off-layout and installed it and plaster fabric enclosing it.


This is with the plaster added and then soaked with 'wet' water using a spray bottle.


After drying over night, I stained with a water-color of 'dirt' color, covered with ground foam.


After soaking the ground foam with white glue/water, I added clump foliage where ever it would
stick.  Then added natural 'dead fall'.

Last, I ballasted.  


Tomorrow, when everything is dry, I'll take a grill brush (the kind with real stiff PLASTIC bristles).
and scrape off any ballast remaining on top of the ties and remove the track nails.

...and here's another water tank.  Looks like her ride showed up.


Thanks for looking.

Ken

Edit: Had two of the same picture
#3
HO / More New Railroad
July 08, 2020, 11:49:08 AM
Now that can post pictures again, I thought I'd add another little update.

This is the foreground of the backdrop, that will go all the way beyond of the 'cribbing' .


Here's a church and little red schoolhouse that is 'downhill' from the cribbing.


Here's a backed off photo showing where on my layout I'm working.


That's about for now, more later.

Ken
#4
HO / Test picture
July 07, 2020, 10:16:50 PM
Just opened a Flickr account and am now trying to post a picture.

https://www.flickr.com/photos/189202153@N05/50088303963/in/dateposted-public/

...and I'm obviously having trouble.  I can still use Facebook has a hosting sight but the
"Time Signature Expired" notification keeps deleting my photos about a week or so.

Any advice would be helpful.

TIA

Ken

Trying again:


WHOOHoo !  Looks like it worked.

#5
HO / More of the same...
June 07, 2020, 02:12:44 PM
Here's an update of a little more progress on the new tunnel portals I've been working on.
This is the lower side of the tunnel.


...and the upper end.


Another view showing a little higher elevations.  For ballast I use crushed black walnut shells.
You can get from your local arms dealer, and they're used for polishing brass cartridges.


And, the best part is cost and it comes in ten pound boxes.

Here's a shot of the overall mining district/area.  The part where the cardboard is will eventually
be a slope where a stamp mill will be installed.


Last but not least, water under the bridge.


As always, more to follow...

Ken
#6
HO / New Railroad...etc...
April 26, 2020, 06:57:30 PM
Thought I'd just start a new string every time I put something up because of 'time expired' issue I get using Facebook
as my photo host.

First up, remake of older trestle and tunnel portal.


...A lot more blending in to do...

Here's one behind this trestle.


I made the rock formations using crumpled up aluminum foil as a plaster mold.
Nobody goes back there anymore.

Here's an abandoned stamp mill...got closed down...


Since the shutdown, the wildlife has started to return.


...and here's one for Terry...


Thanks for looking.

Ken
#7
HO / New Railroad (sorta) part V (preview)
December 29, 2019, 04:57:49 PM
Don't know about you guys, but my 'subjects' are getting longer...

Previously on part IV, I said I' be back with what I'd be working on after Christmas.  I had this small yard laid out
for another layout that didn't get built.  Since I had it leftover I thought I'd install on this layout.


On the lower left was going to be a two stall engine house and other service facilities around the small yard.

Here I have it partially installed on my new layout.  Still planning at this stage.


Here it is from the front.  I'm still playing around with buildings, and other detail items.


Here it is from the back, I have enough space to extent all the tracks to use for more storage if needed.


Another angle.  That curved track in the lower right of this photo will be an 'interchange' track.
On the wall to the right I hope to eventually install 'building flats' to show outskirts of a larger town/city.


There will be an interchange office on the distant end.

This is just another view showing the 'open spaces' that will eventually be filled with 'ground work'.


And last but not least, a revival of part III.
With the creek coming in from the back at a lower elevation from that of which I already installed
downriver, I had to lower the upper water fall as it traveled under the rails above it.  Make sense ?


The 'white' you see under the arch is the creek bed before it 'flows' under the bridge.

So much for the preview, I'll be updating as I go along...

Ken
#8
HO / New Railroad (sorta) part IV
October 23, 2019, 08:52:17 PM
I'm baaaacck !

Just thought I'd show what I've been doing since part iii.

This is pretty much where I left off in part iii.  Waterfall is in, working on the 'downstream' side, and continuing
to develop 'the town'.


Here's the downstream side of the waterfall, and a few buildings being arranged to get the right fit.
The bridge is scratch built.


More of the same only from the North side.


Cardboard 'road' showing one of the roads will go into town.


One of Bachmann's Shays hard at work.  The 70-ton coal hoppers came as a set of six with all different
numbers.  They are also by Bachmann.  The short 2-bay MoPac hopper is from somewhere else, just can't
remember.


Another 'cardboard' road leading into town.


One more showing the road coming down into town on the lower right of the photo.


That's about for now, hope to finish up the creek and add more landscaping and foliage.

More to follow...

Ken

#9
HO / New Railroad (sorta) part III
June 22, 2019, 08:31:01 PM
New void:


New jig, same raw materials:


And, what I came up with:


The blue tape is to keep the plaster from running all over the place while I add the landscape material.  The bridge
is only temporarily installed.

...as always, more to come...

Ken
#10
HO / New Railroad, sorta (Part II)
October 24, 2018, 08:42:05 PM
Rather than drag everything forward (with missing pictures and all)  I'd thought I'd do a recap and update all in one.

You remember the void ?


..raw materials and a jig...


...and what I came up with.


Then there was the last shot.


Now, fast forward to the little bit of 'void' left.

I'm gradually filling in the bowl shaped bluff behind the trestle.  Starting on the left (or Northeast) end.


...and also from the right (Southwest).


Which leaves the middle:


The 'water' source will be the pond at the top.


The little cardboard circular thing in the remaining void will be where the pond spills via waterfall and by a
second waterfall down to the creek flowing under the trestle.


Here's one of my four GP-15-1's dragging a peddler freight across.


And if you missed anything, report it to security.


Till next time...

Ken

#11
HO / New Railroad, sorta
March 28, 2018, 08:13:41 PM
Just replacing the pictures that were mysteriously deleted from the original post.


This first photo is a 4X4 section that I saved from my earlier layout.  I wanted to keep the 'matchstick' trestle and
just re-landscaped around it.


Just more of the same from a different angle.


More of the same, but now all three levels are one continuous loop.  


Some new 'tree making' technique I dumbed into.  On the upper right you can see the 'distance' created
by using 'forced perspective'.  By using the smallest bits of landscaping material at the top and gradually
getting bigger the lower you go, you give the image of distance.


The far distant hill just in front of the painted 'sky' backdrop is a single thickness piece of cardboard with
landscape foam glued directly onto it.

More to follow.

Ken
#12
HO / Photo puttin' up test from Facebook page
March 28, 2018, 06:12:34 PM


This is why I'm rebuilding my layout...
#13
HO / 50-ton Climax
March 28, 2018, 04:38:56 PM
Finally, ordered one and got it today.  The first thing I did was to look and see all those new metal gears in the trucks.
The detail is exquisite !  Runs great, nice and slow.  I had a few minor derailments at first but, that was more indicative of my track laying abilities than the engine  itself.  I'll have to put in a work order to get road crew out and
have them gauge the track.

Another thing, I run strictly DC and was wandering if both headlight and back up light were supposed to be on all the
time.  It doesn't matter what direction I'm going, both lights are always on.  Any suggestions ?

One more thing:  Has anyone posted any pictures from their Facebook web-page ?  I'm rebuilding my entire layout and
would like to put up a few pictures of the progress.

Thanks for any advice.

Ken

#14
HO / Adding a mining district (pics)
February 19, 2016, 03:51:46 PM
First I arranged a few mine structures, then put cardboard silhouettes for a rough idea of what I wanted.


With that, I started to add rock castings from molds.


I figured approximate location for mine entrances and used 'matchstick' entrances.


I filled in the spaces between the rock molds with more plaster and added scenic material.


I added a 'second' layer of bluffs and hills higher up and 'beyond' the back of the first piece.


You can tell the smaller tufts of trees seem to be a lot more distant into the scenery that the larger 'puff ball'
trees on the earlier pieces of scenery to the left.  I'll also have to 'blend' the two pieces together and rearrange
the trees with the smaller ones to the back to create a 'forced perspective'.  I still have to add a meadow beneath
the bridge.


That's about for now, thanks for looking.

Ken
#15
HO / Pickin' up Trash
January 09, 2016, 02:29:52 PM
A while back when I posted a few pictures of my layout, someone (It was Len) made a comment about the giant pencil
in the junk pile.  Here's the photo:


Anyway, because this person (did I mention it was Len), word got back to the RR owners and they sent out a crew to clean up the place a bit.


So now, thanks to this person (Thanks Len) there's a happy giant somewhere waiting patiently for his pencil.


#16
HO / Bachmann geared steamers -pics-
December 21, 2015, 05:07:37 PM
Here we go...
Pic 1  All my Bachmann geared steam engines.  Shays on the Mainline coupled together, they can pull every piece of
rolling stock I own...at the same time.


Pic 2  All my Bachmann Climaxes.  The class-A on the turntable is an MDC/Roundhouse kit over a Bachmann 44 tonner.
(as per "Geared Steam's" website.)


Pic 3  My little 50-ton two-truck Class A Climax regeared with a parted-out three-truck Climax.


Pic 4  Three of the70-ton three-truck Climaxes...one with a Fungineer.


Pic 5  Bachmann 44-tonner with new Climax body.


Pic 6  One of the Shays.  All of my Shays have been regeared with NWSL metal gears.  They all run like originals.


Pic 7  Not geared but Bachmann.  An Alco 2-6-0 Mogul.


That's all the Bachmann motive power I have, maybe I'll have to get out some 'brass' later...
#17
HO / A little update
December 17, 2015, 03:27:35 PM
Photo #1  General view looking back down the mainline.


Photo #2  My first ever brass engine.  It's a 12-ton Vertical boiler, class 'A' Climax by NWSL pulling a run of Kadee disconnect log cars over my scratch-built matchstick trestle. 


Photo #3  MoPac Mikado 1301 waiting in the chute.  The 2-8-2 is a Broadway Limited Import.


Photo #4  The Railroad Transfer Boat "Ste. Genevieve" hauls a load across the Mississippi River between Thomure, Mo and Kellogg, Ill.  Missouri Pacific (MoPac) and Missouri Illinois (Mike and Ike) Railroads were in operation when this
photo was taken in 1958.


... next up, maybe a staged shot of all my Bachmann geared steam locos...
#18
HO / 2-Truck Climax
January 05, 2014, 05:50:42 PM
Beer #1

Disassembly:  
The first photo shows the difference between the front truck of the 3-truck Climax (left)
and the 2-truck Climax (right).  Notice on the 3-truck Climax the front truck is a little more
forward than on the 2-truck.  This is where the fiddly bits I mentioned on my earlier post
concerning the drive-shafts, you have to sort of mix and match to get the right lengths.


The second photo shows the entire drive-train from truck to truck.


Here's a close-up of the drive-train.  Note the 3-truck replacement have the newer vinyl (white)
gears as opposed to the black plastic ones that were used in the 2-truck.


At this point, the three screws holding the old transmission to the frame have been removed and
also the three screws holding the boiler and cab assembly.  Only one empty hole for the rear screw
of the transmission is visible.  The forward hole (behind the pivot for the front truck) and left-side
(just below the cab and beneath the frame) and another on the right below the cab is what holds
the boiler on.  


At this point everything is still pretty tight.  I started to wiggle things to get them separated and slowly
but surely got as far as the next picture.


I forgot to mention that the drive-rods can pried off their axle and slid out of their respective cylinder.

That's as far as I got today.  If anybody knows what the next step I should take short of cutting any wires
that might be holding things together, let me know.

Beer #2
Disassembly (cont.):

I decided to cut the wires and it turns out that they go to the headlight and taillight. 


In the above photo, the headlight wires have yet to be cut.  I won't have any problem reattaching them.

The only thing(s) holding this all together is the two screws holding the motor to the mount.  They are
located on either side of the worm gear.


That was quick !  The old transmission, motor and bottom of the boiler were all held together by the two
screws that held to motor to the mount.  The lower portion of the boiler is trapped between the motor
and the transmission.  The plastic part in the lower right of the picture is the cover for the worm gear.  It
just snaps into place.

Here's a close-up of the new transmission installed.


All that's left to now is reinstall the running gear and see if it works.

You can see a few more of my future projects.  Both are RoundHouse kits.


#19
HO / Two-truck Climax
December 30, 2013, 04:10:10 PM
I decided to see if the trucks from the new Bachmann 70-ton 3-truck Climax are interchangeable with the
Bachmann Class B 2-truck Climax.  Good news !  They are.  They simply snap off just like the Class B.  The  fiddly trick is to interchange/swap out the drive shafts that are different lengths because of distance from the differential and truck spacing.  I think now I'll look into the differential itself and find one more gear to get my Class B running again.  It looks promising.  I'll keep you posted.

Ken
#20
HO / another photo test
September 23, 2013, 03:32:59 PM
I'm re-scenicing my railroad and this is the general view of what I've done so far.


Thanks Hunt, I figured it out.

Ken